Procedure 26 Reconstruction of Key Pinch in Tetraplegia Patients
 See Video 21: Tendon Transfer for Lateral Pinch in Tetraplegic Patients (BR to FPL, FPL to EPL, ECRL to FDP)
Indications
 Procedure is used in patients with cervical spine injury with partial upper limb paralysis (spinal cord injury at or below C5 cervical segment) with at least grade 4 strength of the brachioradialis (BR).

 Specific considerations for key pinch
Examination/Imaging
Clinical Examination
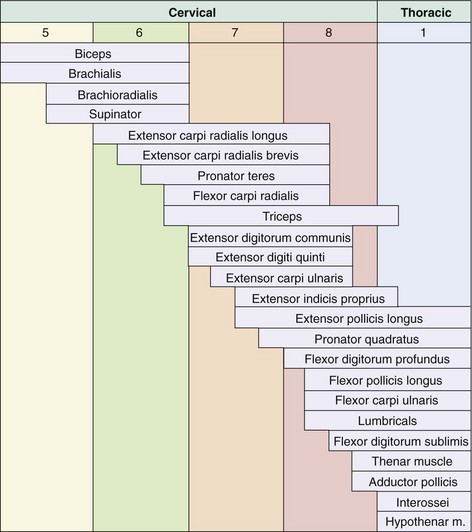
 Tetraplegia patients are classified based on the number of functional muscles with grade 4/5 Medical Research Council (MRC) strength below the elbow (Table 26-1). Based on what the patient has, the patient’s needs are matched by using a combination of tendon transfers, tenodesis, and arthrodesis to optimize surgical reconstruction.

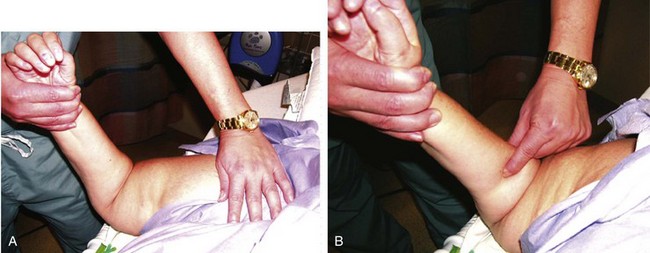
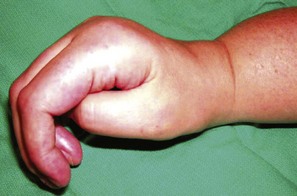
 It is important to assess the strength of the BR. Muscles chosen for transfer should be at least MRC grade 4 because they lose one grade after transfer. This is done by holding the patient’s elbow in midprone position and asking the patient to flex the elbow against resistance (Fig. 26-1). This will contract the BR. The examiner tries to move the contracted BR. If the BR cannot be moved easily with BR contraction, it is suitable for transfer. On the other hand, if the BR is flaccid and can move easily during contraction, the muscle may not be strong enough for transfer.


Table 26-1 International Classification for Surgery of the Hand in Tetraplegia
| Motor Group | Functioning Muscles (Grade 4 or Greater) |
|---|---|
| 0 | No available muscles |
| 1 | BR |
| 2 | BR and ECRL |
| 3 | BR, ECRL, and ECRB |
| 4 | BR, ECRL, ECRB, and PT |
| 5 | BR, ECRL, ECRB, PT, and FCR |
| 6 | BR, ECRL, ECRB, PT, FCR, and finger extensors |
| 7 | BR, ECRL, ECRB, PT, FCR, finger and thumb extensors |
| 8 | Lacks only intrinsics |
BR, brachioradialis; ECRL, extensor carpi radialis longus; ECRB, extensor carpi radialis brevis; FCR, flexor carpi radialis; PT, pronator teres.
Surgical Anatomy
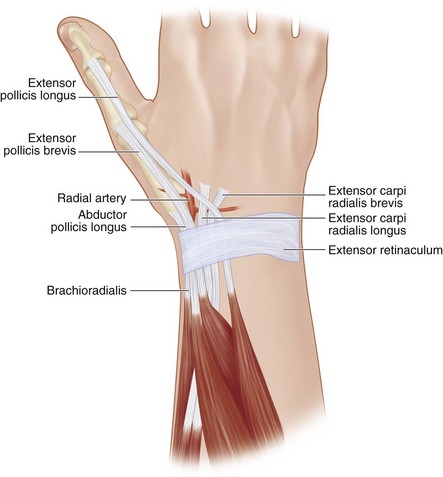
 Figure 26-2 presents the segmental innervation (C5 to T1) of muscles of the elbow, forearm, and hand, and Figure 26-3 shows the relevant anatomy of the procedure.

Exposures
 A 3-cm longitudinal incision is centered over the IP joint on the radial side of the thumb (Fig. 26-4). This incision is used for the split FPL-to-EPL transfer. The A2 pulley is identified and released to expose the FPL tendon. The FPL tendon must be dissected quite proximally to obtain a sufficiently long tendon that can reach the EPL over the dorsum of the thumb IP joint.


Procedure
Step 1: Split FPL-to-EPL Transfer
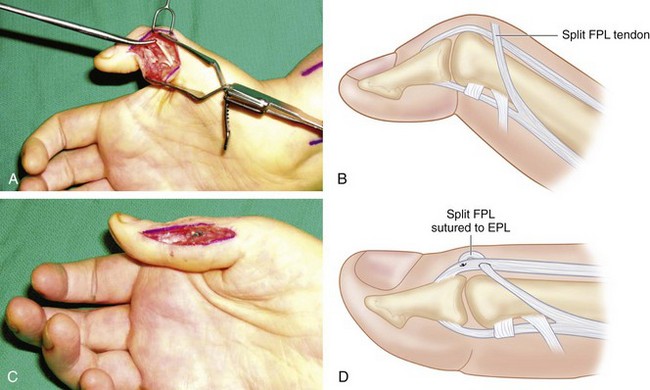
 One half of the FPL tendon is transected distally, and this half is then sutured to the EPL tendon to achieve extension of the IP joint to neutral position. The tendons are sutured using 3-0 horizontal mattress sutures (Fig. 26-5).
Step 1 Pearls
The FPL-to-EPL tenodesis procedure is performed first. This is particularly important because the reconstructed FPL tendon for the key pinch procedure will result in maximum flexion at the MCP joint level and not at the IP level. Extensive flexion of the thumb IP joint will cause a mallet deformity that is not the optimal posture to pinch between the thumb and the index finger (Fig. 26-6).
Step 2: APL Tenodesis
 The APL tendon is identified in the first dorsal compartment and divided proximal to the first dorsal compartment.
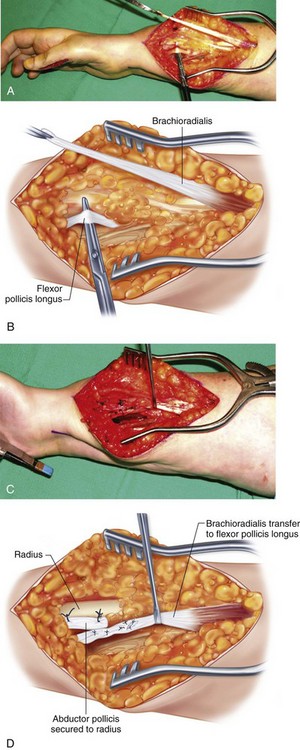
 The distally based APL tendon is brought out of the first dorsal compartment distally and secured to the radius using a Mitek Mini bone anchor. It should be secured to the dorsal surface of the radius so that the direction of pull during wrist flexion will result in maximal thumb abduction (Fig. 26-7).

Step 3: EPL Tenodesis
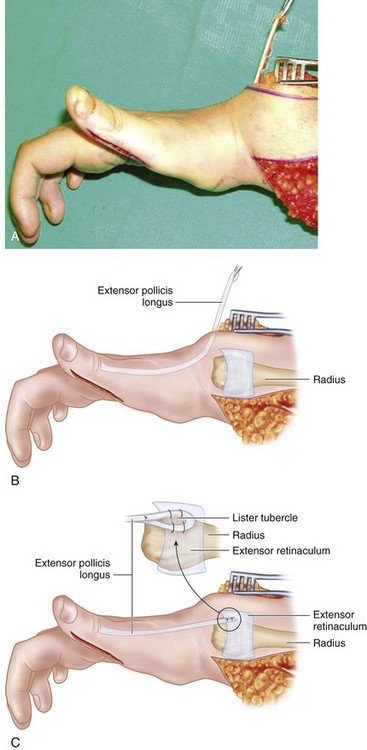
 The EPL tendon is then isolated from the dorsal incision and divided proximal to the extensor retinaculum. It can be secured to either the radius or the extensor retinaculum (Fig. 26-8).
Step 3 Pearls
When the tendons are secured to the bone, the result is more predictable, and loosening should not be a problem. Loosening with attachment to the extensor retinaculum may be an issue. The tendon inset in Figure 26-8C shows a method of EPL tenodesis to the extensor retinaculum by making a loop around Lister tubercle. By this method, one can also suture the EPL to Lister tubercle to strengthen the attachment.
Step 4: Tenodesis of FPL
 This is done in patients who do not have a strong wrist extensor, and the BR is used for wrist extension rather than transferred to the FPL. The FPL is identified below the FCR in the same plane as the flexor digitorum profundus, but radial to it.
 The FPL is divided 1 cm proximal to the proximal edge of the pronator quadratus (PQ) and anchored to the volar surface of the distal radius proximal to the PQ using a Mitek Mini bone anchor (Fig. 26-9).
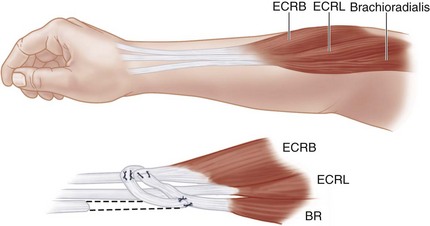
Step 5: BR-to-ECRB Transfer
 The BR tendon is dissected off its insertion and mobilized proximally.
 A short subcutaneous tunnel is made so that the BR tendon can reach the ECRB.
 The ECRB is identified ulnar to the ECRL, and an end-to-side Pulvertaft weave repair is performed between the BR and ECRB using 2-0 Ethibond (Fig. 26-10). The end-to-side repair is more secure, and the direction of pull will still be straight.

Step 5 Pearls
Care must be taken to protect the superficial radial nerve as it passes below the BR and becomes superficial by passing between the BR and ECRL about 5 to 9 cm proximal to the radial styloid.
The BR is invested in fascia along its course in the forearm and must be mobilized from the distal radius and forearm fascia to provide adequate excursion.
Step 6: BR-to-FPL Transfer
 This is done in patients who have strong wrist extension. Here the BR is used to provide active pinch by transferring it to the FPL.

 A repair of the FPL and BR is done using a Pulvertaft weave with 2-0 Ethibond sutures (Fig. 26-11).
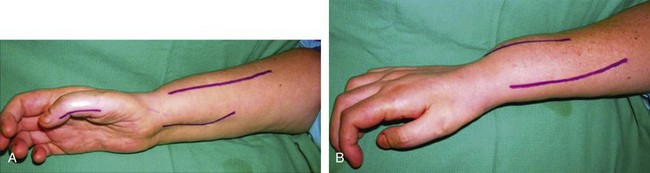
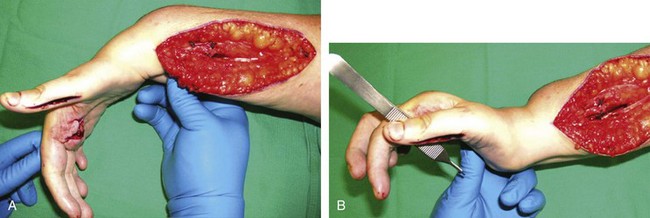
 Tension is set so that with wrist flexion, the patient’s thumb will abduct and extend in this release phase of the operation (Fig. 26-12A). With the wrist extended, sufficient tension on the FPL tendon must achieve a strong enough flexion of the thumb metacarpophalangeal joint so that the pulp of the thumb will press firmly against the radial side of the middle phalanx of the index finger (Fig. 26-12B).
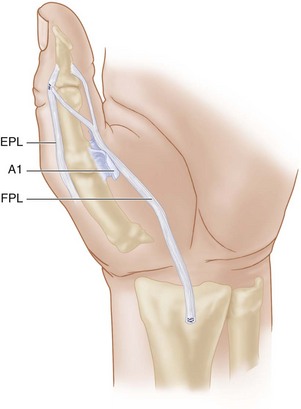
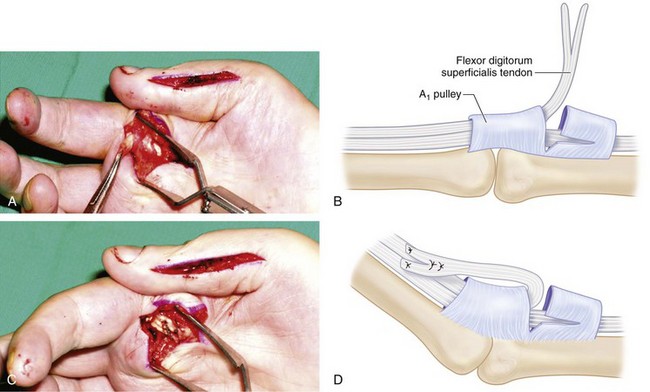
Step 7: Index Finger MCP Joint Flexion Using an FDS Lasso
 If the index finger MCP joint is flaccid and not sufficiently flexed to meet the thumb, the Zancolli lasso procedure will flex and stabilize the index MCP joint so that the thumb pulp will meet the radial border of middle phalanx of the index finger during key pinch.
 The A1 and A2 pulleys are defined clearly, and a space is developed between them by dissection.
 Both slips of the FDS are divided distal to the A1 pulley (Fig. 26-13A and B).
 The distal ends of the tendon slips are folded over the A1 pulley and sutured to the proximal tendon and the A1 pulley using horizontal 2-0 Ethibond mattress sutures (Fig. 26-13C and D).
 Tension is adjusted to maintain the index finger MCP joint in 50 to 60 degrees of flexion.
Postoperative Care and Expected Outcomes


Hamou C, Shah NR, Curtin CM, et al. Pinch and elbow extension restoration in people with tetraplegia: a systematic review of the literature. J Hand Surg [Am]. 2011;34:692-699.
Paul SD, Gellman H, Waters R, et al. Single-stage reconstruction of key pinch and extension of the elbow in tetraplegic patients. J Bone Joint Surg [Am]. 1994;76:1451-1456.
Vastamäki M. Short-term versus long-term comparative results after reconstructive upper-limb surgery in tetraplegic patients. J Hand Surg [Am]. 2006;31:1490-1494.