CHAPTER 21. SUBCUTANEOUS AND INTRAMUSCULAR INJECTIONS
The Irish physician Francis Rynd (1811–1861) invented the hollow needle in 1844, patented in the Irish patents office. Charles Gabriel Pravaz (1791–1853), a French physician, created the first hypodermic tubular needle and syringe in 1853, made entirely from silver. Soon after, the Scottish physician Alexander Wood (1817–1884) went on to develop a method for subcutaneous injection. Not without an unfortunate sense of irony, the first recorded fatality from an overdose administered by Wood’s invention was that of his wife who had become addicted to intravenous morphine.
INTRODUCTION
Subcutaneous and intramuscular injections provide routes for medication delivery that do not require intravenous access. This may be advantageous in either an emergency situation (e.g. intramuscular epinephrine) or electively (e.g. subcutaneous insulin).
INDICATIONS
CONTRAINDICATIONS
• Local contraindications to injection include:
— cellulitis
— haematoma
— lipoatrophy
— lipohypertrophy
— lymphoedema.
• Bleeding diatheses – coagulopathy or thrombocytopaenia may increase the risk of subcutaneous or intramuscular haematoma formation.
• Lack of consent.
 Tip Box
Under common law intramuscular sedation in the acutely confused patient does not require the patient’s consent if:
• the patient lacks capacity and
• the administration of the medication is in the best interests of the patient (and not those of the ward staff!)
This route for delivery of sedative medications does not work instantly, and the need for it should be carefully considered prior to prescription.
EQUIPMENT
• Gloves.
• Sterile hypodermic needles (Fig. 21.1):
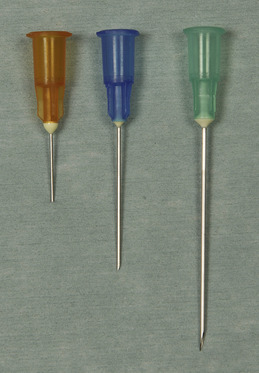
— 25 gauge needle (orange: length 16 mm, inner diameter 0.241 mm) for subcutaneous delivery
— 21 gauge (green: length 40 mm, inner diameter 0.495 mm) to 23 gauge needle (blue: length 30 mm, inner diameter 0.318 mm) for intramuscular delivery
— 21 gauge needle for drawing up the drug.
• Syringe (of required volume for the medication +/– volume of dilutant required to reconstitute the medication).
• Sterile alcohol swabs.
• Gauze.
• Plaster.
• Vial of medication to be administered. Always read the instructions to check the correct dosage, route of delivery and solution required to reconstitute the powder form of the medication.
PRACTICAL PROCEDURE
PREPARATION
• Explain the procedure to the patient and gain consent.
• Position the patient and expose the area for injection.
• Wash your hands and wear gloves.
• Perform the following checks prior to administering any medication:
— Confirm the patient’s personal details and check that they correspond with their drug chart and name band.
— On the drug chart confirm the patient’s drug allergies, the drug to be given, the dose required, the timing of the dose and the route of administration.
— Check the drug itself together with the dosage and expiry date in the presence of a colleague.
• Draw up the required volume of specified dilutant (see information accompanying the medication) into the syringe using a green needle.
• Reconstitute the medication in the vial and aspirate into the syringe when complete. Discard the vial and green needles into a sharps bin.
• Expel any excess air or air bubbles from the syringe by gently tapping the side of the syringe whilst holding it upright.
• Clean the area of skin for injection with sterile alcohol swabs and allow to dry.
 Tip Box
Allowing the alcohol to evaporate from the skin surface is the mechanism of its bacteriocidal activity, not the vigour with which you clean the area! Furthermore, injecting before the alcohol has evaporated is more painful for the patient.
SUBCUTANEOUS INJECTION
• Attach the 25 gauge (orange) needle to the syringe.
• Choose a site for injection. Suitable sites include the triceps area, anterior thigh area or the abdomen.
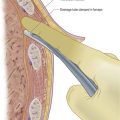
• Pinch and lift the skin overlying this area gently into a fold between the thumb and index finger of your non-dominant hand, thereby separating the subcutaneous adipose tissue layer from the muscle (Fig. 21.2).
• Warn the patient of a sharp scratch.
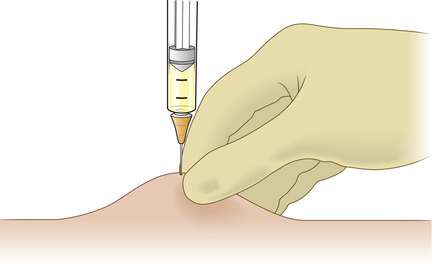
• Gently insert needle into the skin at a 30–45 degree angle.
 Tip Box
When injecting with a shorter needle, such as when administering insulin, a 90 degree angle is the most appropriate approach for insertion.
• Slowly inject the medication.

INTRAMUSCULAR INJECTION
• Attach the 23 gauge (blue) or 21 gauge (green) needle to the syringe.
 Tip Box
Needle size will be influenced by the patient’s body habitus. In obese individuals intramuscular injection in the buttock will require the length of a green needle.
• Choose a site for injection taking into account the individual’s muscle mass. Suitable muscles include the deltoids, the gluteal muscles and the lateral thigh muscles.
 Tip Box
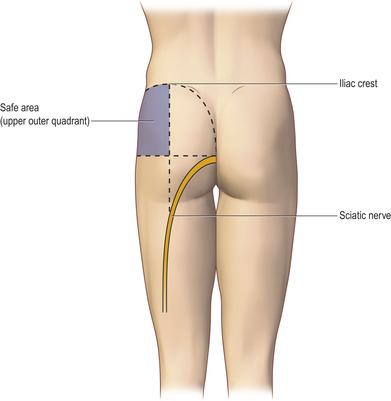
When injecting into the gluteal muscles, split the buttock into four quadrants (Fig. 21.3). Only inject into the upper outer quadrant to minimize the risk of sciatic nerve injury.
 Tip Box
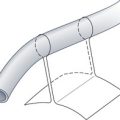
This technique is termed the ‘Z track’. Upon releasing the tension applied to the overlying skin, the needle track from the skin to the underlying muscle disappears and hence reduces the risk of medication leakage through the puncture site following the injection.
FINISHING OFF
• Remove the needle and apply pressure to the puncture site with gauze or cotton wool to prevent haematoma formation.
• Dispose of the syringe and needle into a sharps bin.
• Attach a plaster if needed.
• Observe for any adverse drug reactions.
• Record the date and time of injection on the patient’s drug chart.
 Tip Box
Rotate injection sites to minimize the risks of infection (either superficial cellulitis or deep abscess formation), atrophy and hypertrophy of the underlying tissue.
COMPLICATIONS
• Local infection – either superficial (cellulitis) or deep (abscess formation).
• Bleeding – either superficial or deep haematoma formation. This may predispose to infection.
• Lipoatrophy.
• Lipohypertrophy.
• Injection fibrosis – if injections are delivered with an incorrect technique or too frequently to that site.