

[level-membership-for-orthopaedics-category]
Spine
Francis H. Shen
Regional Anatomy and Surgical Intervals
Regional Anatomy
Osteology
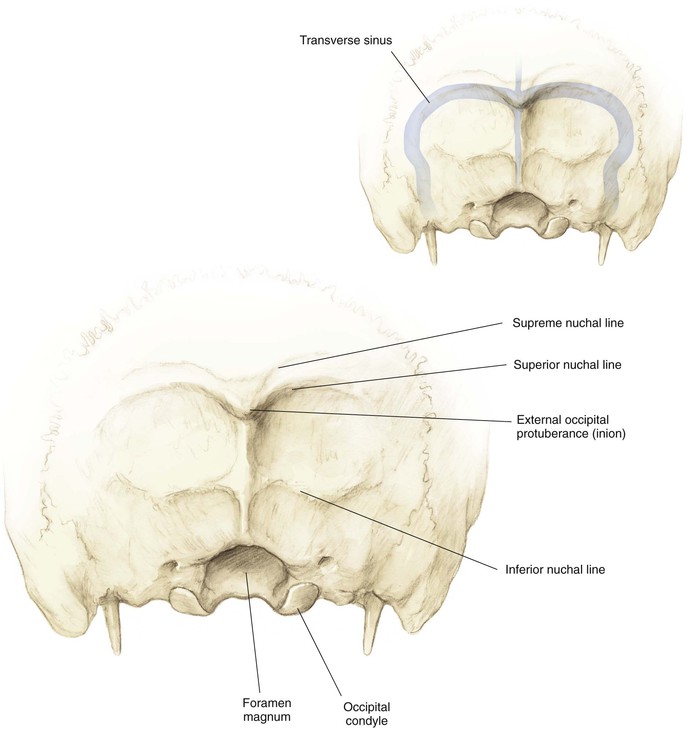
Occiput (Fig. 5-1)
External occipital protuberance (inion)
• Thickest portion of bone (4-18 mm)
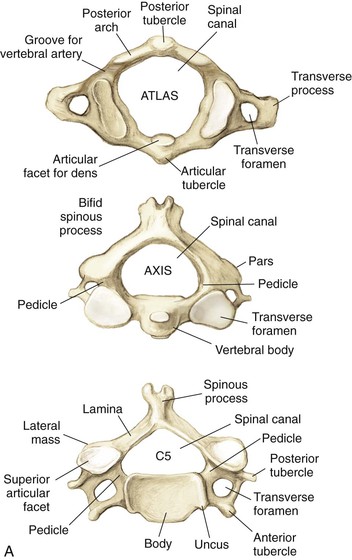
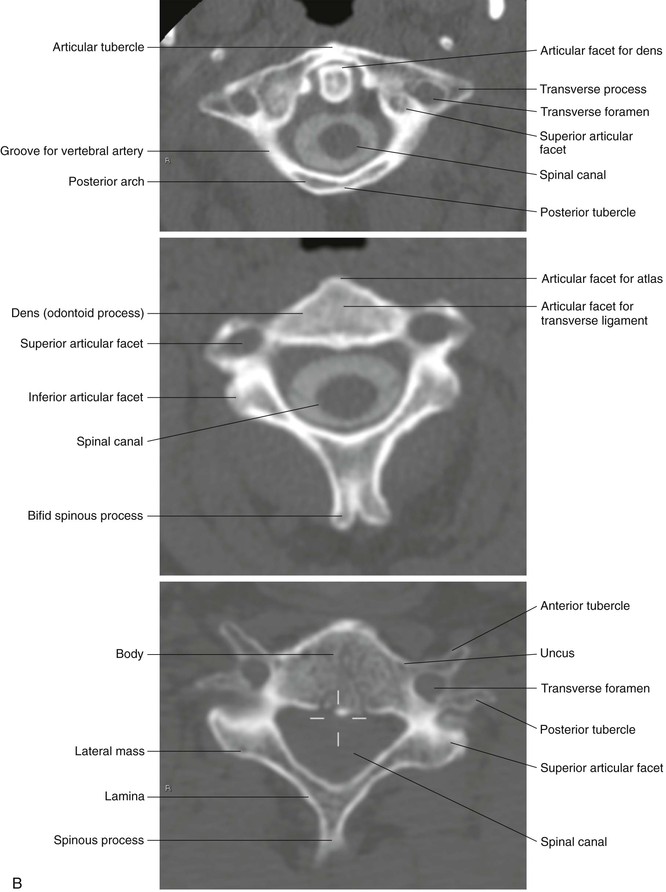
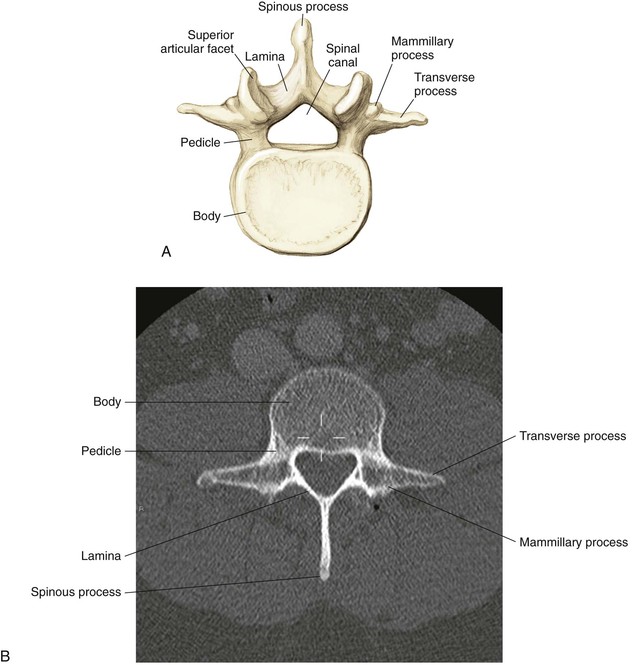
Cervical Vertebrae (Fig. 5-2)
• A ring that lacks a centrum and spinous process
• The groove for the vertebral artery sits posterior and superiorly
• Prominent bifid spinous process
• The superior articular facet lies anterior to the inferior facets
• Spinal canal triangular configuration
• The sagittal diameter varies from 17 to 18 mm (C3-C6) to 15 mm (C7)
• Lateral masses are thinnest at C6 and C7
Arthrology
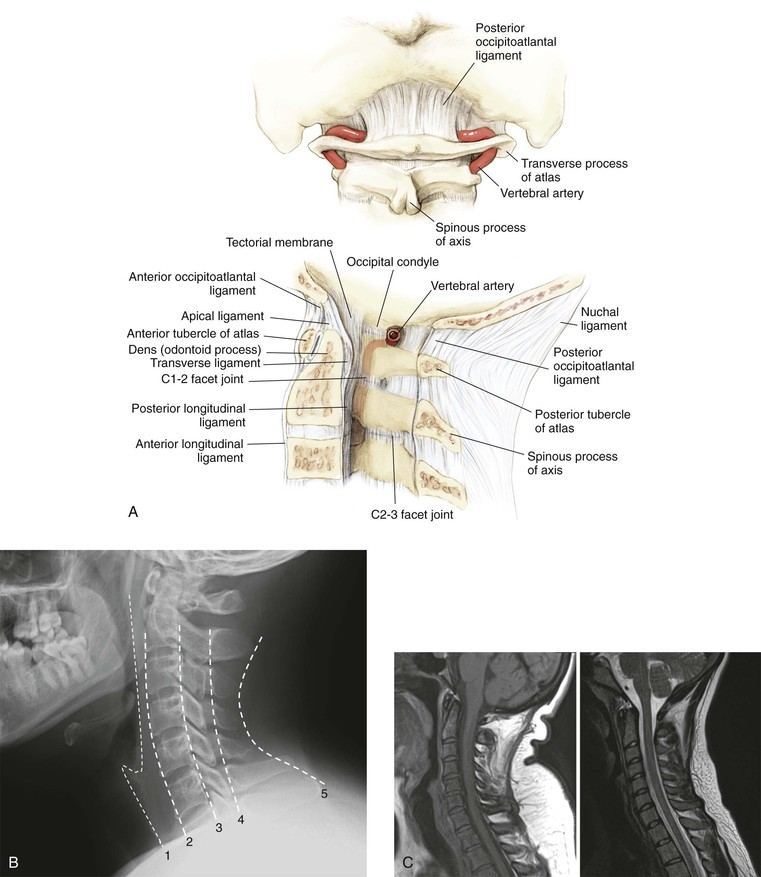
Cervical
• 50% of cervical flexion-extension
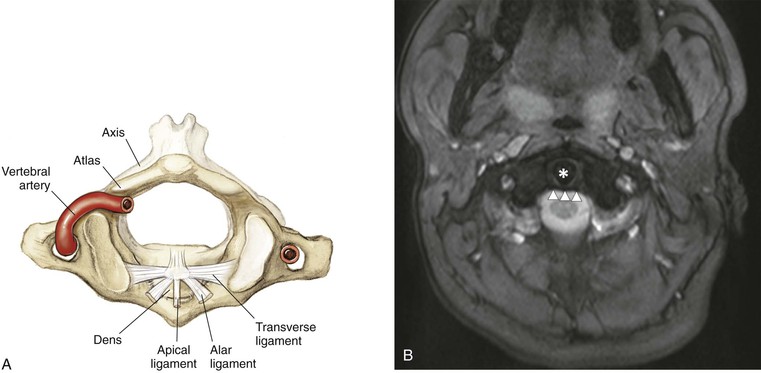
• Tectorial membrane (after the foramen magnum it becomes the posterior longitudinal ligament)
• Anterior longitudinal ligament (continues throughout the mobile spine)
• Posterior occipitoatlantal and anterior occipitoatlantal ligaments
• One apical and two alar ligaments
Uncovertebral joint (Fig. 5-7)
• Not a true diarthrodial joint
• Forms the anterior border of the neuroforamen
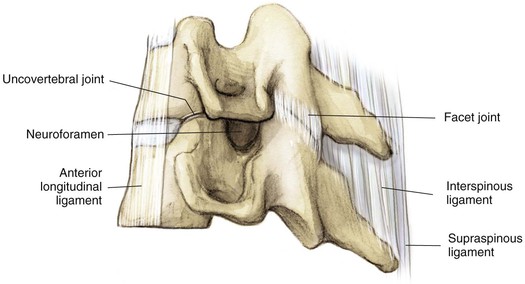
• Shingled with the superior articular facet anterior to the inferior articular facet
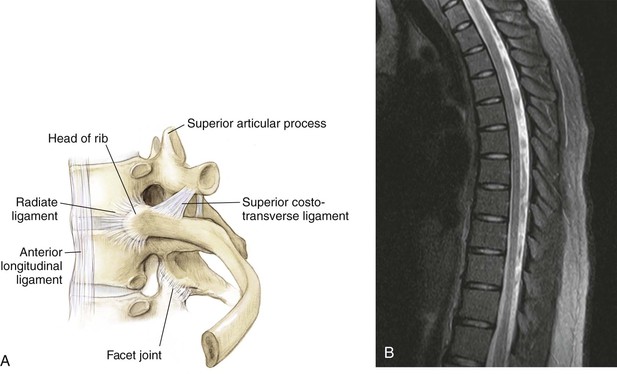
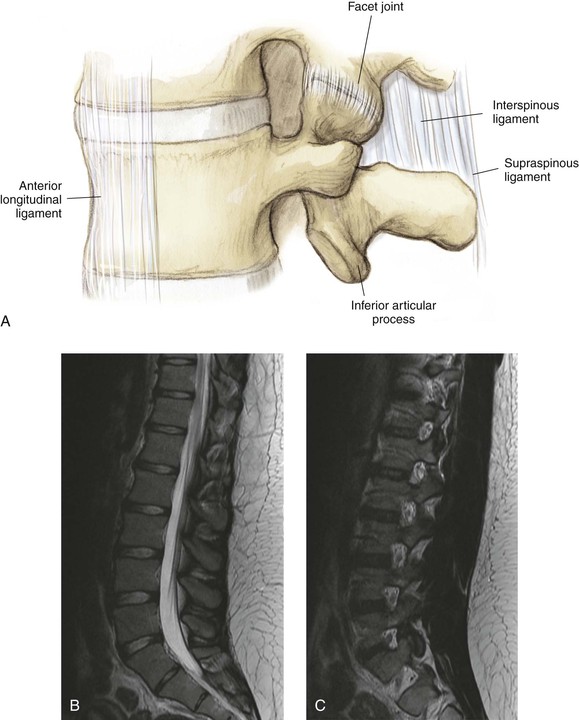
Lumbar and Sacrum (Fig. 5-9)
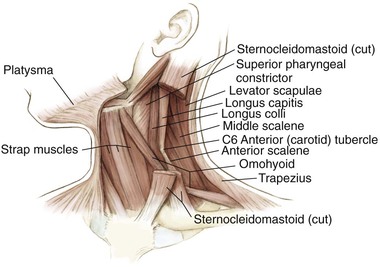
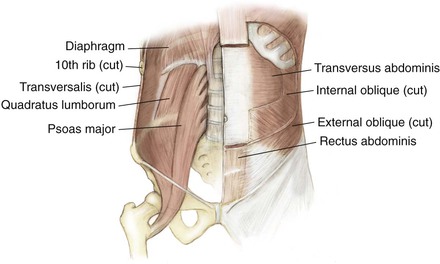
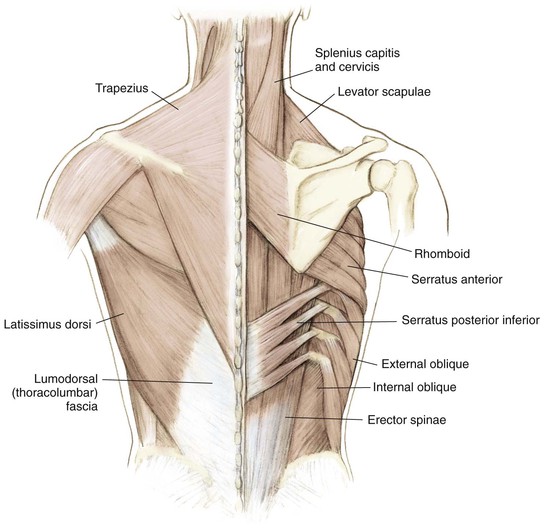
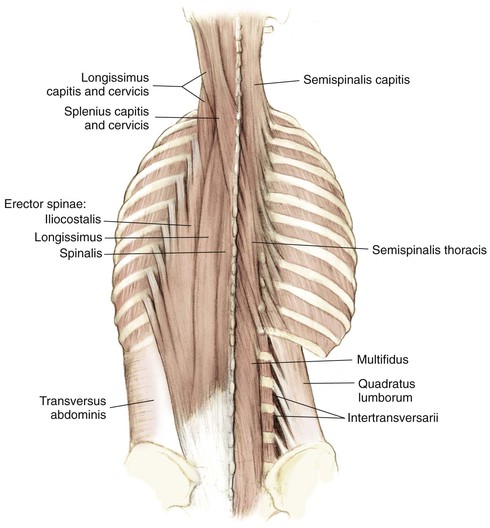
Muscles
Anterior
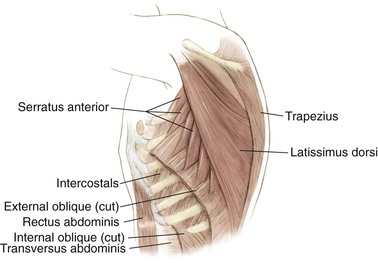
Posterior
Nervous System
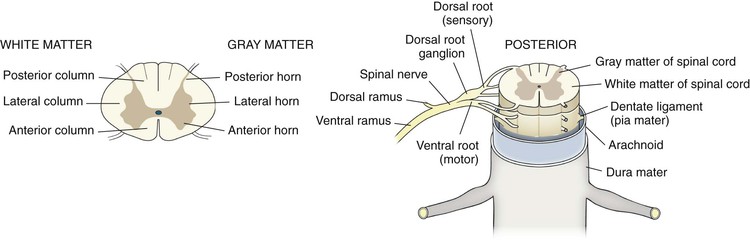
Spinal Cord (Fig. 5-15)
Continuation of the medulla as it exits the foramen magnum
Terminates as the conus medullaris at T12-L1 or L2-L3
Continues caudally as the cauda equina
The spinal cord diameter is largest at the C6 vertebra
Three meninges: dura (outermost covering), arachnoid, and pia mater (innermost covering)
Cerebrospinal fluid is found between the arachnoid and pia mater
White Matter
• Anterior spinothalamic tract
• Carries light/crude touch sensation
• Anterior corticospinal tract
• Delivers voluntary contraction
• Fasciculus cuneatus laterally
• Fasciculus gracilis medially
• Carries deep touch, proprioception, and vibratory sense
• Carries contralateral pain and temperature fibers
Nerve Roots
• Formed by the convergence of the dorsal and ventral roots
• Delivers the dorsal primary rami
• Supplies skin and muscle to the neck and back
• Delivers the ventral primary rami
• Supplies the anteromedial trunk and limbs
• Brachial plexus in the cervical spine
• Lumbosacral plexus in the lumbar and sacral spine
Sympathetic Chain
Surgical Intervals
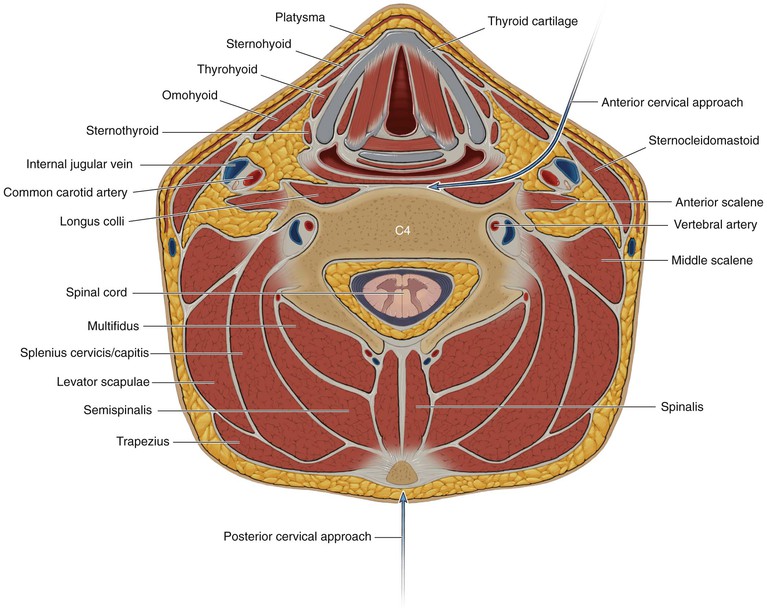
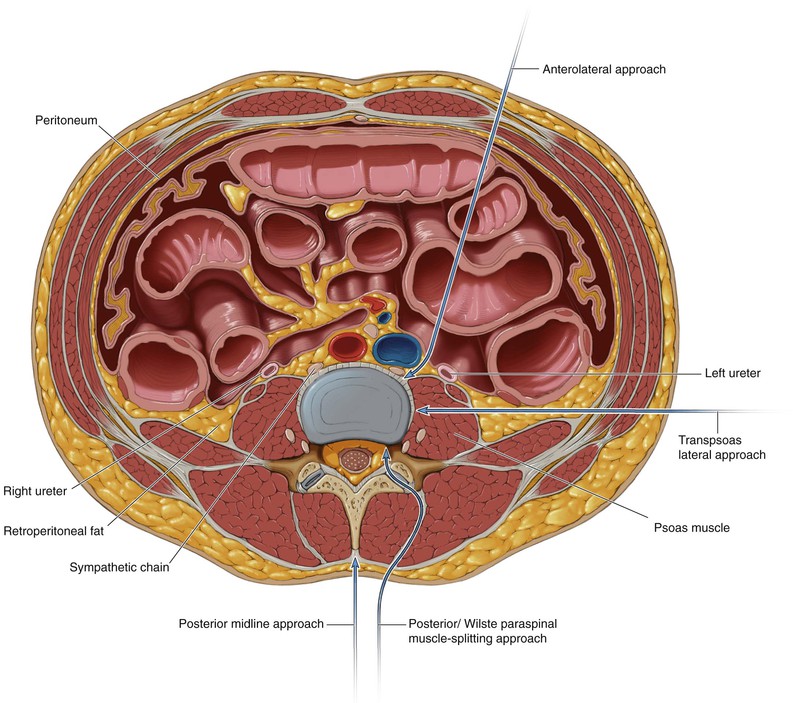
Unlike surgical approaches in the appendicular spine, surgical approaches for the spine traditionally utilize intermuscular planes; approaches for the cervical and lumbar spine are depicted in Figs. 5-16 and 5-17
• The anterior approach to the cervical spine utilizes an intermuscular plane as the safe interval (Fig. 5-16)
• Posterior midline incision (Fig. 5-16)
• Anterolateral approach to the lumbar spine (Fig. 5-17)
• Lateral/transpsoas approach to the lumbar spine (Fig. 5-17)
• Posterior/Wiltse paraspinal muscle-splitting approach to the lumbar spine (Fig. 5-17)
• Posterior midline approach to the lumbar spine (Fig. 5-17)
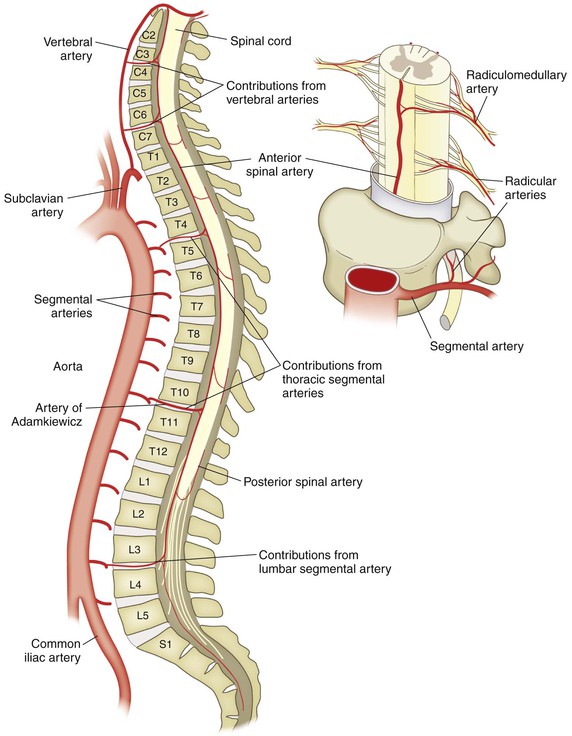
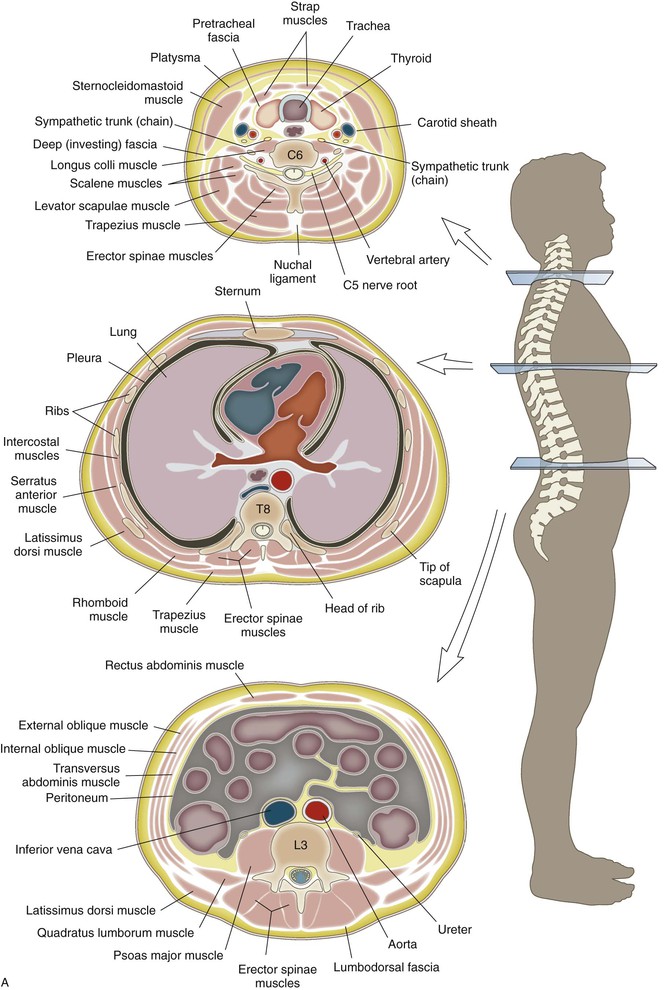
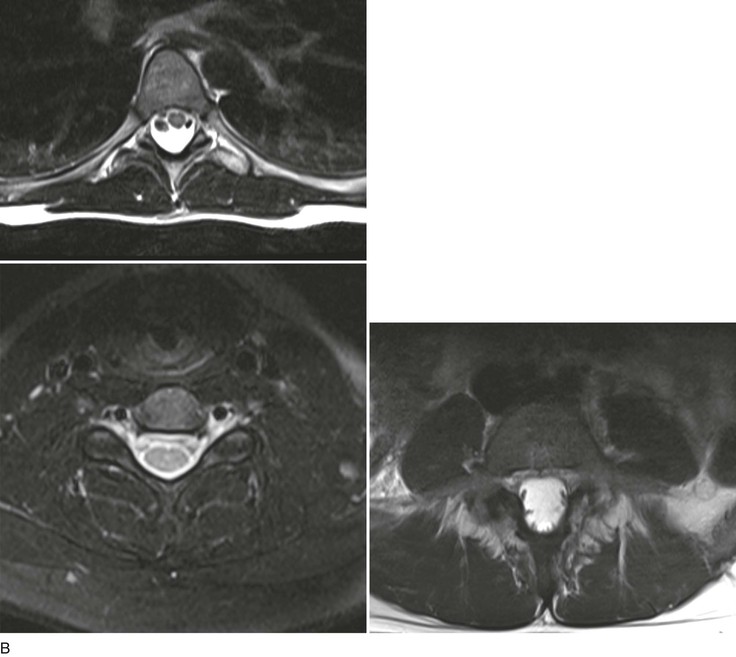
Cross-Sectional Anatomy (Fig. 5-19)
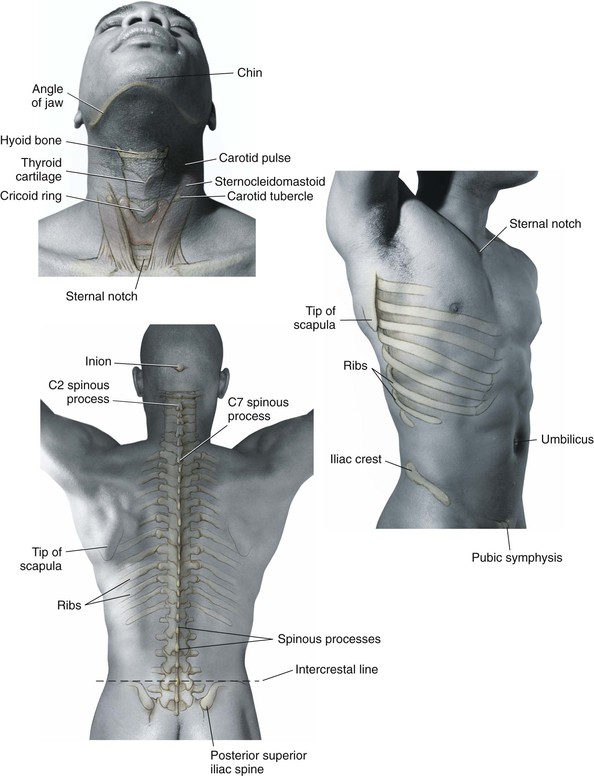
Landmarks (Fig. 5-20)
Cervical Spine
Anterior
Approaches to the Spine
Anterior Approach to the Cervical Spine (Video 5-1)
Indications
Anterior Decompression of the Spinal Canal
Positioning
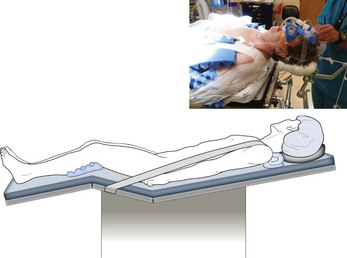
Supine (Fig. 5-21)
• Typically, the head is placed in a neutral alignment
• Extension and contralateral head rotation can help improve surgical exposure if necessary
• Care should be taken to ensure that the degree of extension necessary is possible before intubation
• Gentle taping of the shoulders inferiorly can improve intraoperative radiographs
• Neck extension can be facilitated by placement of a roll between the shoulder blades
• Gardner-Wells or Halter traction can be used if distraction is required
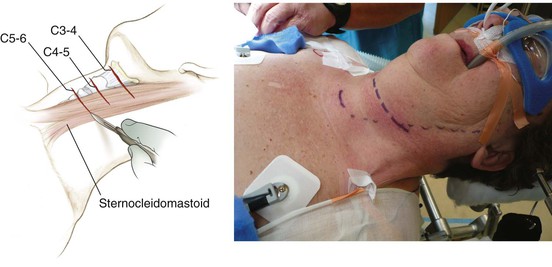
Superficial Dissection
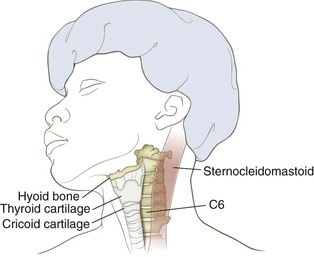
Identify the platysma (Fig. 5-24)
• Divide the fibers of the platysma
• Alternatively, split the muscles of the platysma in line with fibers
• Elevate and mobilize the platysma superiorly and inferiorly as needed
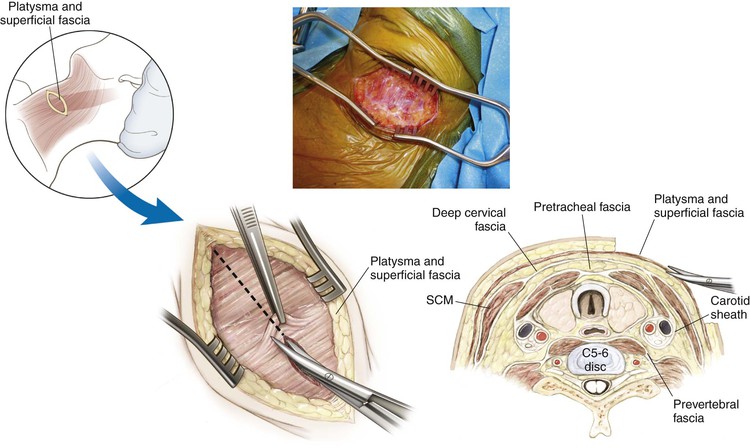
Identify the anterior border of the sternocleidomastoid muscle (Fig. 5-25)
• Divide the fascia immediately anterior to the sternocleidomastoid muscle (deep cervical fascia)
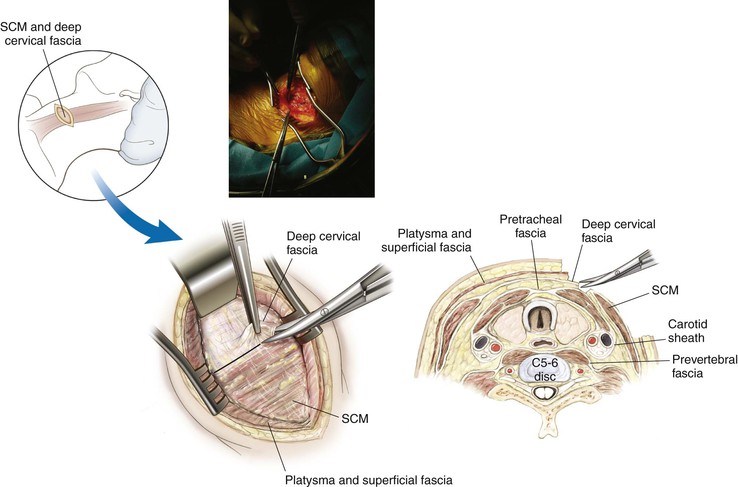
Palpate the pulse of the carotid artery (Fig. 5-26)
• Divide the fascia immediately anterior to the carotid sheath (pretracheal fascia)
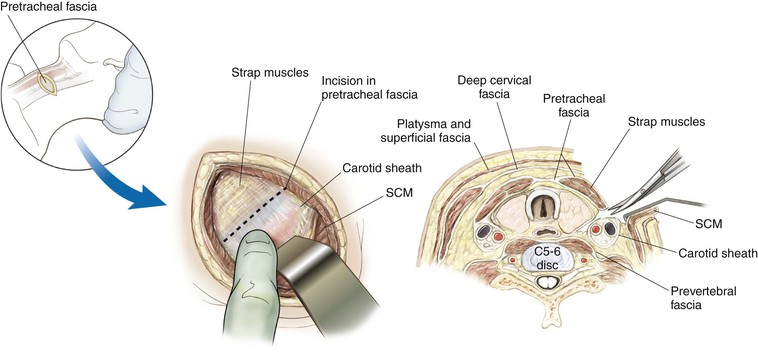
Continue with blunt dissection to develop the plane down to the anterior surface of the cervical vertebra (Fig. 5-27)
• Two arteries may be seen crossing the field from the carotid sheath toward the midline structures
• One or both may have to be divided to increase surgical exposure
Deep Dissection
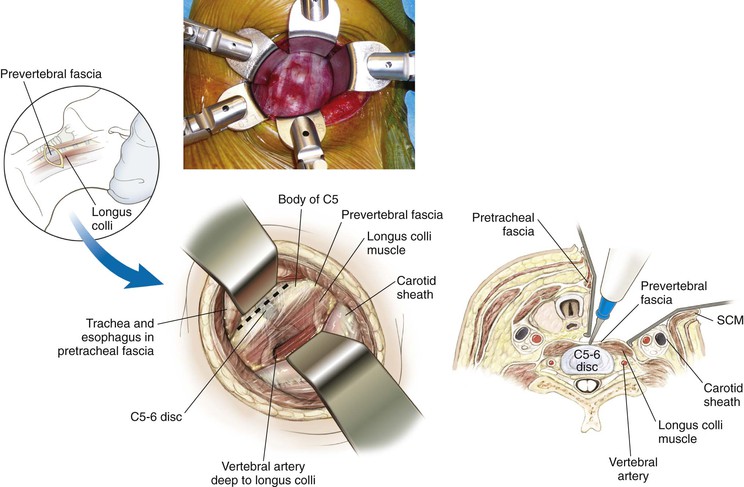
Deep dissection exposes the anterior cervical vertebra (Fig. 5-28)
• The longus colli muscles are now visible on either side
• The prevertebral fascia also can be seen covering the cervical vertebra
• The anterior longitudinal ligament can be seen as a gleaming white structure in the midline
• The sympathetic chain lies on the longus colli lateral to the vertebral bodies
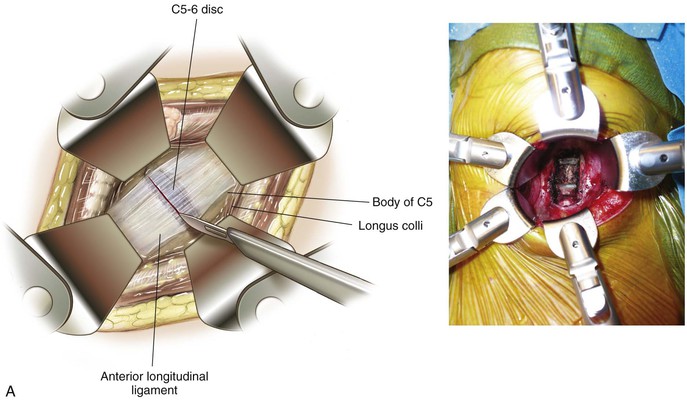
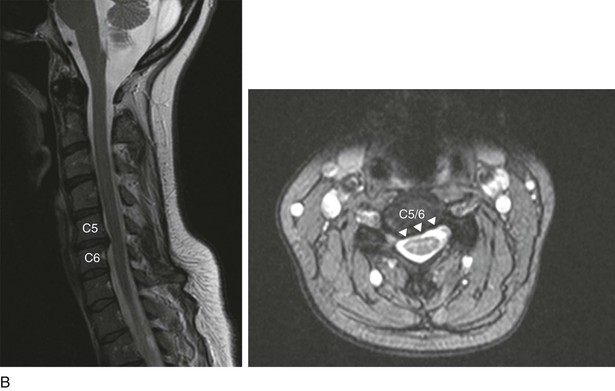
Divide the prevertebral fascia
Detach and elevate the longus colli bilaterally for exposure
Transoral Approach
Indications
Positioning
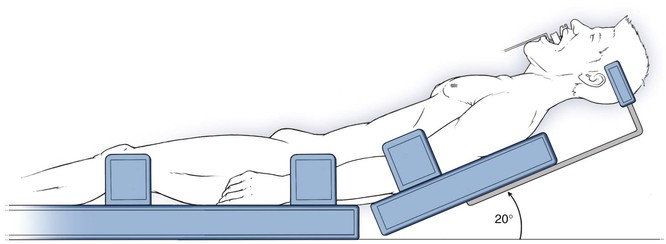
Supine (Fig. 5-29)
Head Position
Typically neutral or slightly extended alignment
Care should be taken to ensure that the degree of extension necessary is possible before intubation
Arms Positioned at the Patient’s Side
Hazards (Figs. 5-30 and 5-31)
Neural Structures
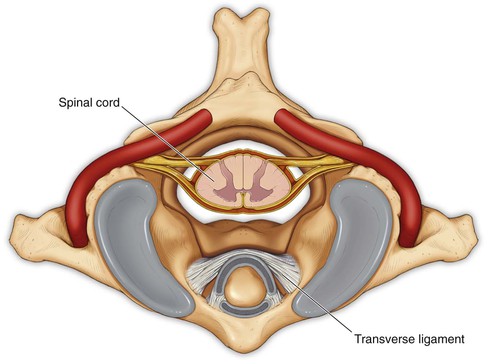
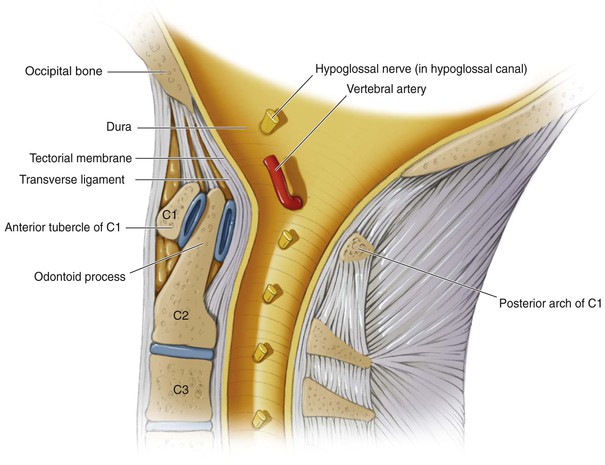
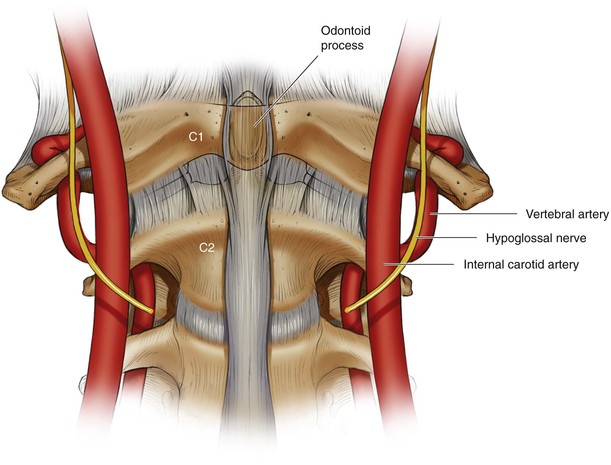
Vascular
• At risk with lateral exposure greater than 20 mm from midline at the level of C1
• At risk with lateral exposure greater than 10 mm from midline at the level of the C2-C3 disc space
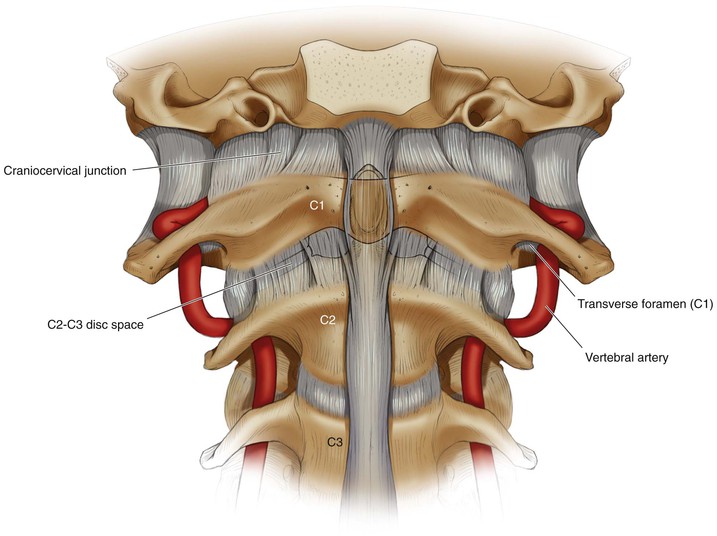
Internal carotid artery (Fig. 5-32)
• Particularly at risk when dissection entails lateral exposure greater than 15 mm from midline
Intraoperative/Preincision Preparation
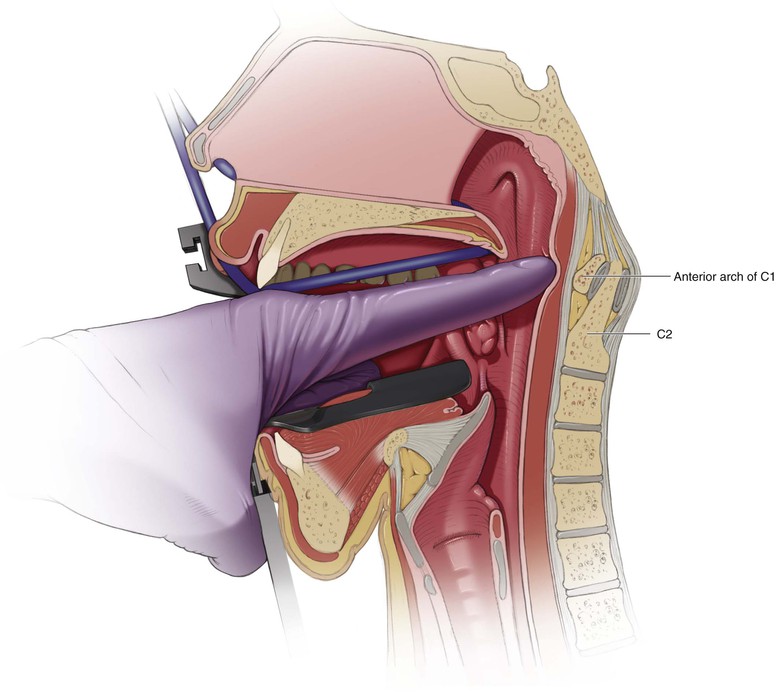
Pack the upper esophagus and trachea with sterile gauze
• Minimizes the ingestion of blood and other products
• Reduces the risk of aspiration
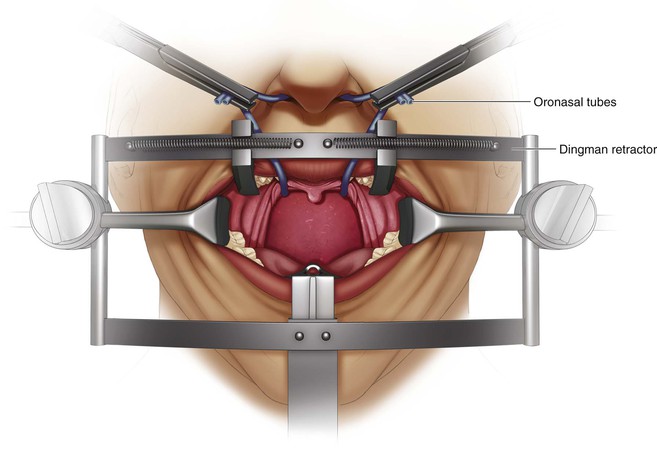
Careful retractor placement improves visualization of the interdental gap (Fig. 5-34)
• Elevate the soft and hard palate
• A tongue blade retractor can be used
Incision
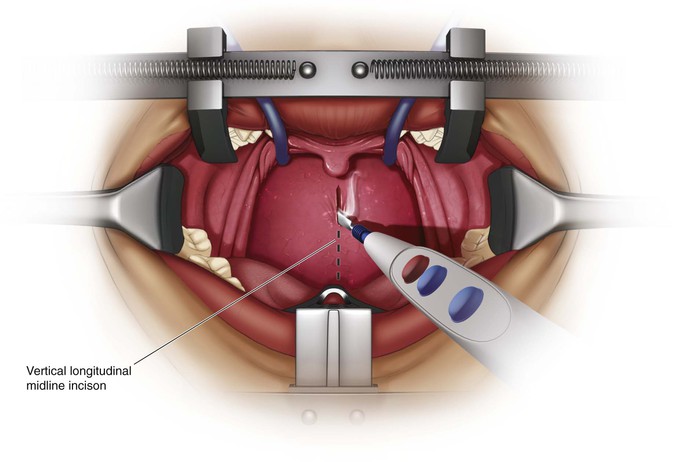
A 1- to 2-cm vertical longitudinal midline incision (Fig. 5-36)
• Just proximal to the anterior C1 tubercle down onto the body of C2 distally
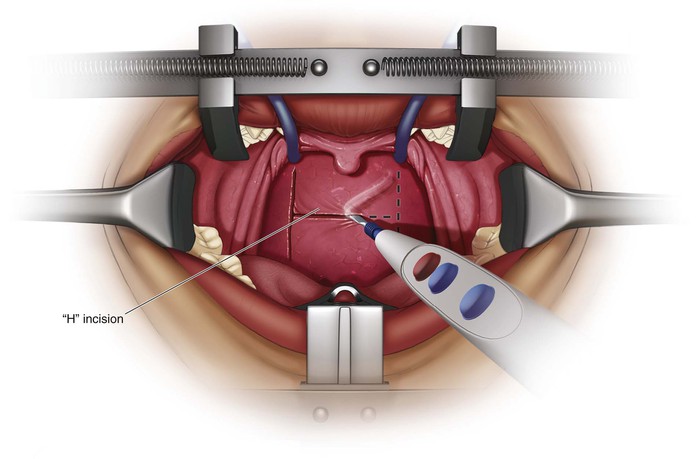
Make an “H” incision (Fig. 5-37)
• Vertical limbs are placed as far lateral as possible
• Injury to the eustachian tubes can occur if the vertical limbs are too lateral
• Allows for two broad-based pharyngeal myomucosal flaps that are elevated superiorly and inferiorly
• The horizontal limb is based on the level of the soft palate
Superficial Dissection
Retract the Soft Palate (Fig. 5-38)
Simple retractor placement may be sufficient
The uvula may be sutured and retracted proximally
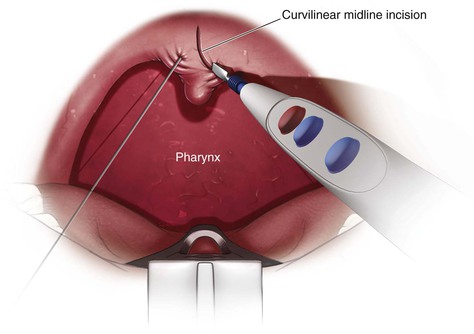
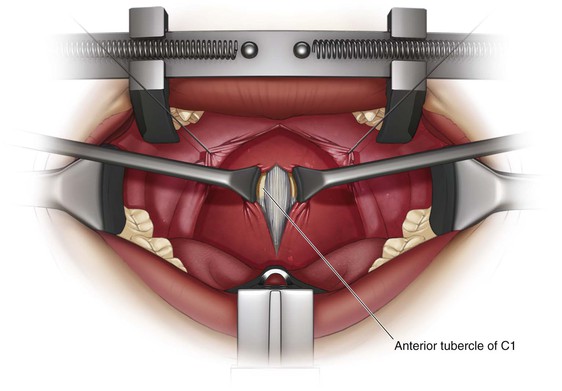
Exposure of the Anterior Ring of C1 (Fig. 5-39)
Full-thickness subperiosteal dissection
• Divide the mucosa and pharyngeal musculature as one flap; four layers:
• Superior constrictor muscle of the pharynx
• Anterior longitudinal ligament
• Attached to the anterior tubercle of C1
• May need to be sharply dissected free to maintain subperiosteal exposure
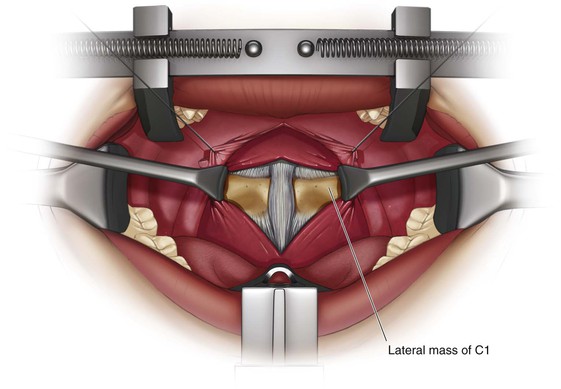
Exposure of the Lateral Mass of C1 (Fig. 5-40)
Elevate the longus colli muscles
Dissection laterally onto the midportion of the lateral mass of C1 bilaterally
• Maintaining midline orientation is imperative
• The anterior tubercle is an important landmark
• The midline can be distorted in patients with atlantoaxial rotatory subluxation
• Atlantoaxial rotatory subluxation can bring the vertebral arteries to the midline
Exposure of the Body of C2 and the C1-C2 Joint (Fig. 5-41)
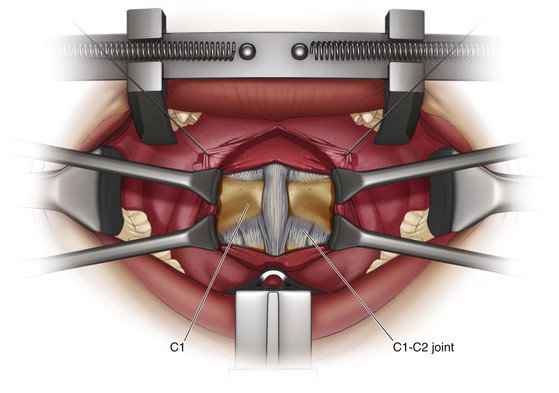
Deep Dissection
Exposure of C2
Exposure of the odontoid process of C2 (Fig. 5-42)
• Remove the central 1.0 to 1.5 cm of the anterior tubercle of C1
• Perform with a burr, pituitary rongeur, and/or curettes
• Maintaining midline orientation is imperative
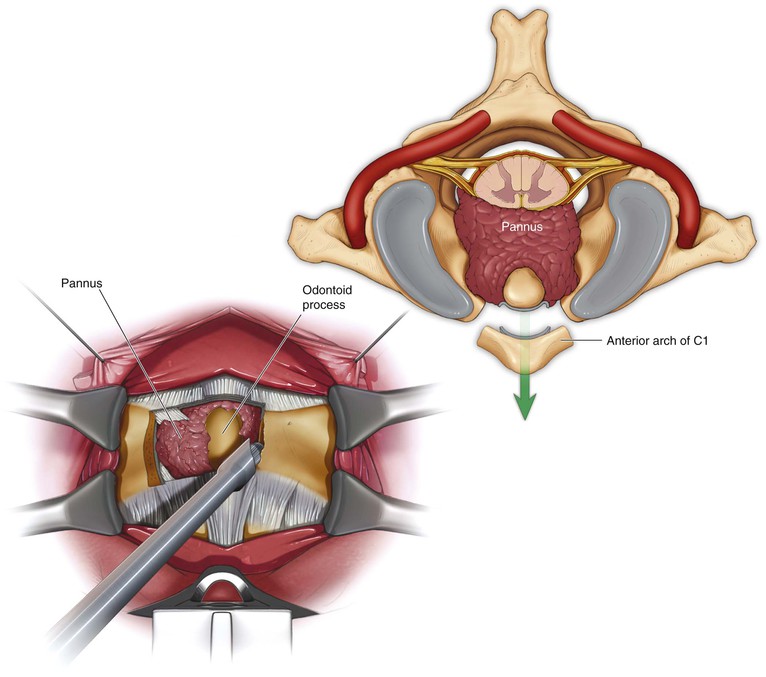
Removal of the Odontoid Process (Fig. 5-43)
• Perform with a burr, pituitary rongeur, and/or curettes
• Resect the odontoid at its base
• Bleeding may arise from the venous plexus just lateral to the base of the odontoid
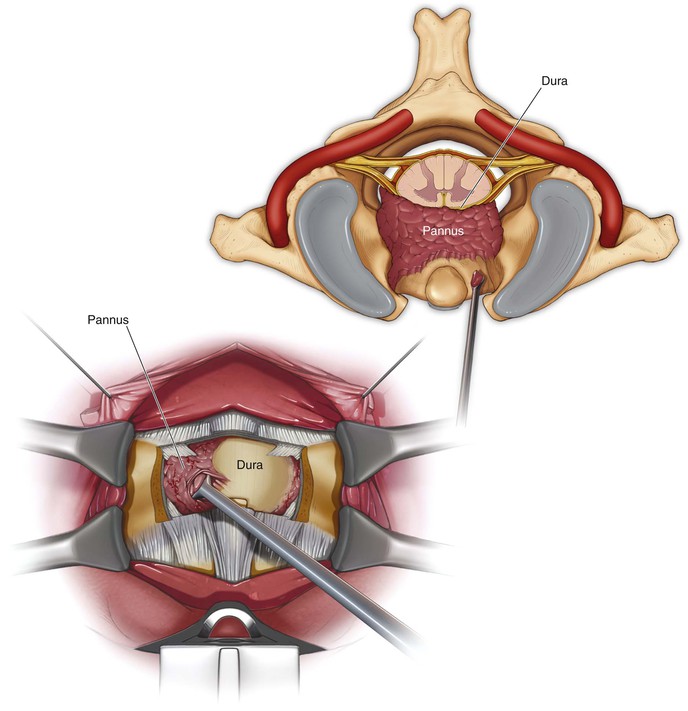
• The tip of the odontoid process can be gently pulled down into the field from the foramen magnum
• Divide the apical and alar ligaments from the tip of the dens
• Care should be taken when using this technique
• Traumatic avulsion of the apical/alar ligament can result in dural leaks
Closure
Confirm that no CSF leak has occurred
• Use the intraoperative Valsalva maneuver
• Persistent leaks may require a lumbar drain
If possible, reapproximate the longus colli in the midline
Approximate the pharyngeal layer with resorbable suture
If a “H”-type incision was used, close the horizontal limb first, followed by the vertical limb
Approximate the soft palate in layers with absorbable suture
Anterior Transthoracic Approach to the Thoracic Spine (Video 5-2)
Indications
Anterior Spinal Cord Decompression
Positioning
Lateral decubitus position with the side to be approached oriented up (Fig. 5-44)
• For deformity, the convexity of the curve is typically oriented up
• For decompressions, the side with the greatest stenosis to be addressed is typically oriented up
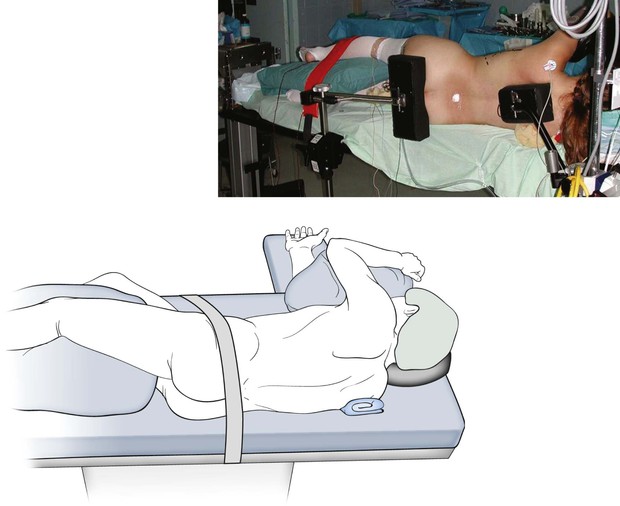
Secure the patient firmly to the operating table
• Stabilize the patient with either beanbags or hip positioners
• Carefully note the orientation of the spine before draping
• Place the hand and arm on the side to be approached above the head
Incision
It is easier to extend the dissection distally than proximally
• It is best to center the incision on the rib associated with the vertebra of interest or the one more superior (Fig. 5-45)
• The rib articulates with the corresponding vertebra and the one more cranial
• The eighth rib typically articulates with the T7 vertebra and the T8 vertebra
• Correlate the number of ribs from preoperative imaging with the number of ribs palpated on the patient after positioning
• Typically, the twelfth rib cannot be felt, and the most inferior rib palpated is the eleventh rib
Superficial Dissection
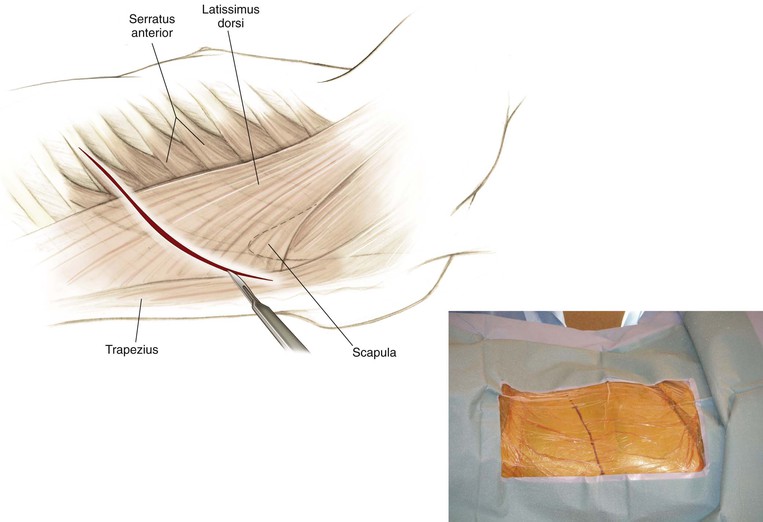
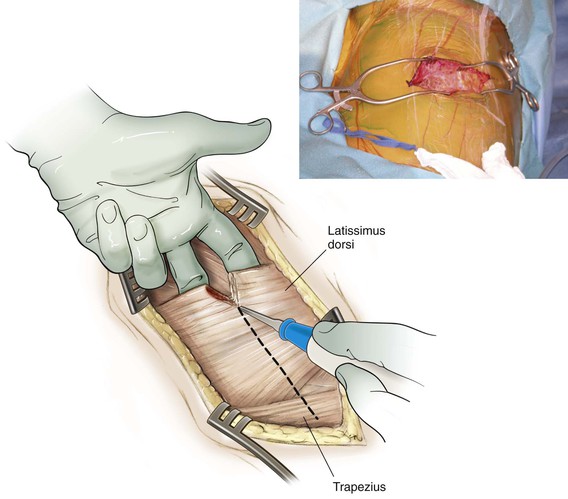
Identify the latissimus dorsi and trapezius muscles (Fig. 5-46)
• Divide the latissimus dorsi in line with the skin incision
• Because this division is not performed in the intramuscular plane, bleeding can be an issue
• The scapula can now be elevated
• Although it is unnecessary, the surgeon can carefully develop the plane between the scapula and ribs to obtain confirmation of the appropriate rib level
• The most proximally palpated rib is typically the second rib
• If necessary, the rhomboids can be detached to improve the posterior exposure
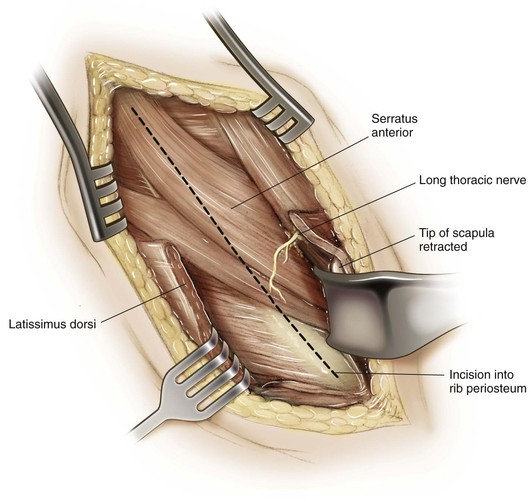
The serratus anterior can now be better identified (Fig. 5-47)
• Divide the serratus anterior in line with the incision to expose the rib
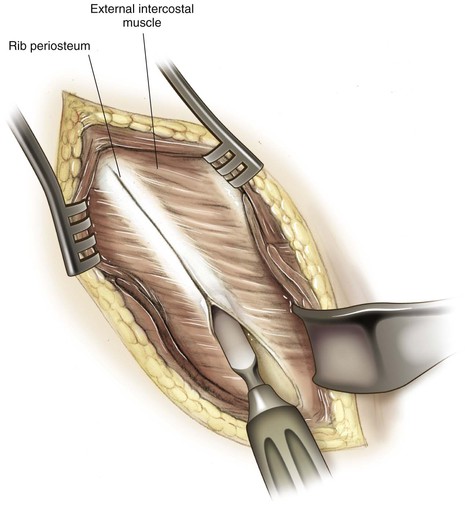
Subperiosteally elevate the musculature from the ribs (Fig. 5-48)
• Detachment of the muscular attachments
• Above the rib, proceed posterior to anterior (Fig. 5-49)
• Below the rib, proceed anterior to posterior
• Continue the subperiosteal dissection as far posteriorly as necessary
• Using a rib cutter, resect as much rib as necessary to obtain the needed exposure
• Bleeding at the posterior angle of the rib after it is resected can be controlled with bone wax
• Save the rib to use as a bone graft if one is needed
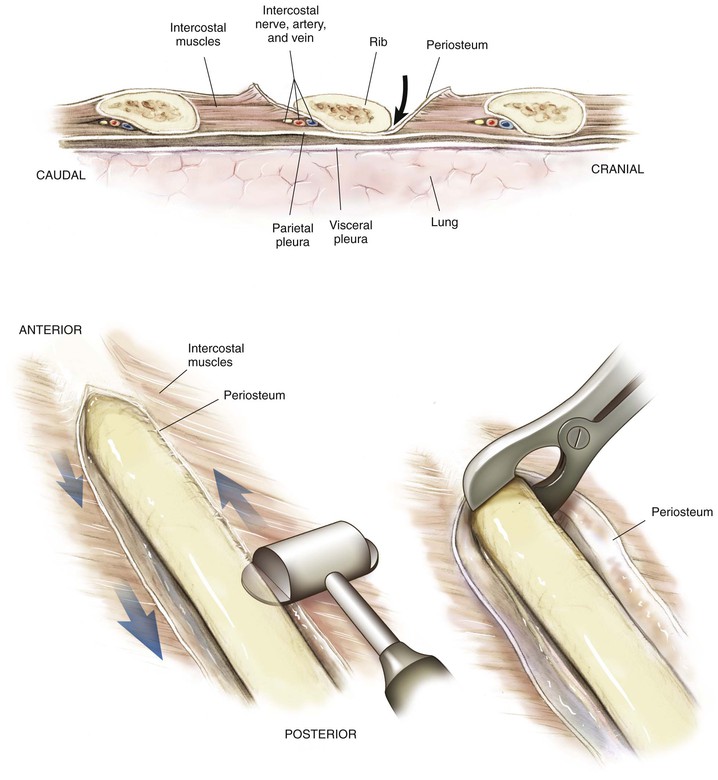
The thoracic cavity can be entered now by cutting the periosteum and pleura above the rib (Fig. 5-50)
• Notify the anesthesia team at this point that you are entering the chest
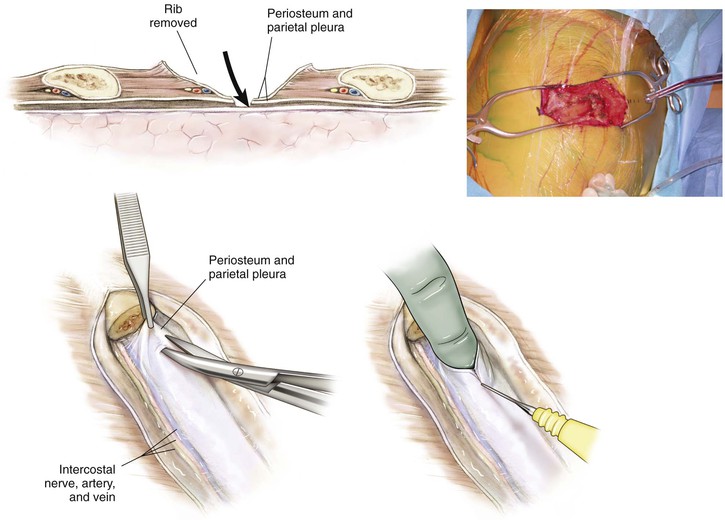
Deep Dissection
The lung can be readily identified
• Typically, use of a double-lumen tube is unnecessary
• Pack moist laparotomy sponges to assist in the exposure
Identify the posterior mediastinum and associated structures (Fig. 5-51)
• The lateral aspect of the spine can be readily identified
• The “hills” are the intervertebral discs
• The “valley” is the vertebral body
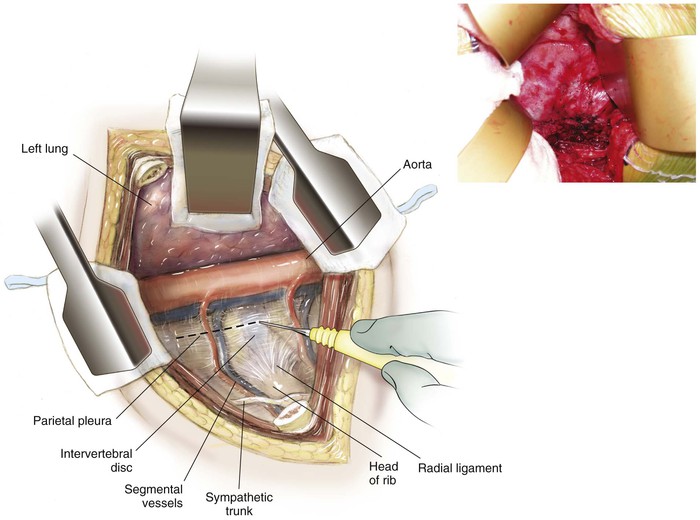
• The intercostal vessels can be seen crossing the operative field at the level of the midvertebral body
• Preserve the intercostal vessels if possible
• Tying off more intercostal vessels than necessary should be avoided
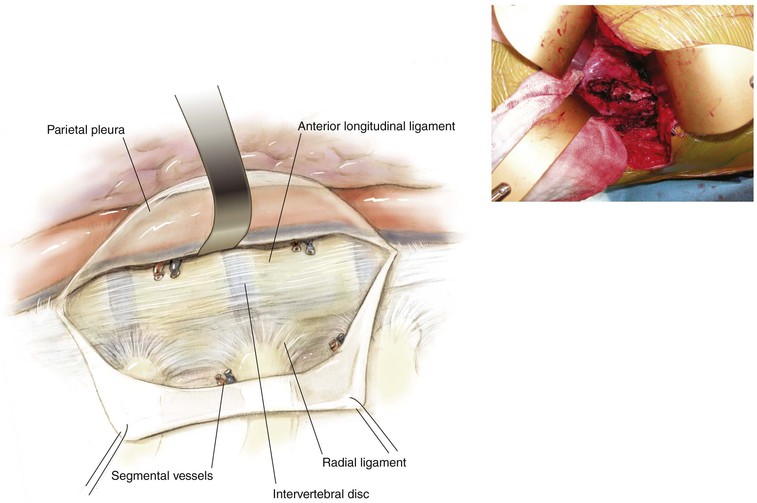
Closure
A careful complete instrument and sponge count should be performed before final closure
• Make the skin incision for the chest tube one to two ribs inferior to the level of the thoracotomy
• Tunnel subcutaneously to the thoracotomy, and place the chest tube above the rib
• Secure the chest tube at the skin with a heavy stitch
Anterior Thoracoabdominal Approach to the Thoracic and Lumbar Spine (Video 5-3)
Indications
Anterior Spinal Cord Decompression
Superficial Dissection
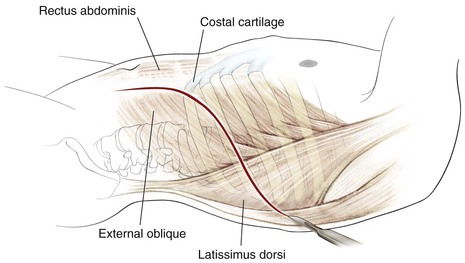
Identify the latissimus dorsi (Fig. 5-54)
• Divide the latissimus dorsi in line with the skin incision
• Because this division is not performed in the intramuscular plane, bleeding can be an issue
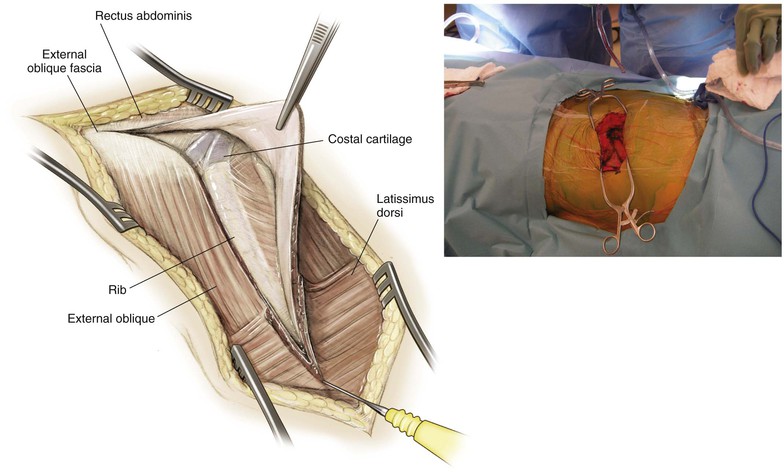
The serratus anterior can be better identified now
• Divide the serratus anterior in line with the incision to expose the rib
Subperiosteally elevate the musculature from the ribs
• Detachment of the muscular attachments
The thoracic cavity can be entered now by cutting the periosteum and pleura above the rib
• Notify the anesthesia team at this point that you are entering the chest
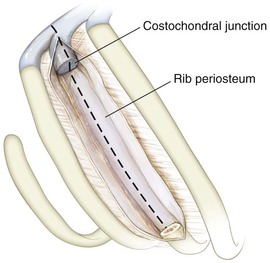
Split the costal cartilage with a knife along its length (Fig. 5-55)
• The preperitoneal fat can be visualized at this time
• Bluntly dissect the peritoneum off the inferior surface of the diaphragm
Next, the three abdominal muscles are sequentially encountered: external oblique, internal oblique, and transversus abdominis (Fig. 5-56)
• See the anterior retroperitoneal approach to the lumbar spine
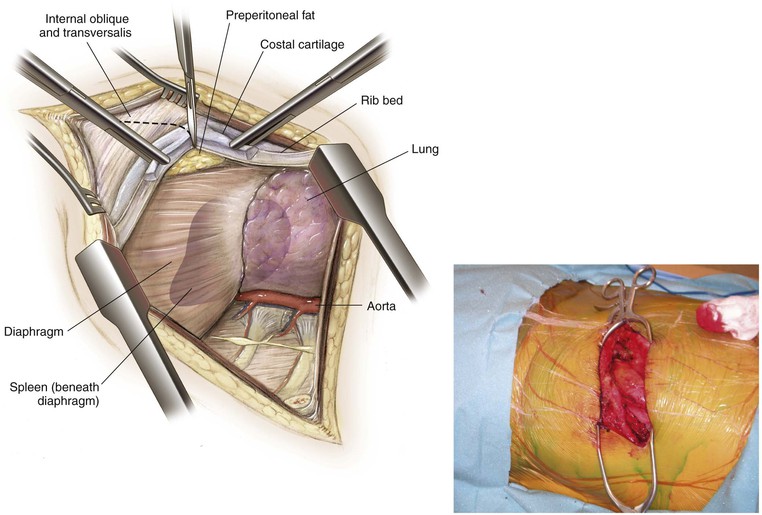
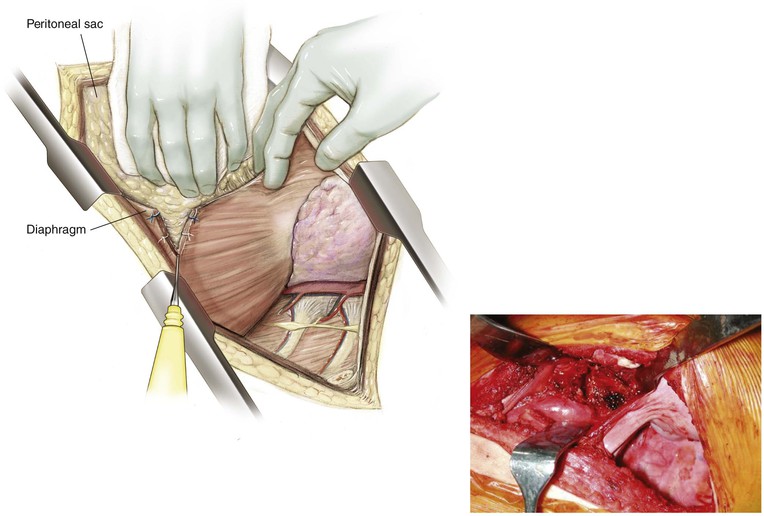
Incise the diaphragm (Fig. 5-57)
• Detach the diaphragm approximately 2 cm from its peripheral attachment to the chest wall
• Mark the diaphragm with suture or ligature clips to allow for accurate reapproximation
Deep Dissection
Insert a rib spreader and abdominal retractor into the respective cavities (Fig. 5-58)
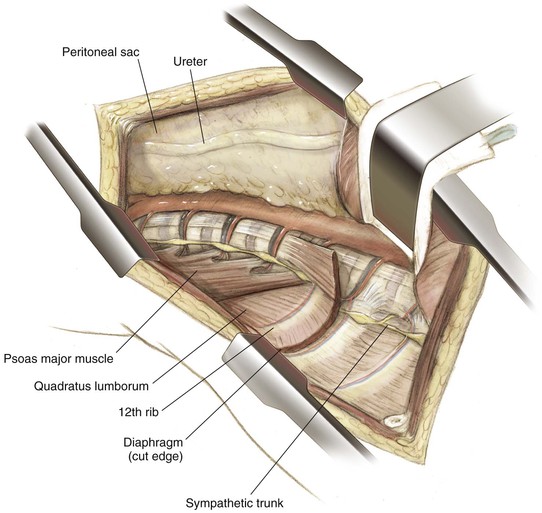
Thoracic cavity (see the thoracic approach)
• The lung can be readily identified
• Identify the posterior mediastinum and associated structures
• The lateral aspect of the spine can be readily identified
Abdominal cavity (see the anterior retroperitoneal approach)
• Identify the psoas fascia, but do not enter the muscle
• Identify and preserve the genitofemoral nerve
• Identify and, if possible, preserve the sympathetic chain
• Identify the segmental vessels as they cross the field at the level of the midvertebral body
Closure
The key to closure is reapproximation of the costal cartilage
• The diaphragm attaches to the superior aspect of the costal cartilage
• The transverse abdominal fascia and abdominal musculature insert into the distal split cartilage
• Carefully repair the diaphragm with interrupted suture based on the predivision markings
Insert a chest tube, and close the chest cavity in the standard fashion
The abdominal musculature is closed in layers in the standard fashion
Anterior Retroperitoneal Approach to the Lumbar Spine (Video 5-4)
Indications
Anterior Spinal Cord Decompression
Positioning
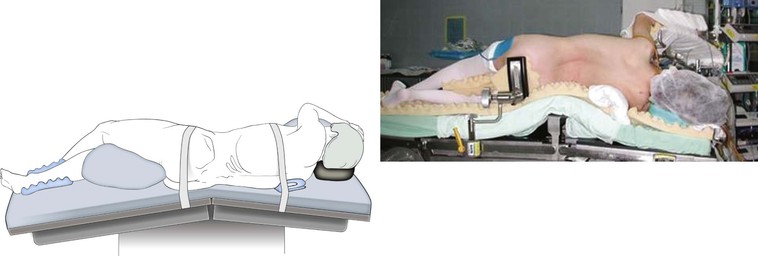
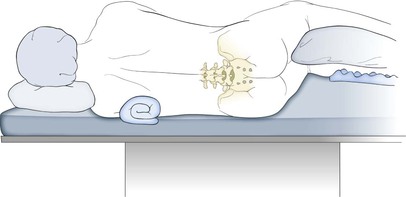
Semilateral or Lateral Decubitus Position (Fig. 5-59)
For deformity, the convexity of the curve is typically oriented up
For decompressions, the side with the greatest stenosis to be addressed typically is oriented up
If both sides are equivalent, the left-sided exposure is typically preferred
Secure the patient firmly to the operating table
• See the description for the anterior transthoracic approach
Flexion of the down leg may help reduce the amount of rolling experienced by the patient intraoperatively
• Pad the bony prominences well, particularly the lateral malleolus and the fibular head
Flexion of the leg on the side of the approach may help reduce psoas tension
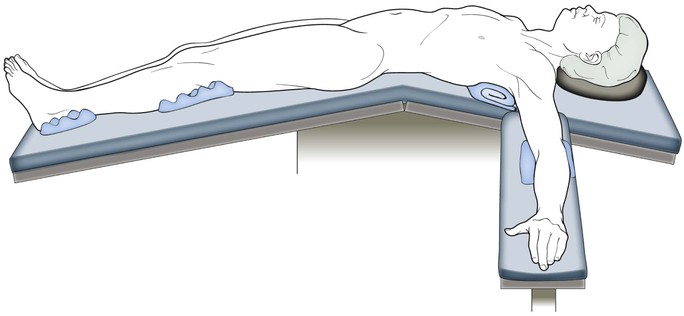
Supine Positioning on the Operating Table (Fig. 5-60)
The supine position is frequently used for total disc replacement
Table hyperextension assists in the exposure
Insert a urinary catheter to decompress the bladder
• Place the patient in the Trendelenburg position
• The Trendelenburg position helps move the abdominal contents superiorly to improve visibility
Hazards
Neural Structures
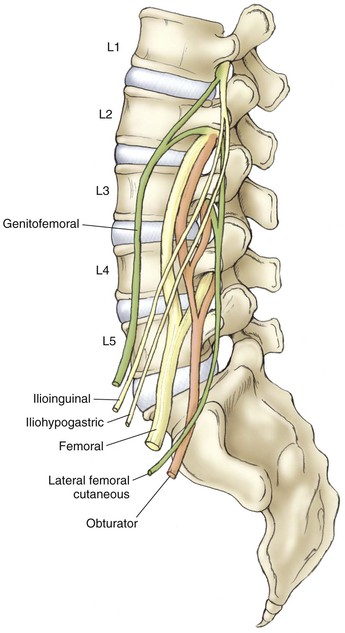
• May be at risk if the substance of the psoas is entered (Fig. 5-61)
• Particularly at risk during the transpsoas/direct lateral approach
• At greater risk more distal within the psoas
• At greater risk more posteriorly within the psoas
• Particularly at risk during approaches to the L4-L5 and L5-S1 disc space
• Use of bipolar electrocautery can reduce the risk of injury
• Injury can lead to retrograde ejaculation in men
• Lies on the anterior border of the psoas muscle
• Injury can result in an increase in warmth to the ipsilateral lower extremity
Incision
Identify the pubic symphysis, ASIS, and inferiormost rib (Fig. 5-62)
• Correlate the number of ribs from preoperative imaging with the number of ribs palpated on the patient after positioning
• Typically the twelfth rib cannot be felt, and the most inferior rib palpated is the eleventh rib
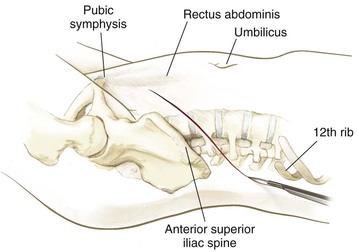
Identify the umbilicus and palpate the lateral border of the rectus abdominis muscle
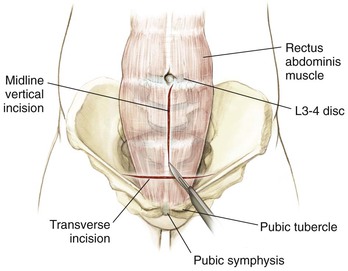
Design the skin incision based on the bony landmarks and the corresponding spinal level to be addressed
• Multiple incisions are described
• Transverse (Pfannenstiel) incision (Fig. 5-63)
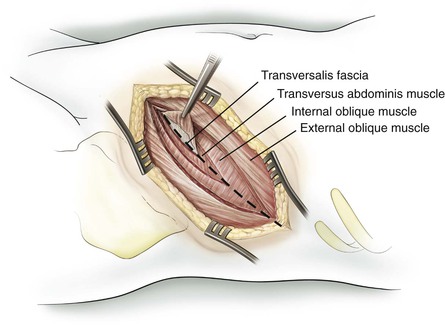
Superficial Dissection (Fig. 5-64)
Deepen the skin incision through the subcutaneous fat
Next, the three abdominal muscles are sequentially encountered: external oblique, internal oblique, and transversus abdominis
• Partial denervation of the muscle may result in a postoperative hernia
The aponeurosis of the external oblique enters into view
• Muscle fiber orientation is from superolateral to inferomedial
• Muscle fibers of the external oblique may not be present below the level of the umbilicus
The internal oblique muscles are identified next
The transversus abdominis is the next muscle to be identified
The transversalis fascia is encountered
• Careful division of the transversalis fascia provides access to the retroperitoneal space
Using blunt dissection, develop the plane between the peritoneum and the retroperitoneal space
• Avoid entering into the peritoneal cavity
Mobilize the peritoneal cavity and its contents anteromedially until the fascia of the psoas is identified
• Do not mistake the quadratus lumborum for the psoas muscle
• The ureter typically is carried forward with the peritoneal cavity
• If any doubt exists, the ureter can be gently stroked with DeBakey forceps to induce peristalsis
Deep Dissection
Identify the psoas fascia, but do not enter the muscle (Fig. 5-65)
• If a transpsoas approach is planned, neuromonitoring should be considered to reduce the risk of lumbosacral plexus injury because the lumbosacral plexus typically runs in the posterior aspect of the psoas (Fig. 5-66)
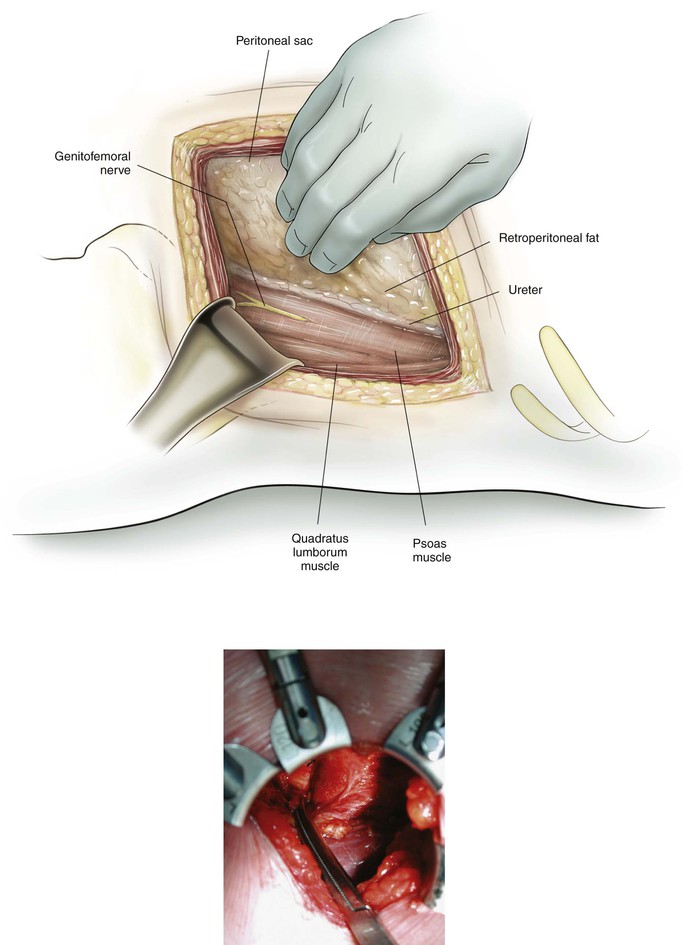
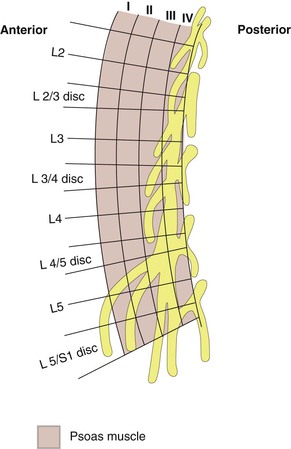
Identify the genitofemoral nerve
• This nerve should be preserved
Identify the sympathetic chain
• The sympathetic chain lies even more anterior and medial to the genitofemoral nerve
• Preserve the sympathetic chain if possible
Identify the segmental vessels as they cross the field at the level of the midvertebral body (Fig. 5-67)
• Depending on the procedure to be performed, these vessels can be either spared or tied and cut
• Access to the anterior portion of the vertebral bodies requires mobilization of the great vessels by ligating the segmental vessels
• Do not cut the lumbar segmental vessels flush with the great vessels
• Identifying the iliolumbar vein is important, particularly for approaches to the L4-L5 disc space
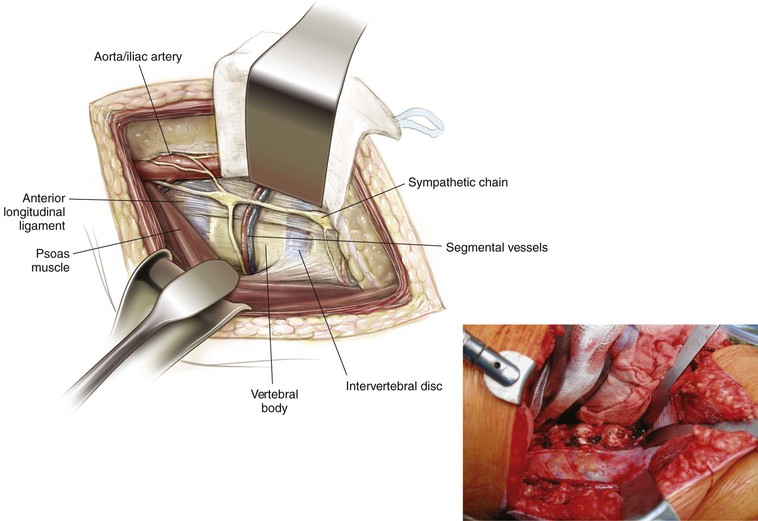
Closure
A careful complete instrument and sponge count should be performed before final closure
Peritoneal contents are allowed to fall back into place
Closure of the abdominal muscles can be performed either in layers or as a single layer
• The muscle fascia provides the strength of closure
Skin and subcutaneous tissues are closed in the standard fashion
Anterior Transperitoneal Approach to the Lumbosacral Spine
Indications
Decompression
Landmarks
Incision (See Fig. 5-63)
Longitudinal, midline from the umbilicus to the pubic symphysis
• Curve the incision just lateral to the umbilicus to allow for appropriate closure
Transverse (Pfannenstiel) incision
• Typically, a more cosmetic but less extensile exposure
• A gentle curved incision approximately 4 to 8 cm above the pubis
Superficial Dissection
Deepen in line with the skin incision down to the rectus sheath
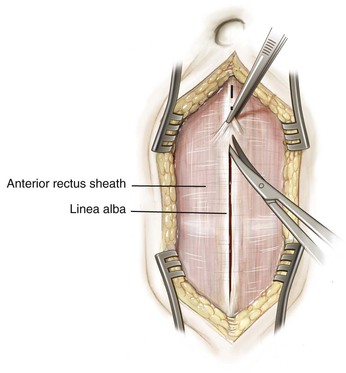
Identify the rectus sheath (Fig. 5-68)
• Incise the sheath in the midline in line with the skin incision
• The linea alba marks the midline of the rectus abdominis muscles
• This landmark is typically more apparent above the umbilicus and less distinct below it
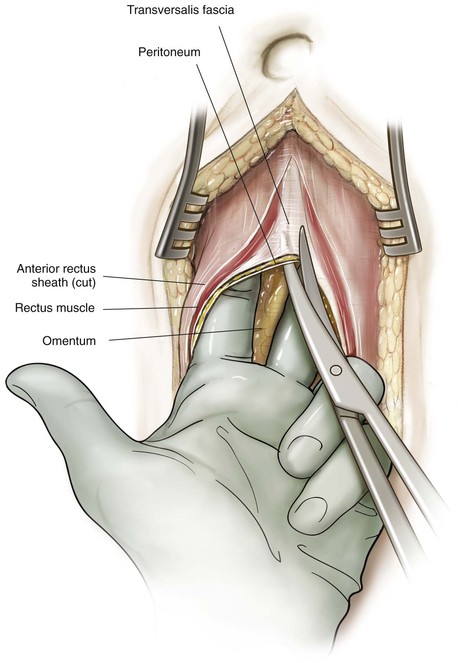
Enter the peritoneal cavity (Fig. 5-69)
• The linea alba may be divided in the midline
• Next, bluntly dissect between the rectus muscles with your fingertips
• Alternatively, the rectus fascia may be divided longitudinally over its lateral margin
Mobilize the rectus medially to expose the posterior rectus fascia
Entering lateral to the rectus allows the surgeon to proceed with either a transperitoneal or a retroperitoneal approach to the lumbar spine
• Identify and carefully incise the peritoneum
• Avoid injury to the underlying structures
• The dome of the bladder is at risk if the incision is distal and deep
• Placing one hand or a moist laparotomy sponge within the abdominal cavity helps protect the viscera
Deep Dissection
Insert an abdominal self-retainer
• Assists in retracting the rectus abdominis and the bladder
• Additional blades may be inserted as needed to provide access to the deep structures
The posterior peritoneum can be seen overlying the retroperitoneal structures (Fig. 5-70)
• Identify the common iliac vein and artery underneath the peritoneum
• Typically, the bifurcation lies at the level of the L4-L5 intervertebral disc or the L5 body
• Identify the ureter passing over the pelvic brim bilaterally
• Palpate the sacral promontory through the posterior peritoneum
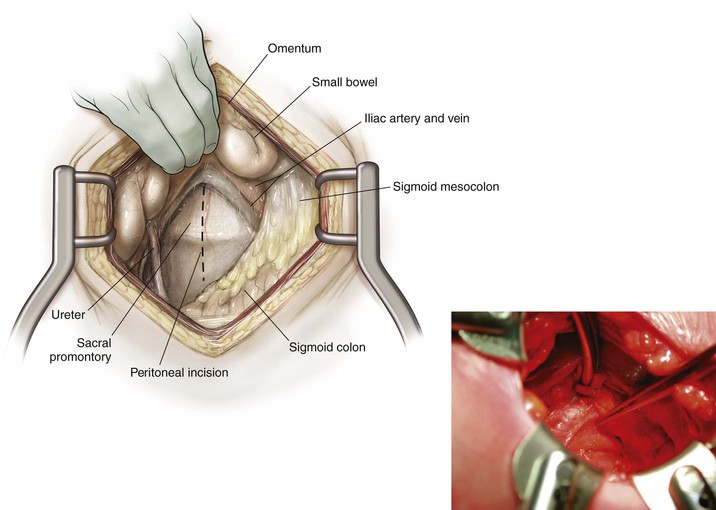
Open the posterior peritoneum by incising it over the sacral promontory (Fig. 5-71)
• Ligate the middle sacral artery, which runs down the anterior sacrum
• Presacral sympathetic nerves (superior hypogastric plexus) also run in this area
• Although variable, most of the fibers overlie the left iliac vessels
• Injury to these nerves may result in retrograde ejaculation and impotence in men
• Expose the presacral space using blunt dissection as much as possible
• Limit the use of monopolar electrocautery if possible
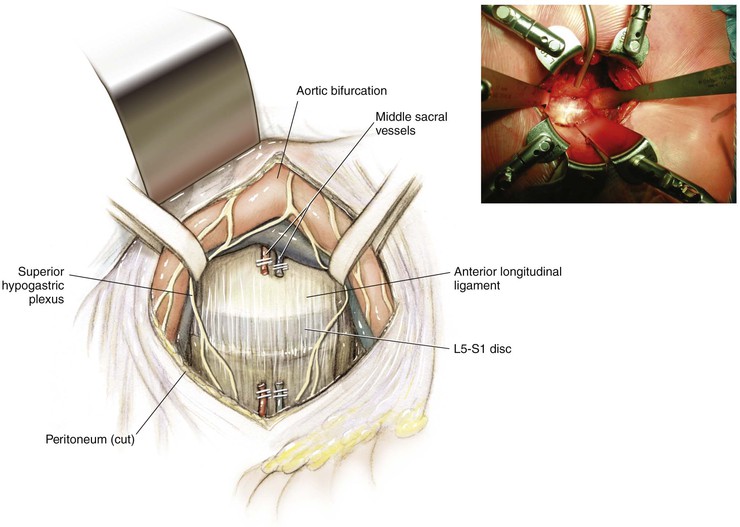
Identify the L5-S1 disc and the sacral promontory
• Confirm the level with an intraoperative radiograph if necessary
Posterior Approach to the Occipitocervical Junction (0-C2)
Indications
Posterior Decompression
Posterior Occipitocervical Fusions and C1-C2 Fusions
Positioning
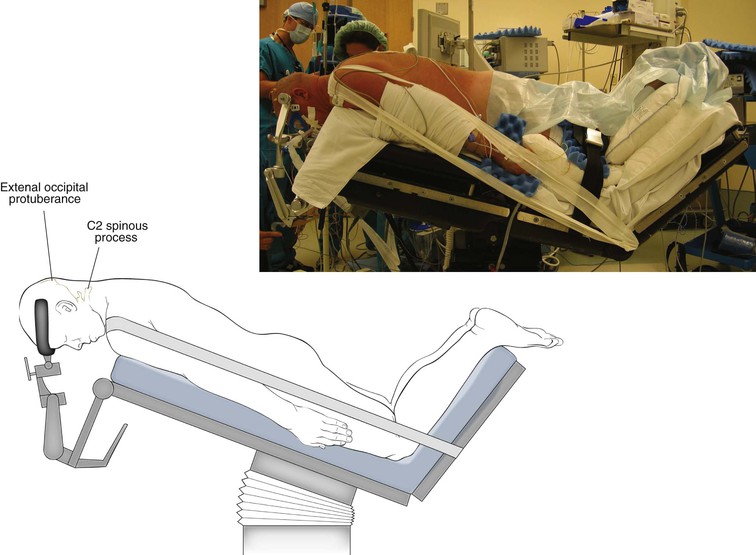
Prone (Fig. 5-72)
• Halo or Mayfield tongs are applied for stabilization
• Head and neck flexion separates the occiput and ring of C1
• Gentle taping of the shoulders inferiorly can improve intraoperative radiographs
• Elevate the operating table 30 degrees to reduce venous bleeding
• Knee flexion prevents the patient from sliding inferiorly during the reverse Trendelenburg position
Hazards
Neural Structures
Spinal Cord; Cervical Nerve Roots
• Lies posterior to the C1-C2 joint
• Injury may result in numbness to the posterior aspect of the skull
Superficial Dissection
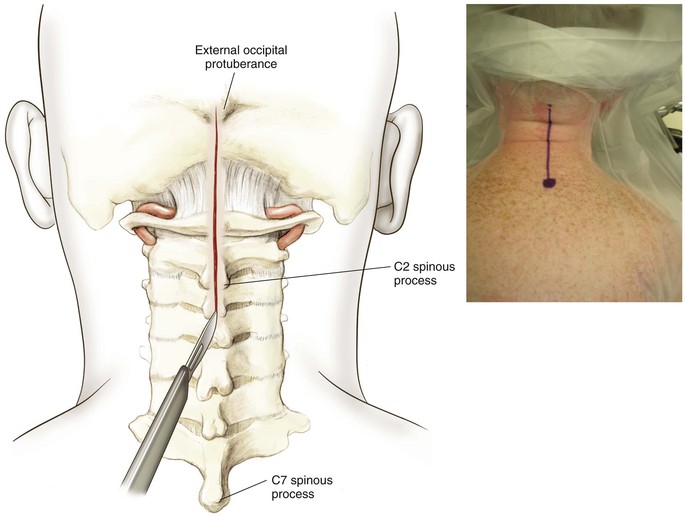
Divide subcutaneous fat and deep cervical fascia in line with the skin incision (Fig. 5-74)
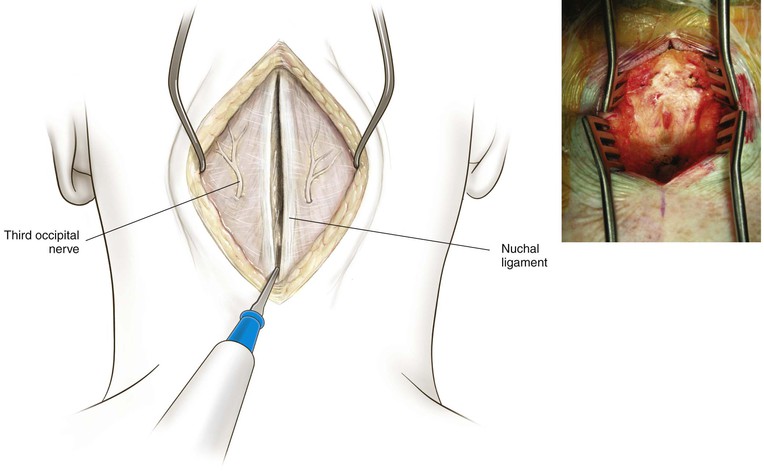
• This plane is relatively avascular and is typically seen as a thin white line in the midline
Deepen the incision to the external occipital protuberance and down to the posterior tubercle of C1 and the bifid spinous process of C2 and C3
• The ring of C1 has no spinous process
• The dissection should be performed carefully to prevent inadvertently entering the spinal canal
Deep Dissection
Expose the Occiput
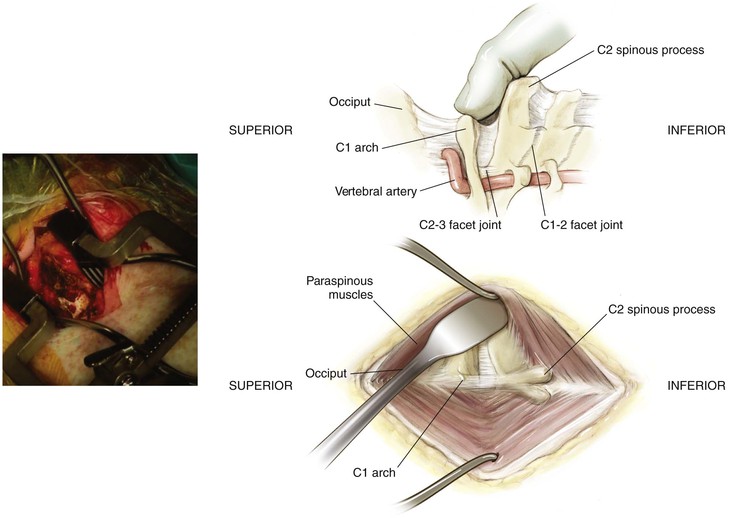
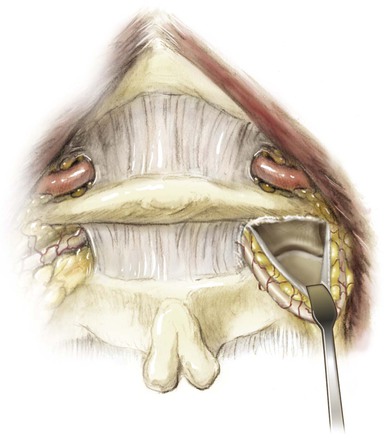
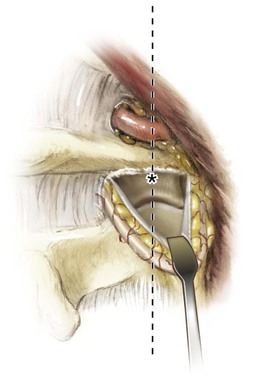
Expose C2
The spinous process of C2 is bifid and typically palpable
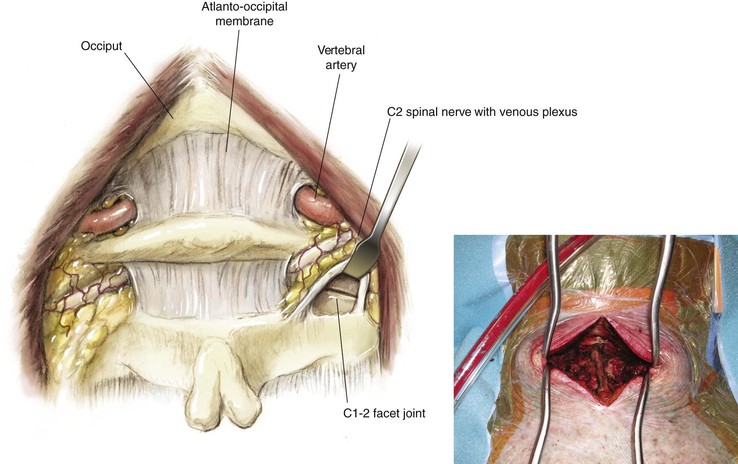
Identify the C1-C2 joint (Fig. 5-78)
• Follow the spinous process to the lamina and then superiorly to the C1-C2 joint
• The C1-C2 joint lies approximately 2 to 3 cm anterior to the facet joint of C2-C3
• A plexus of veins typically overlies the greater occipital nerve
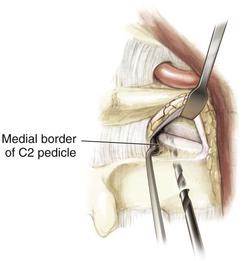
• Enter the C1-C2 joint (Fig. 5-79)
• Allows for visualization of the C1 lateral mass and placement of a C1 screw
• Allows for identification of the medial border of the C2 pedicle for placement of a C2 pedicle screw
Posterior Approach to the Subaxial Cervical Spine and Cervicothoracic Junction (Video 5-5)
Indications
Posterior Decompression of the Spinal Canal and Nerve Root
Superficial Dissection
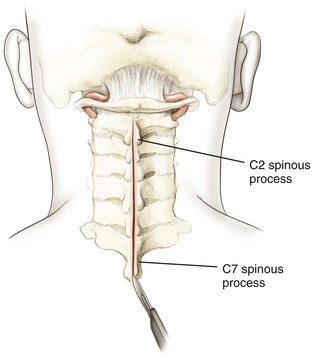
Divide subcutaneous fat and deep cervical fascia in line with the skin incision (Fig. 5-81)
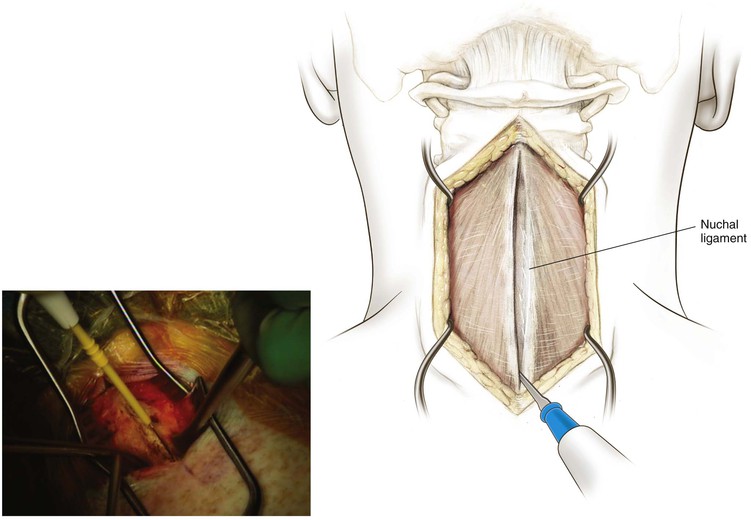
Identify the nuchal ligament (see previous description)
The supraspinous and interspinous ligaments should be protected during the initial dissection
Subperiosteally, follow the spinous process out laterally first onto the lamina and then to the lateral mass (Fig. 5-82)
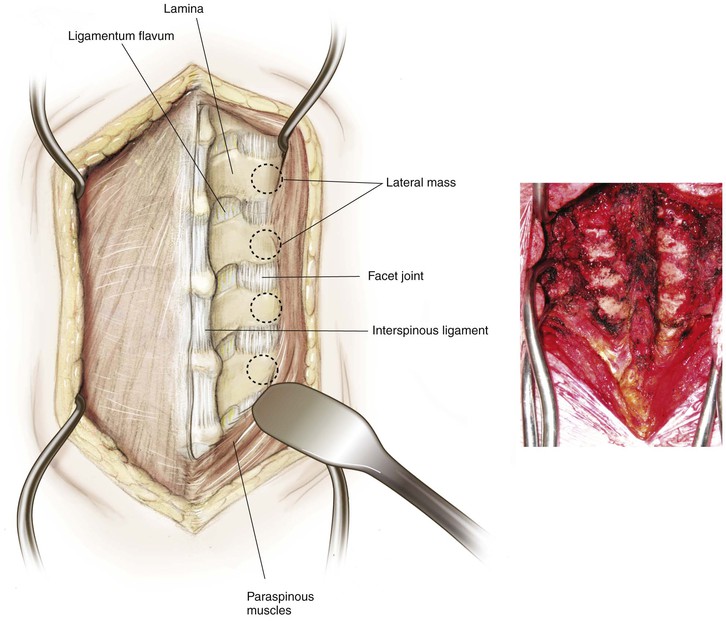
If possible, protect the facet capsule unless a fusion is to be performed at that level
The lateral mass is the rectangular mass of bone that lies between the superior articular and inferior articular facet of the same vertebra
Exposure of the cervicothoracic junction
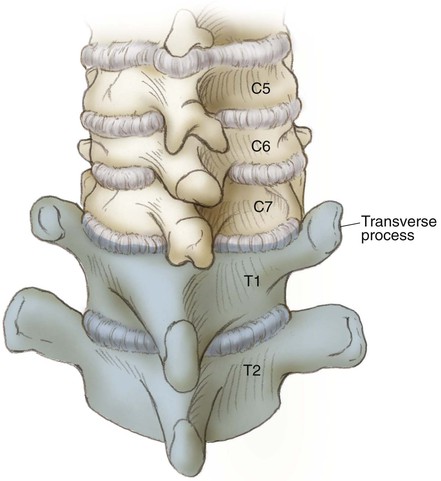
• The posterior cervicothoracic junction typically can be identified by the characteristic bony landmarks
• This situation is in contradistinction to the T1 transverse process, which is readily identified and travels in a lateral superior direction and is partially overlapped by the C7 lateral mass, giving the C7-T1 junction a distinct anatomic appearance (Fig. 5-83)
Deep Dissection
Identify the ligamentum flavum running between the lamina
• Using a fine curette, carefully detach the ligamentum flavum from the lamina
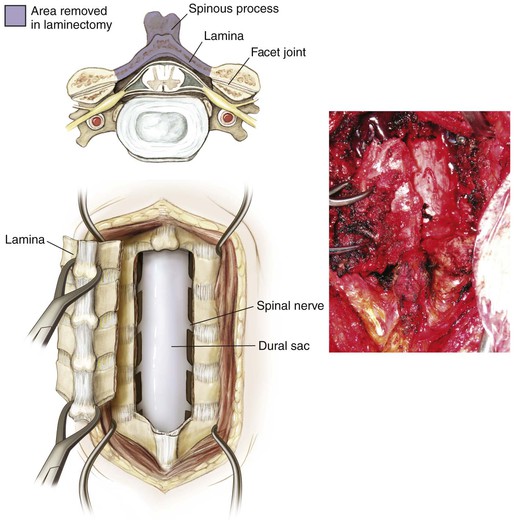
Laminectomy or Laminotomy (Fig. 5-84)
Multilevel Laminectomies
Complete the trough using a 1- or 2-mm Kerrison rongeur
Carefully remove the ligamentum flavum at the superior and inferior edges of the decompression
Carefully remove the lamina en bloc using multiple towel clips secured into the spinous processes
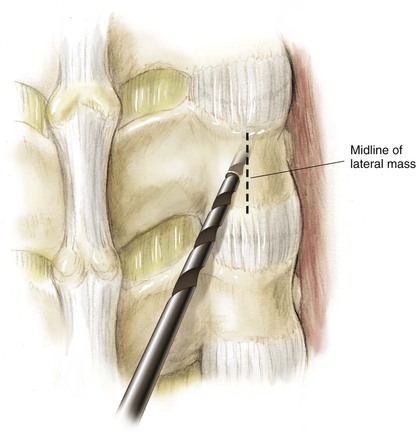
Depending on the level, consideration should be given to placement of either lateral mass or pedicle screws (Fig. 5-85)
Keyhole Laminoforaminotomy
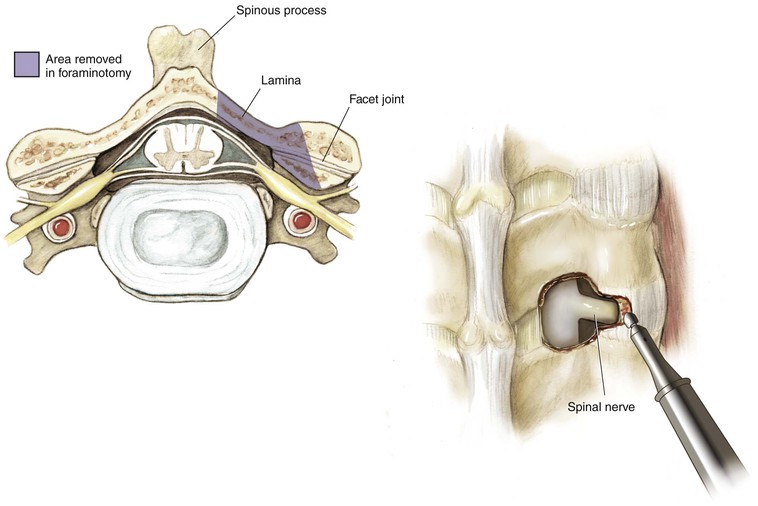
Create a laminotomy at the level of interest, as described previously (Fig. 5-86)
• This procedure forms the circular portion of the “keyhole”
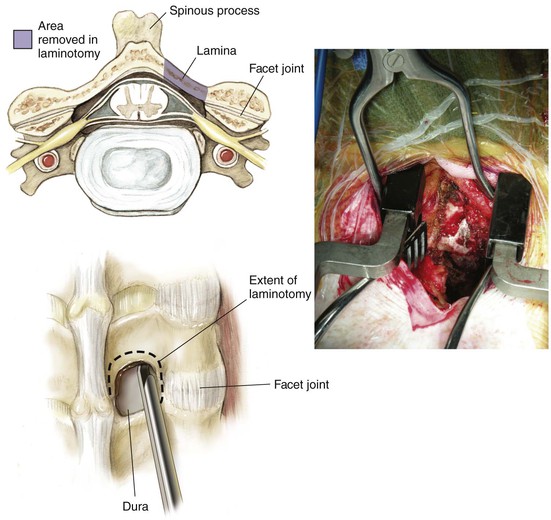
Trace the path of the exiting nerve root with a Woodson instrument or nerve hook
Using a power burr, thin the medial 50% of the facet joint (Fig. 5-87)
• Perform this maneuver from a medial to lateral direction
• Remove the remaining thinned bone with a Kerrison rongeur
• Do not remove more than 50% of the facet
• If more than 50% is removed, a fusion should be included
Pedicle screw fixation is not routinely placed in the cervical spine
• In selected cases, pedicle screws can be placed at levels from C2 to C7
• Lateral mass screws are typically used from C3 to C6
Epidural bleeding can be brisk and difficult to control during any portion of the deep dissection
• Use of thrombostatic agents and Neuropaddies typically can control most bleeding
Posterior Midline Approach to the Thoracic Spine (Video 5-6)
Indications
Posterior Decompression of the Spinal Canal and Nerve Root
Superficial Dissection
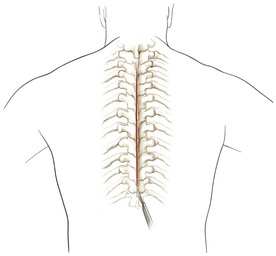
Identify individual spinous processes (Fig. 5-90)
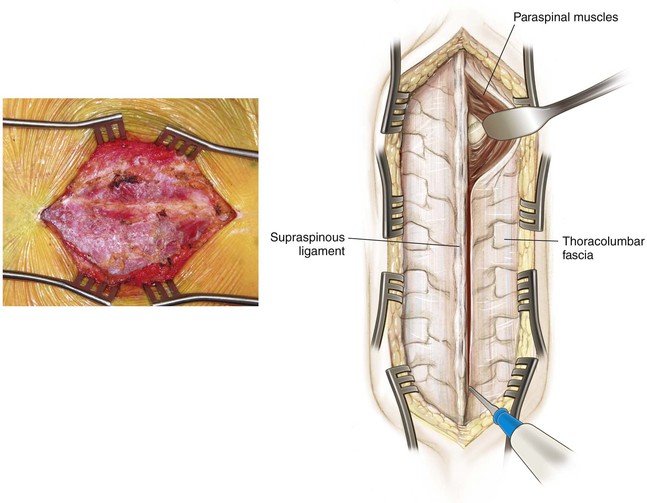
Subperiosteally dissect off the paraspinous musculature bilaterally
• In adults, identify and preserve the supraspinous and interspinous ligaments whenever possible
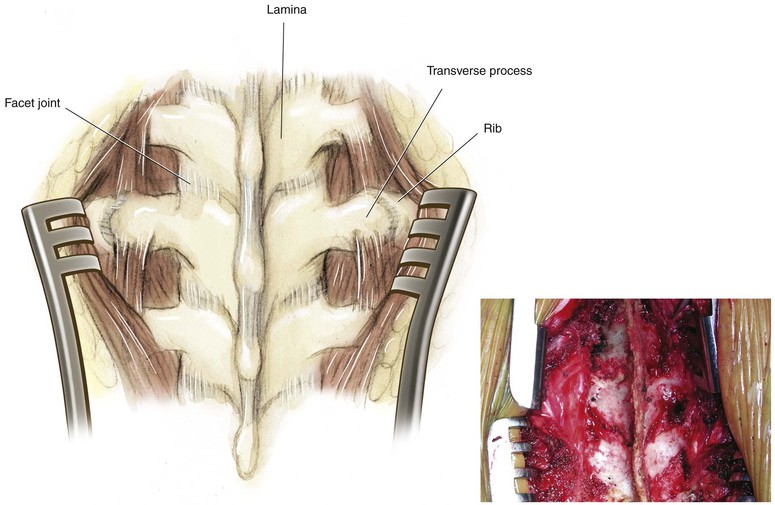
Expose the lamina and transverse processes bilaterally (Fig. 5-91)
• The transverse processes of the thoracic spine are oriented laterally and superiorly
Deep Dissection
Laminotomy/Laminectomy
Using a combination of the Woodson instrument and curettes, carefully develop the plane between the ligamentum and the inferior aspect of the superior lamina
• If the lamina is too thick, it can be carefully thinned using a rongeur or power burr
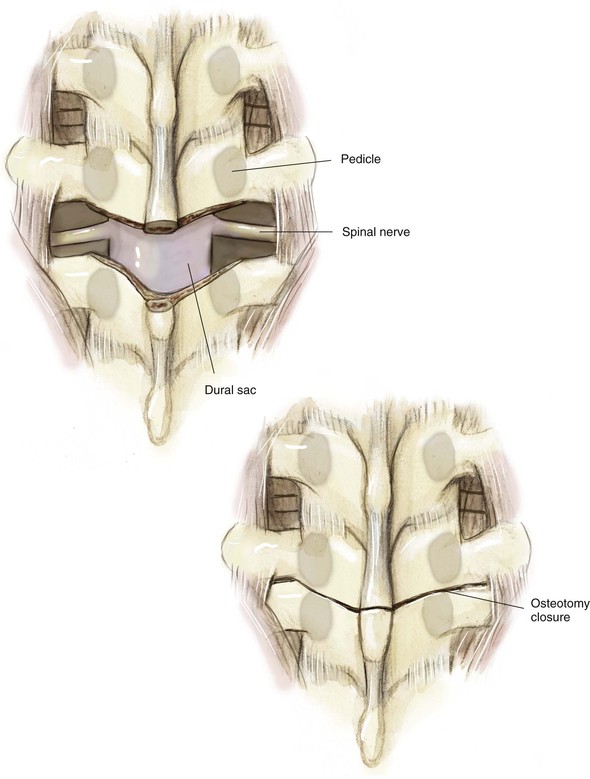
Multiple Posterior Wedge (Modified Smith-Petersen or Ponte) Osteotomies (Fig. 5-92)
The number of levels should be based on the magnitude of kyphosis to be corrected
Each osteotomy is a wedge-shaped “V”
• Begin medially and carefully enter into the spinal canal as described previously
• Using a Woodson instrument, carefully palpate the medial wall of the pedicle
• Each osteotomy is performed superior to the corresponding pedicle through the neuroforamen of the level above
• This maneuver exposes the superior articular facet of the vertebra below
• Next, remove the superior articular facet using a Kerrison rongeur
• This removal is performed bilaterally at as many levels as planned
Identification of the Thoracic Pedicle
Posterior Extracavitary/Costotransversectomy/Posterolateral Approach to the Thoracic Spine
Indications
Decompression
Incision
Palpate the spinous processes in the midline (Fig. 5-94)
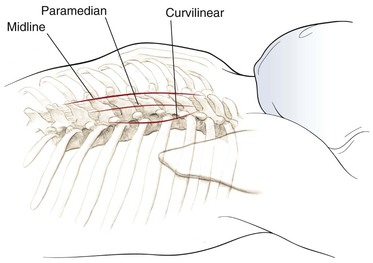
Confirm the level with intraoperative radiographs to help plan the surgical incision
Several skin incisions have been described
• Midline longitudinal over the spinous process
• Approximately 2.5 cm lateral to the spinous process
• “T” incisions also have been described but are typically not required
Superficial Dissection
Divide subcutaneous tissue in line with the skin incision
• If a midline approach is used, then this exposure will be analogous to the posterior midline approach to the thoracic spine
• Superiosteally dissect off the paraspinous musculature either bilaterally or unilaterally, depending on the pathologic condition being addressed (see Fig. 5-90)
• Expose the lamina and transverse processes out to the tip (see Fig. 5-91)
• Expose onto the rib and rib–transverse process articulation (Fig. 5-95)
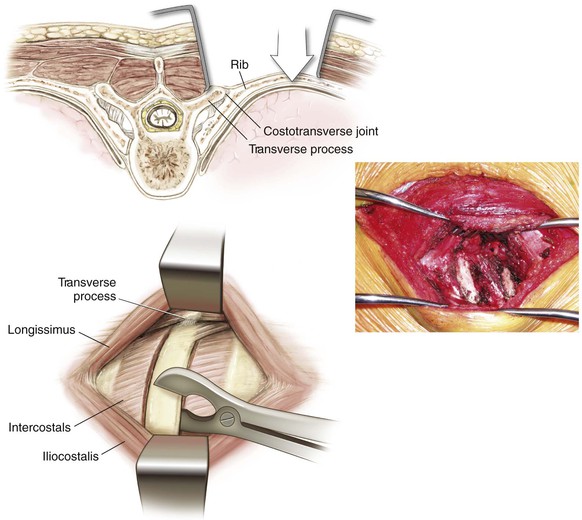
• If a paramedical approach is used, then a slightly more lateral approach and plane is developed
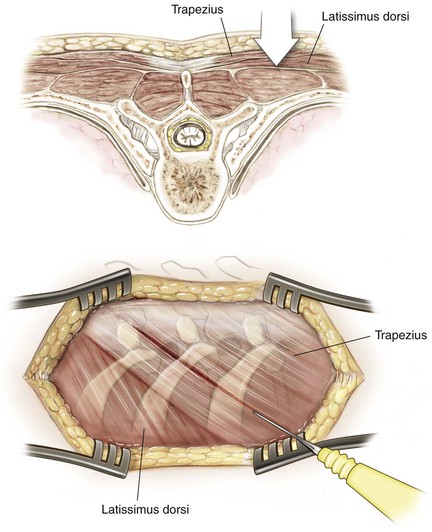
• Identify the trapezius as the next muscle layer, and split it in line with the incision (Fig. 5-96)
• The trapezius is innervated by the spinal accessory nerve proximally and is not denervated
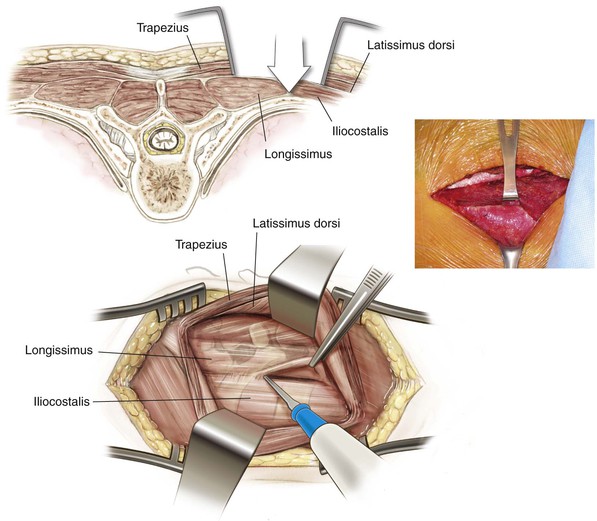
Next, identify the erector spinae and transversospinales muscles (deep paraspinal muscles), and divide these muscles in line with the incision (Fig. 5-97)
• These muscles are segmentally innervated and are not significantly denervated by this approach
Identify the junction of the rib–transverse process articulation (see Fig. 5-95)
Deep Dissection
The amount of rib resection varies based on the exposure required (2 to 8 cm of rib from the midline; Fig. 5-98)
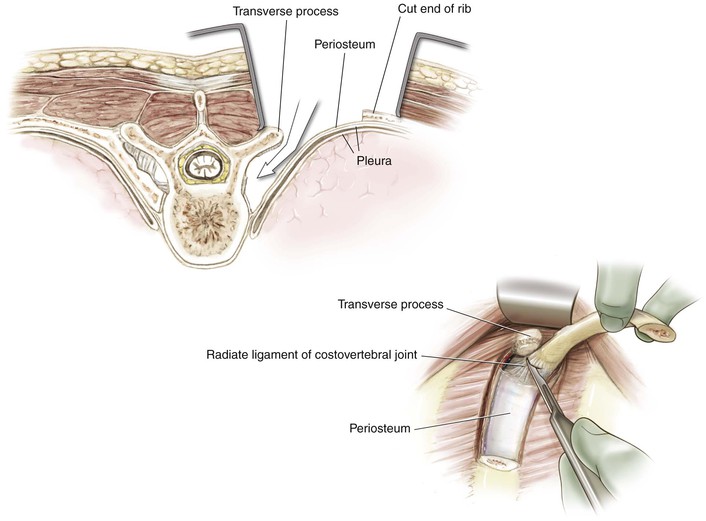
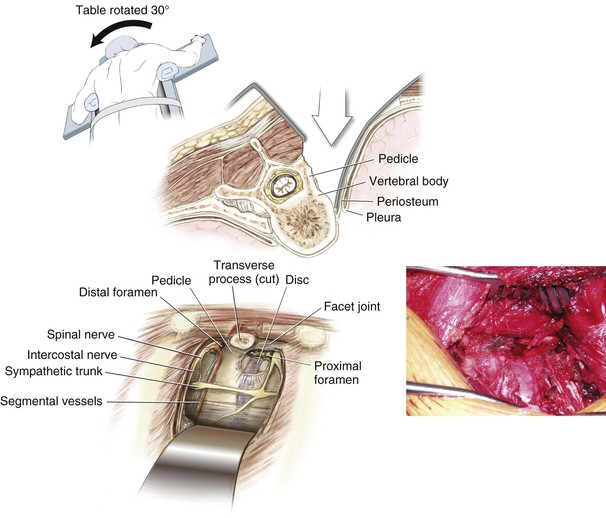
Enter the retropleural space and identify the lateral vertebral body and corresponding disc space (Fig. 5-99)
• Avoid entering the pleural cavity if possible
• Rotating the patient away from the side of the surgical exposure can improve visualization of the lateral aspect of the vertebral body
• This maneuver can be performed at several levels as necessary
Closure
If the pleural cavity has not been entered, a chest tube is not necessary
• If the chest cavity has been entered, a chest tube should be placed
• Make a skin incision for the chest tube one to two ribs inferior to the level of the rib resection
• Subcutaneously, tunnel superiorly up to the level, and place the chest tube above the rib
• Place the chest tube posteriorly and superiorly toward the apex of the chest
• Secure the chest tube at the skin with a heavy stitch
Skin and subcutaneous tissues are closed in a standard fashion
Posterior Midline Approach to the Lumbar Spine (Video 5-7)
Indications
Decompression
Positioning
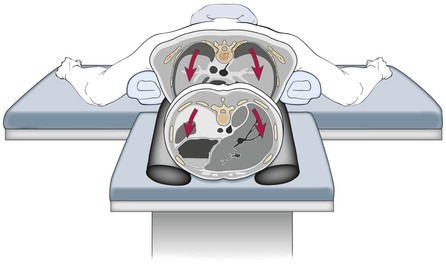
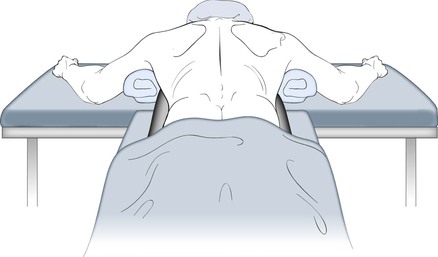
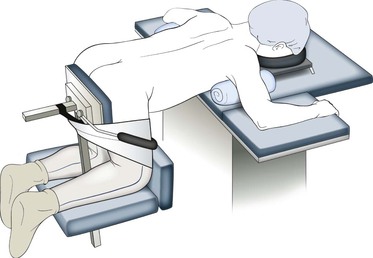
Prone (See Fig. 5-88)
Use well-padded, longitudinally placed bolsters
• Make sure the chest wall is free to allow for chest expansion
Hazards
Neural Structures
Superficial Dissection
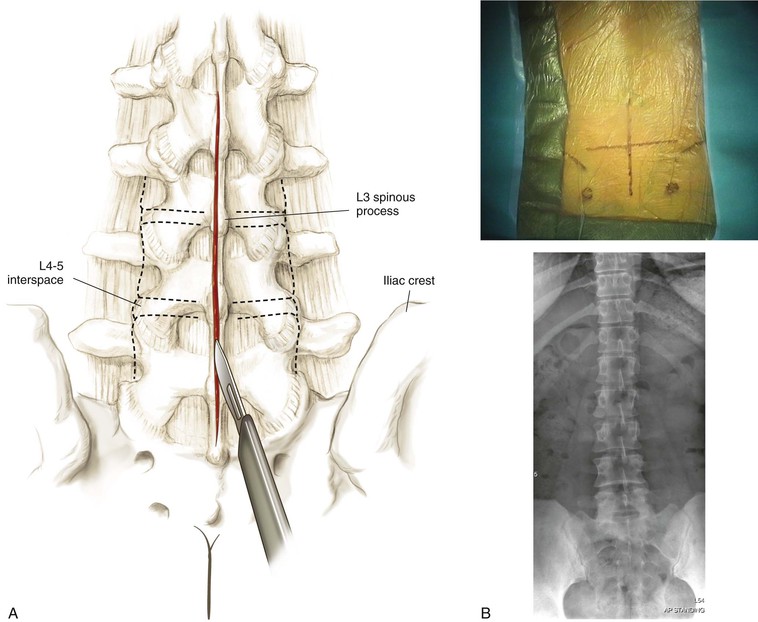
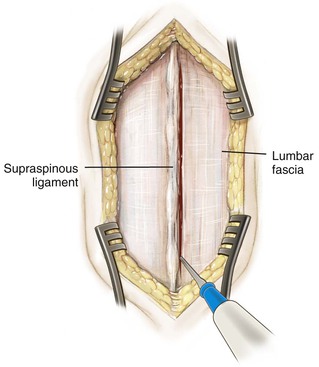
Divide the fat and fascia in line with the skin incision (Fig. 5-104)
Palpate for the spinous process intermittently to help identify the midline
• This palpation is particularly important in larger patients and patients with scoliotic deformity
Using a Cobb elevator, dissect down to the spinous process
Detach the paraspinous muscles subperiosteally from the midline (Fig. 5-105)
• Subperiosteal dissection helps reduce bleeding
• In young patients, the tips of the spinous process are cartilaginous apophyses
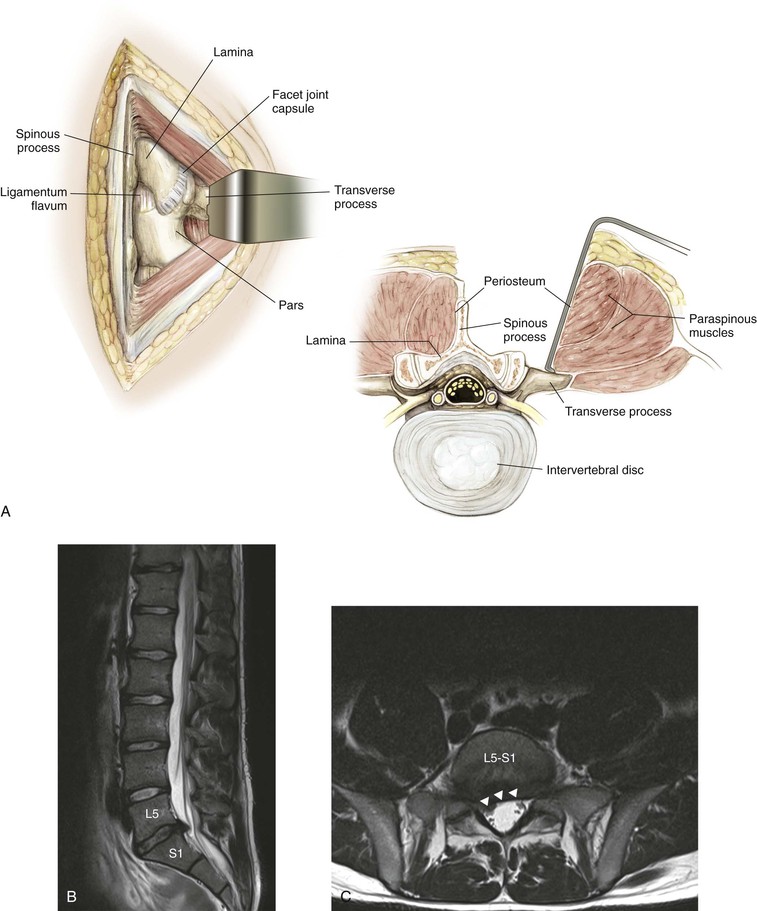
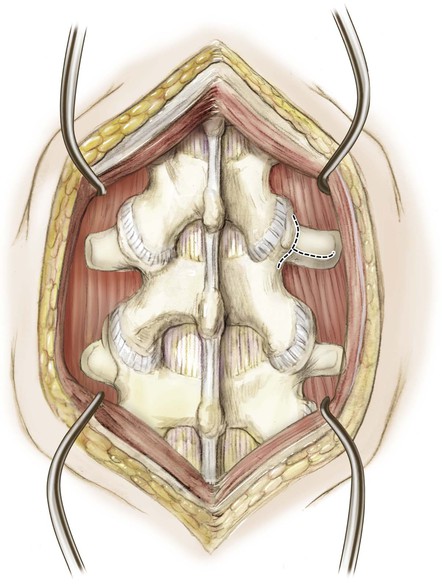
Follow the spinous process laterally to the lamina and out to the facet joint capsule (Fig. 5-106)
• If a fusion is not planned, preserve the facet joint and overlying capsule
• Facet joints in the lumbar spine are oriented in a parasagittal plane
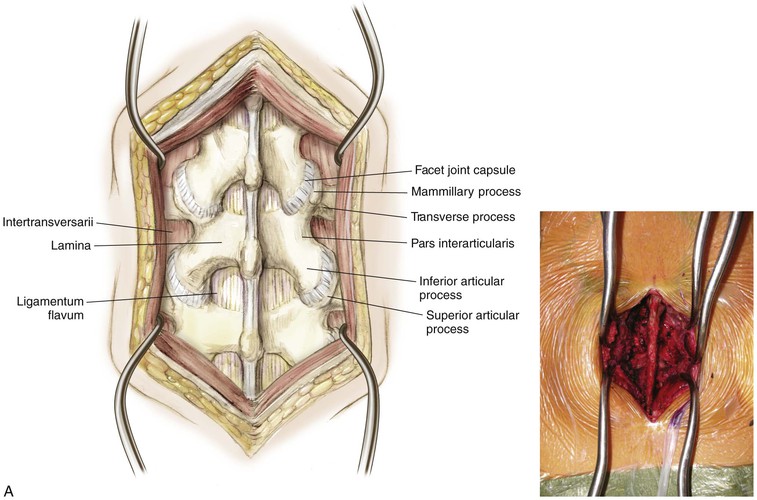
Identify the pars interarticularis
• This structure lies between the superior and inferior articular facet of the same vertebra
If necessary, the dissection can be continued laterally to the mammillary process, then onto the transverse process
• Care should be taken to stay on the transverse process. Straying inadvertently deep to the intertransverse ligament can result in injury to the exiting nerve root
• Occasionally, excision of a far lateral disc requires that the intertransverse ligament be divided
• Dissection lateral to the facet joint may result in injury to the articular branches of the segmental vessels
Deep Dissection
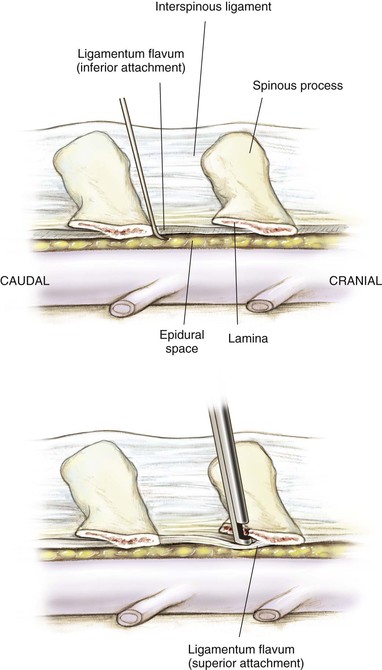
Identify the ligamentum flavum (Fig. 5-107)
• The superior attachment is on the superior lamina halfway up its anterior/undersurface
• The inferior attachment on the inferior lamina is at its superior (leading) edge
Variable amounts of epidural fat are seen upon entering the spinal canal
Immediately beneath the epidural fat is the blue-white dura
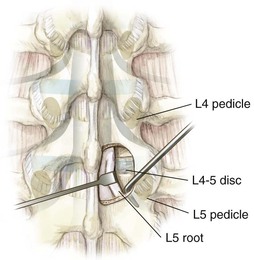
Success for almost all procedures in the lumbar spine lies in identifying the location of the pedicle (Fig. 5-108)
• The disc space lies just superior to the pedicle
Identify the pars interarticularis
• The pars interarticularis should be exposed and defined during the superficial dissection
• Bilateral pars defects result in segmental instability and an iatrogenic spondylolisthesis
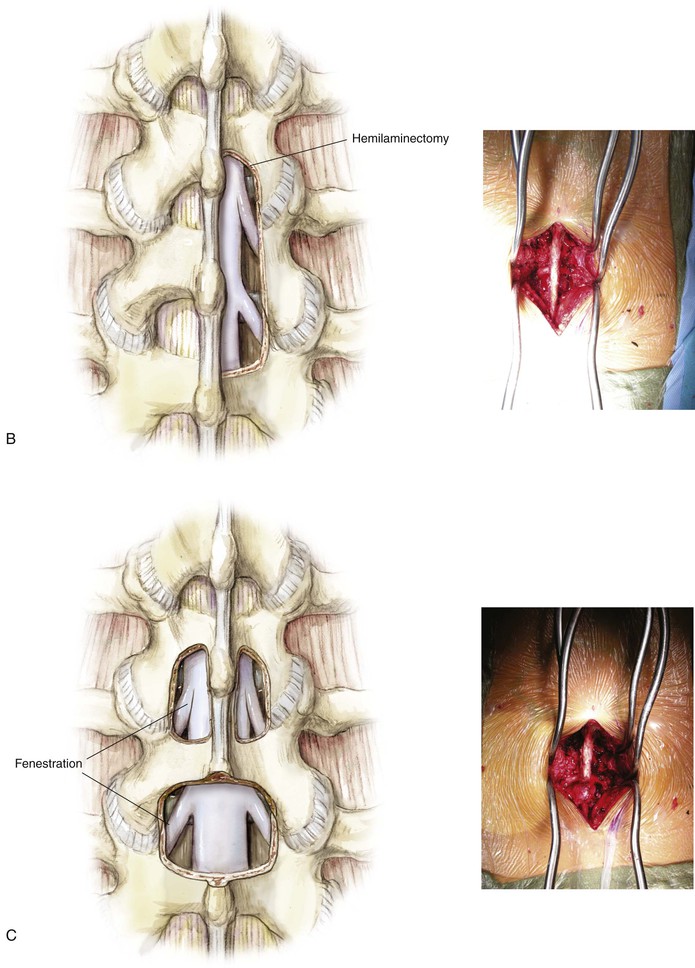
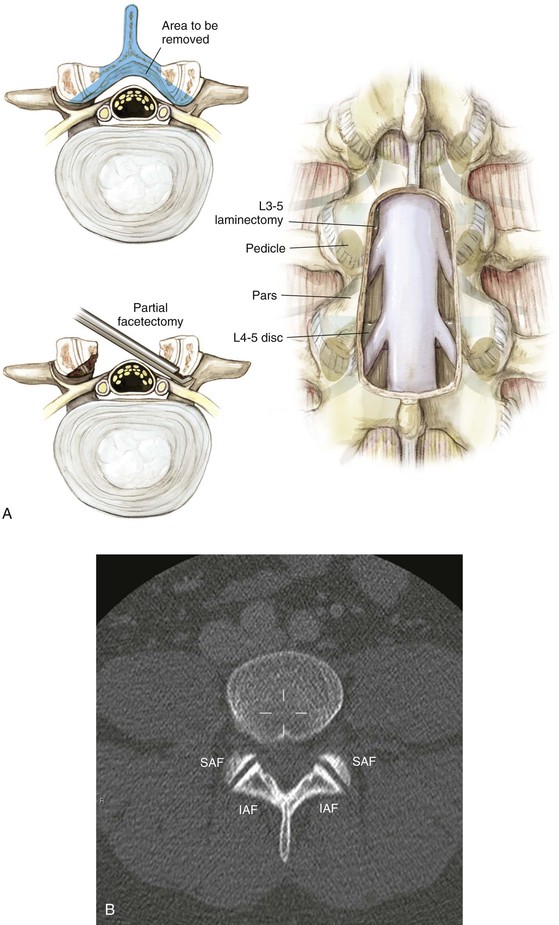
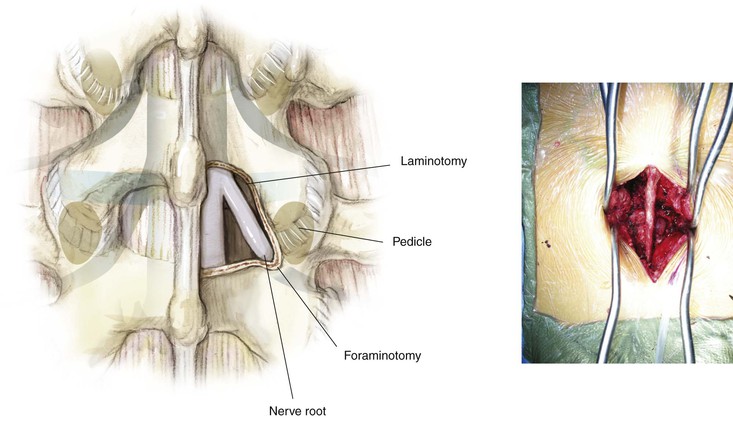
Laminotomy/laminectomy (Fig. 5-109)
• Depending on the etiology and location of the spinal compression, a laminotomy (windowing), a laminectomy, or a variation of the two can be used to gain access to the spinal canal (Fig. 5-110)
• The most common location for disc herniations remains posterolateral
• A natural weakening occurs just lateral to where the posterior longitudinal ligament begins to thin
• In the case of neuroforaminal stenosis, direct nerve impingement can result from facet capsule hypertrophy or bony osteophytes
• This typically results in impingement of the nerve root exiting at that level
Identification of the lumbar pedicle (Fig. 5-111)
• Use of fluoroscopic guidance can assist in pedicle localization
• Anatomic landmarks for the pedicle entry site
• Variations exist, but typically the entry site can be identified by the confluence of several lines
• The line bisecting the midpoint of the transverse process
• The lateral edge of the superior articular facet
• The superomedial edge of the mammillary process
• A curvilinear line following the pars proximally to the crossing point of the other lines
Posterior Muscle-Splitting Approach to the Lumbar Spine
Indications
Decompression
Landmarks
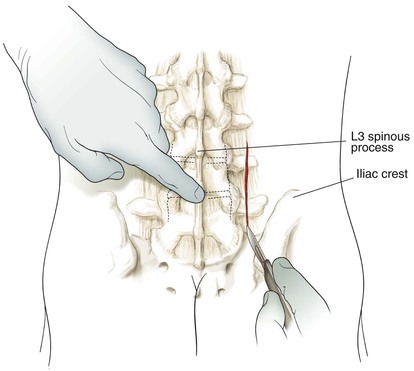
Before making the surgical incision, identification of the appropriate landmarks is vital
• The spinous processes are easily palpable
• The gluteal cleft helps identify the midline distally
• Identify the cephalad and caudal levels
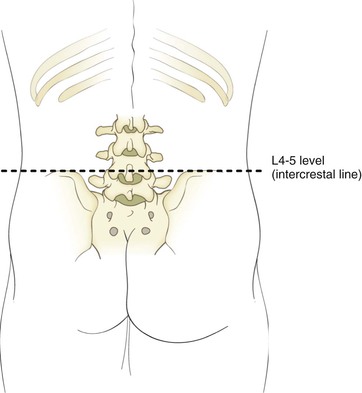
• Superior aspects of the iliac crest help identify the approximate level of the L4-L5 interspace
• The use of fluoroscopy before the surgical incision can be useful, especially for percutaneous and limited-open techniques
• Identify the middle of the pedicle on the anteroposterior view
• Identify the level of the intervertebral disc space on the anteroposterior view
• Identify the direction of the intervertebral disc on the lateral fluoroscopic view
Superficial Dissection
Divide the skin and subcutaneous tissue down to the lumbodorsal fascia (Fig. 5-113)
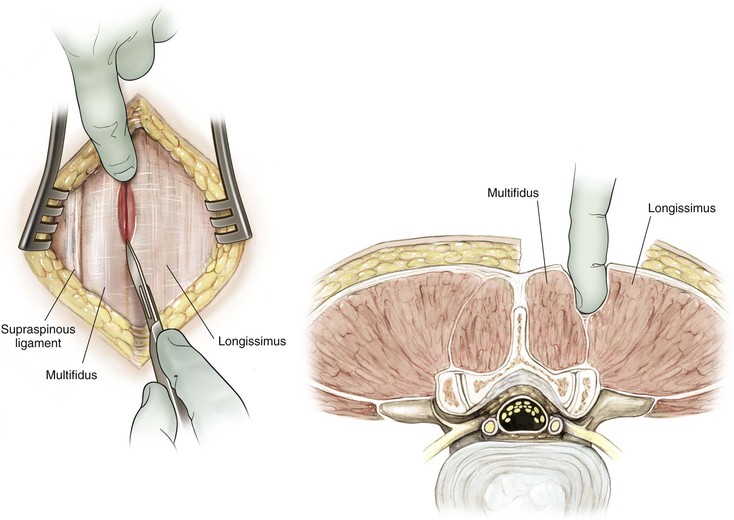
Gently feel for the natural interval between the multifidus and longissimus with the fingertip
• Sharply divide the fascia longitudinally with either electrocautery or a scalpel blade
With use of blunt dissection, this plane can be gently developed down to the lumbar spine
• This procedure can be done with finger dissection or over sequential dilators
• If the proper plane is identified and developed, this approach is relatively bloodless
When the appropriate location is identified, retractors are placed
• Currently, dozens of commercially available retractors are available
• Alternatively, for limited-open procedures, a traditional Taylor retractor can be used
• Place the spike tip just lateral to either the facet joint or the pars interarticularis
• Care should be taken not to place the spike tip inadvertently within the neuroforamen
Deep Dissection
Far Lateral Disc
Identify the transverse processes superior and inferior to the herniated disc
Identify the pars interarticularis
Retract the muscle off the intertransverse ligament (Fig. 5-114)
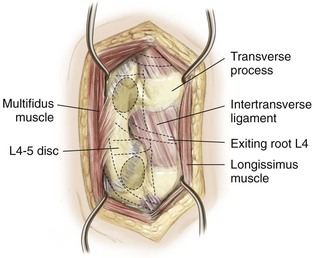
Detach the intertransverse ligament (Fig. 5-115)
• This procedure can be performed with a combination of a straight and curved curette
• Detach the intertransverse ligament from the superior transverse process and pars
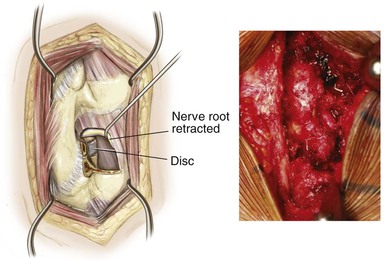
Identify the exiting nerve root, traversing just below the pedicle
Identify the intervertebral disc just inferior to the exiting nerve
Transforaminal Approach
Identify the inferior articular facet of the superior vertebra
This procedure now exposes the superior articular facet of the inferior vertebra
• Remove the superior articular facet down to the pedicle
• Care should be taken to identify and protect the common dural sac
The intervertebral disc is clearly exposed just above the inferior pedicle
• Depending on the amount of exposure required, the exiting nerve root may or may not be identified
Anterior Iliac Crest Bone Graft (Video 5-8)
Indications
Bone Graft Harvest
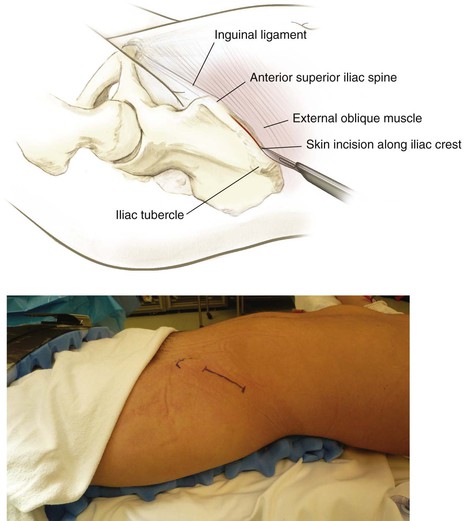
Superficial Dissection
Deepen in line with the skin incision down to the iliac wing
• Do not stray anterior to the ASIS
• Lateral femoral cutaneous nerve
• Typically, it runs 1 cm anterior to the ASIS underneath the inguinal ligament
• Takes origin off of the ASIS
• Do not inadvertently cut or detach the inguinal ligament, which can result in an inguinal hernia
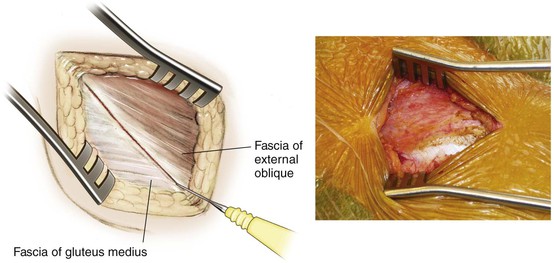
Identify the natural raphe between the fascia overlying iliac wing (Fig. 5-117)
• Fascia of external oblique anteriorly
Deep Dissection
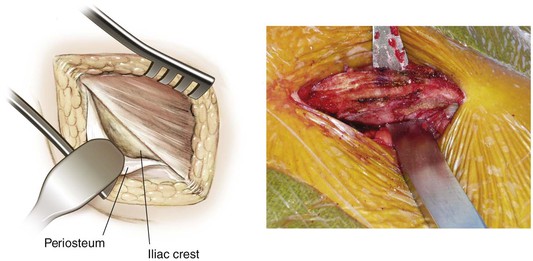
Subperiosteal Dissection (Fig. 5-118)
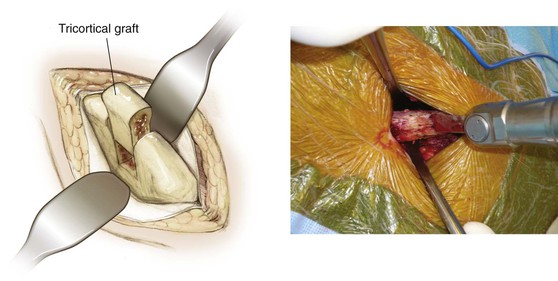
Osteotomies (Fig. 5-119)
• Make the osteotomy at least 2 cm from the ASIS
• Reduces risk of iatrogenic ASIS avulsion
• Make parallel osteotomies to ensure that the graft has parallel end plates
• Measure the length and depth of the graft required
• One-level and two-level grafts are typically obtained without difficulty
• Insufficient crest may be available for longer strut grafts
• The natural curvature of the iliac wing also may prohibit long strut grafts
Posterior Iliac Crest Bone Graft (Video 5-9)
Indications
Bone Graft Harvest
Deep Dissection
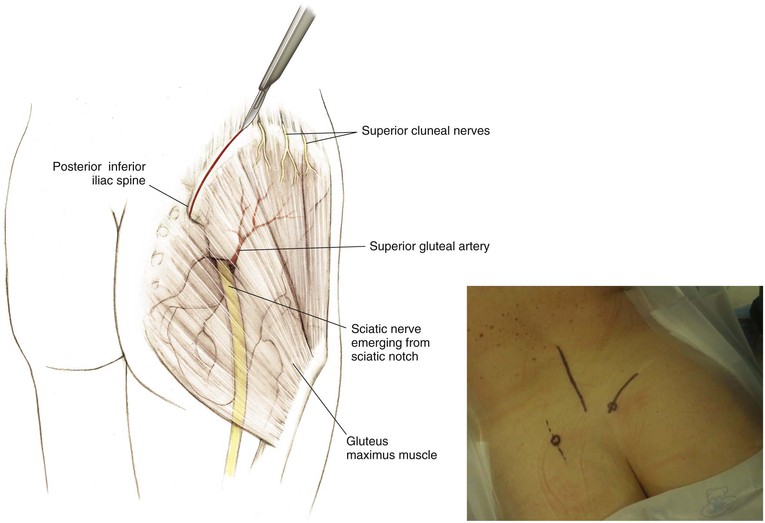
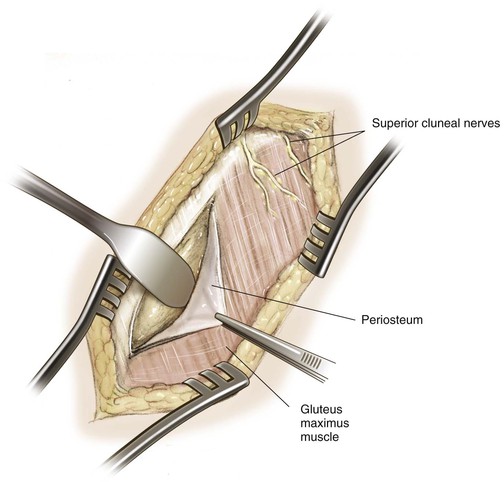
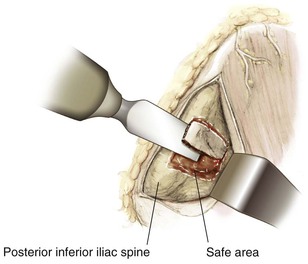
Exposure of the Outer Table (Fig. 5-121)
[/level-membership-for-orthopaedics-category][not-level-membership-for-orthopaedics-category]
Spine
Francis H. Shen
Regional Anatomy and Surgical Intervals
Regional Anatomy
Osteology
Occiput (Fig. 5-1)
External occipital protuberance (inion)
• Thickest portion of bone (4-18 mm)
Cervical Vertebrae (Fig. 5-2)
• A ring that lacks a centrum and spinous process
• The groove for the vertebral artery sits posterior and superiorly
• Prominent bifid spinous process
• The superior articular facet lies anterior to the inferior facets
• Spinal canal triangular configuration
• The sagittal diameter varies from 17 to 18 mm (C3-C6) to 15 mm (C7)
• Lateral masses are thinnest at C6 and C7
Arthrology
Cervical
• 50% of cervical flexion-extension
• Tectorial membrane (after the foramen magnum it becomes the posterior longitudinal ligament)
• Anterior longitudinal ligament (continues throughout the mobile spine)
• Posterior occipitoatlantal and anterior occipitoatlantal ligaments
• One apical and two alar ligaments
Uncovertebral joint (Fig. 5-7)
• Not a true diarthrodial joint
• Forms the anterior border of the neuroforamen
• Shingled with the superior articular facet anterior to the inferior articular facet
Lumbar and Sacrum (Fig. 5-9)
Muscles
Anterior
Posterior
Nervous System
Spinal Cord (Fig. 5-15)
Continuation of the medulla as it exits the foramen magnum
Terminates as the conus medullaris at T12-L1 or L2-L3
Continues caudally as the cauda equina
The spinal cord diameter is largest at the C6 vertebra
Three meninges: dura (outermost covering), arachnoid, and pia mater (innermost covering)
Cerebrospinal fluid is found between the arachnoid and pia mater
White Matter
• Anterior spinothalamic tract
• Carries light/crude touch sensation
• Anterior corticospinal tract
• Delivers voluntary contraction
• Fasciculus cuneatus laterally
• Fasciculus gracilis medially
• Carries deep touch, proprioception, and vibratory sense
• Carries contralateral pain and temperature fibers
Nerve Roots
• Formed by the convergence of the dorsal and ventral roots
• Delivers the dorsal primary rami
• Supplies skin and muscle to the neck and back
• Delivers the ventral primary rami
• Supplies the anteromedial trunk and limbs
• Brachial plexus in the cervical spine
• Lumbosacral plexus in the lumbar and sacral spine
Sympathetic Chain
Surgical Intervals
Unlike surgical approaches in the appendicular spine, surgical approaches for the spine traditionally utilize intermuscular planes; approaches for the cervical and lumbar spine are depicted in Figs. 5-16 and 5-17
• The anterior approach to the cervical spine utilizes an intermuscular plane as the safe interval (Fig. 5-16)
• Posterior midline incision (Fig. 5-16)
• Anterolateral approach to the lumbar spine (Fig. 5-17)
• Lateral/transpsoas approach to the lumbar spine (Fig. 5-17)
• Posterior/Wiltse paraspinal muscle-splitting approach to the lumbar spine (Fig. 5-17)
• Posterior midline approach to the lumbar spine (Fig. 5-17)
Cross-Sectional Anatomy (Fig. 5-19)
Landmarks (Fig. 5-20)
Cervical Spine
Anterior
Approaches to the Spine
Anterior Approach to the Cervical Spine (Video 5-1)
Indications
Anterior Decompression of the Spinal Canal
Positioning
Supine (Fig. 5-21)
• Typically, the head is placed in a neutral alignment
• Extension and contralateral head rotation can help improve surgical exposure if necessary
• Care should be taken to ensure that the degree of extension necessary is possible before intubation
• Gentle taping of the shoulders inferiorly can improve intraoperative radiographs
• Neck extension can be facilitated by placement of a roll between the shoulder blades
• Gardner-Wells or Halter traction can be used if distraction is required
Superficial Dissection
Identify the platysma (Fig. 5-24)
• Divide the fibers of the platysma
• Alternatively, split the muscles of the platysma in line with fibers
• Elevate and mobilize the platysma superiorly and inferiorly as needed
Identify the anterior border of the sternocleidomastoid muscle (Fig. 5-25)
• Divide the fascia immediately anterior to the sternocleidomastoid muscle (deep cervical fascia)
Palpate the pulse of the carotid artery (Fig. 5-26)
• Divide the fascia immediately anterior to the carotid sheath (pretracheal fascia)
Continue with blunt dissection to develop the plane down to the anterior surface of the cervical vertebra (Fig. 5-27)
• Two arteries may be seen crossing the field from the carotid sheath toward the midline structures
• One or both may have to be divided to increase surgical exposure
Deep Dissection
Deep dissection exposes the anterior cervical vertebra (Fig. 5-28)
• The longus colli muscles are now visible on either side
• The prevertebral fascia also can be seen covering the cervical vertebra
• The anterior longitudinal ligament can be seen as a gleaming white structure in the midline
• The sympathetic chain lies on the longus colli lateral to the vertebral bodies
Divide the prevertebral fascia
Detach and elevate the longus colli bilaterally for exposure
Transoral Approach
Indications
Positioning
Supine (Fig. 5-29)
Head Position
Typically neutral or slightly extended alignment
Care should be taken to ensure that the degree of extension necessary is possible before intubation
Arms Positioned at the Patient’s Side
Hazards (Figs. 5-30 and 5-31)
Neural Structures
Vascular
• At risk with lateral exposure greater than 20 mm from midline at the level of C1
• At risk with lateral exposure greater than 10 mm from midline at the level of the C2-C3 disc space
Internal carotid artery (Fig. 5-32)
• Particularly at risk when dissection entails lateral exposure greater than 15 mm from midline
Intraoperative/Preincision Preparation
Pack the upper esophagus and trachea with sterile gauze
• Minimizes the ingestion of blood and other products
• Reduces the risk of aspiration
Careful retractor placement improves visualization of the interdental gap (Fig. 5-34)
• Elevate the soft and hard palate
• A tongue blade retractor can be used
Incision
A 1- to 2-cm vertical longitudinal midline incision (Fig. 5-36)
• Just proximal to the anterior C1 tubercle down onto the body of C2 distally
Make an “H” incision (Fig. 5-37)
• Vertical limbs are placed as far lateral as possible
• Injury to the eustachian tubes can occur if the vertical limbs are too lateral
• Allows for two broad-based pharyngeal myomucosal flaps that are elevated superiorly and inferiorly
• The horizontal limb is based on the level of the soft palate
Superficial Dissection
Retract the Soft Palate (Fig. 5-38)
Simple retractor placement may be sufficient
The uvula may be sutured and retracted proximally
Exposure of the Anterior Ring of C1 (Fig. 5-39)
Full-thickness subperiosteal dissection
• Divide the mucosa and pharyngeal musculature as one flap; four layers:
• Superior constrictor muscle of the pharynx
• Anterior longitudinal ligament
• Attached to the anterior tubercle of C1
• May need to be sharply dissected free to maintain subperiosteal exposure
Exposure of the Lateral Mass of C1 (Fig. 5-40)
Elevate the longus colli muscles
Dissection laterally onto the midportion of the lateral mass of C1 bilaterally
• Maintaining midline orientation is imperative
• The anterior tubercle is an important landmark
• The midline can be distorted in patients with atlantoaxial rotatory subluxation
• Atlantoaxial rotatory subluxation can bring the vertebral arteries to the midline
Exposure of the Body of C2 and the C1-C2 Joint (Fig. 5-41)
Deep Dissection
Exposure of C2
Exposure of the odontoid process of C2 (Fig. 5-42)
• Remove the central 1.0 to 1.5 cm of the anterior tubercle of C1
• Perform with a burr, pituitary rongeur, and/or curettes
• Maintaining midline orientation is imperative
Removal of the Odontoid Process (Fig. 5-43)
• Perform with a burr, pituitary rongeur, and/or curettes
• Resect the odontoid at its base
• Bleeding may arise from the venous plexus just lateral to the base of the odontoid
• The tip of the odontoid process can be gently pulled down into the field from the foramen magnum
• Divide the apical and alar ligaments from the tip of the dens
• Care should be taken when using this technique
• Traumatic avulsion of the apical/alar ligament can result in dural leaks
Closure
Confirm that no CSF leak has occurred
• Use the intraoperative Valsalva maneuver
• Persistent leaks may require a lumbar drain
If possible, reapproximate the longus colli in the midline
Approximate the pharyngeal layer with resorbable suture
If a “H”-type incision was used, close the horizontal limb first, followed by the vertical limb
Approximate the soft palate in layers with absorbable suture
Anterior Transthoracic Approach to the Thoracic Spine (Video 5-2)
Indications
Anterior Spinal Cord Decompression
Positioning
Lateral decubitus position with the side to be approached oriented up (Fig. 5-44)
• For deformity, the convexity of the curve is typically oriented up
• For decompressions, the side with the greatest stenosis to be addressed is typically oriented up
Secure the patient firmly to the operating table
• Stabilize the patient with either beanbags or hip positioners
• Carefully note the orientation of the spine before draping
[/not-level-membership-for-orthopaedics-category]