CHAPTER 2. PEAK EXPIRATORY FLOW RATE MEASUREMENT AND SPIROMETRY
Indications15
Contraindications16
Equipment17
Practical procedure – PEFR 17
Practical procedure – spirometry 19
Interpreting the spirometry results20
The spirometer was invented by physician John Hutchison (1811–1861) in 1846. The peak flow meter was introduced into clinical use around 1960.
INTRODUCTION
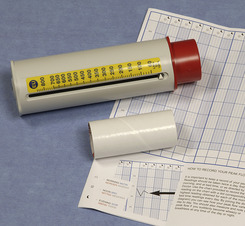
Peak expiratory flow rate (PEFR) and bedside spirometry are simple and cheap non-invasive measures of ventilatory function. A peak flow meter (Fig. 2.1) measures the fastest rate of expiratory airflow in litres per minute. Peak flow meters come in various guises, but they all serve the same function.
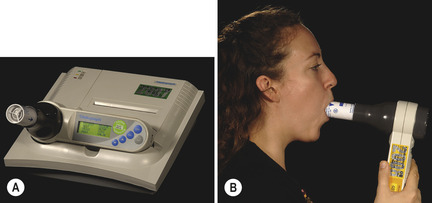
Spirometry (Fig. 2.2) also measures expiratory airflow, but provides extra information including the forced expiratory volume in one second (FEV1), the forced vital capacity (FVC) and the FEV1/FVC ratio. The value of this ratio can be indicative of obstructive or restrictive ventilatory deficits.
 |
| Fig. 2.2 |
INDICATIONS
CONTRAINDICATIONS
Spirometry is a safe and non-invasive test. However, performing PEFR measurement or spirometry does increase intra-thoracic, intra-abdominal and intra-ocular pressures. Therefore, spirometry does carry a small risk to individuals with certain co-morbidities, and so these can be regarded as relative contraindications:
EQUIPMENT
• Peak flow meter and clean mouthpiece.
• Peak flow chart.
• Bedside spirometer (with attached graph paper if a manual tracing).
• Bronchodilator inhaler (with spacer if required) for reversibility testing.
PRACTICAL PROCEDURE – PEFR
 Tip Box
Patients who are taking inhaled bronchodilators may give unreliable measurements if testing is not synchronized with their dosing regime. If the patient is taking inhaled bronchodilators, the scheduled regular dose prior to performing PEFR measurement or spirometry should be omitted in order to give valid pre- and post-bronchodilator measurements.
 Tip Box
Demonstrate to the patient how to perform the procedure prior to their attempt.
• Obtain consent.
• Check that the pointer is at zero and that a clean mouthpiece is in place.
• The patient should preferably stand upright, holding the peak flow meter with the fingers away from the pointer.
• Ask the patient to inhale a large breath through their mouth, then place their lips around the mouthpiece forming a tight seal, and then breathe out as hard and fast as possible.
 Tip Box
Compare this to an example such as blowing out candles on a cake, and emphasize that it is the speed of the blow that is being measured.
• Ensuring correct technique, repeat the measurement three times in total and document the best measurement.
• If appropriate, repeat the above process approximately 10min after inhaling a bronchodilator.
• Dispose of the mouthpiece.
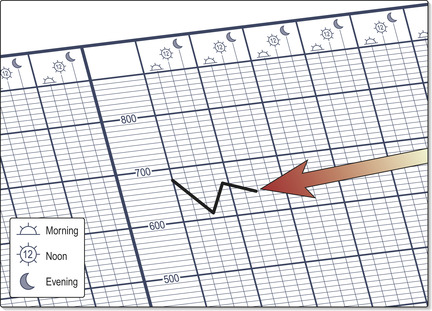
• Document PEFR on a peak flow chart (Fig. 2.3) pre- and post-bronchodilator at both morning and night (looking for diurnal variation, a hallmark of asthma being so-called ‘morning dips’).
• Compare the patient’s PEFR with the ideal PEFR for their height (Fig. 2.4).
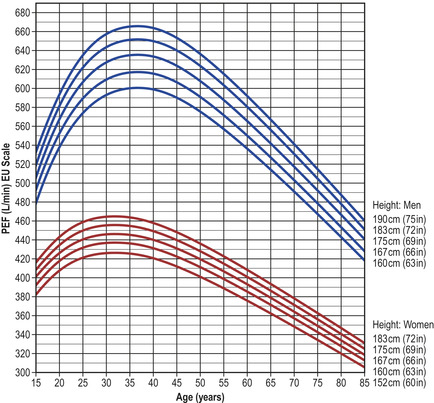 |
| Fig. 2.4
(adapted by C. Clarke from Nunn AJ, Gregg I. BMJ 1989;298:1068–70)
|
PRACTICAL PROCEDURE – SPIROMETRY
• Obtain consent.
• Check that a clean mouthpiece is in place.
• The patient should preferably stand upright. A noseclip should be used to prevent nasal air flow.
• Ask the patient to inhale a large breath through their mouth, then place their lips around the mouthpiece forming a tight seal, and then breathe out as hard and fast and as long as possible until their lungs are completely empty.
 Tip Box
Compare this to an example such as blowing out candles on a cake but encourage the patient to keep blowing for as long as possible.
• Ensuring correct technique, repeat the measurement three times in total.
• If appropriate, repeat the above process approximately 10 min after inhaling a bronchodilator.
• Dispose of the mouthpiece.
• Document the procedure clearly in the medical notes.
INTERPRETING THE SPIROMETRY RESULTS
Spirometry using a traditional vitalograph provides a volume–time curve (Fig. 2.5).
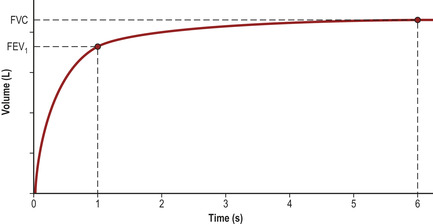
• FEV1 (forced expiratory volume in one second) = the maximal volume of air exhaled within one second.
• FVC (forced vital capacity) = the total volume of air exhaled in one breath.
• Ratio of FEV1/FVC = the proportion of the total air in the lungs that can be exhaled in one second (normally 70–80%).
These values vary characteristically in different disease states of the lung (Table 2.1).
| Normal (70kg man) | Obstructive defect | Restrictive defect | |
|---|---|---|---|
| FEV1 (L) | 4 | ↓↓ | ↓ |
| FVC (L) | 5 | ↓ | ↓↓ |
| FEV1/FVC | 70–80% | ↓ (<70%) | Normal or ↑ (>80%) |
More modern, sophisticated spirometry equipment displays the data as a flow–volume loop (Fig. 2.6). The shape of the flow–volume loop will also vary characteristically in different disease states of the lung (Fig. 2.7).
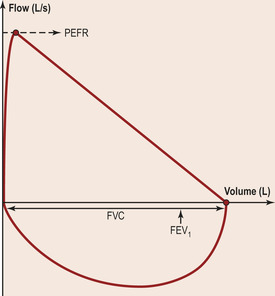 |
| Fig. 2.6 |
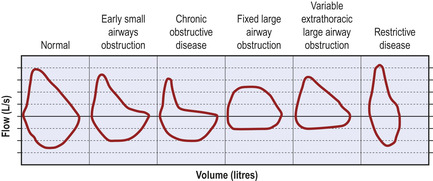
In some cases, a mixed obstructive/restrictive picture will be evident, either due to co-existent obstructive and restrictive conditions (e.g. asthma and interstitial lung disease, Table 2.2) or due to conditions displaying both obstructive and restrictive characteristics (e.g. cystic fibrosis).
| Obstructive | Restrictive |
|---|---|
| Asthma | Thoracic wall deformities |
|
Chronic obstructive airways disease
–emphysema
–chronic bronchitis
|
Interstitial lung disease
–pulmonary fibrosis
–sarcoidosis
|
| Bronchiectasis | Pulmonary oedema |
| Neuromuscular disease (e.g. Guillain-Barré syndrome) | |
| Recurrent pulmonary emboli | |
| Lymphangitis carcinomatosa |