CHAPTER 14. PERFORMING AN ELECTROCARDIOGRAM (ECG)
Augustus Desiré Waller (1856–1922), working at St Mary’s Hospital in Paddington, London, produced the first electrocardiogram (ECG) recording in a human subject in 1887 using a Lippmann capillary electrometer attached to a projector. This projected the resultant trace onto a photographic plate that was moved by a toy train. Interestingly he saw little practical application for this, and it was not until Willem Einthoven (1860–1927) in Leiden used a string galvanometer rather than a capillary electrometer, which increased sensitivity, that the ECG became more usable. Einthoven went on to describe the tracing in terms of P, Q, R, S and T waves, and associated changes with some cardiac disorders. He was eventually rewarded with a Nobel Prize in 1924.
INTRODUCTION
The ECG is the basic investigation for diagnosing acute cardiac disorders. This procedure is normally undertaken by nursing staff but you need to be familiar with the process since positioning of the electrode leads will affect the accuracy of the ECG obtained.
INDICATIONS
• Suspected or confirmed acute coronary syndrome.
• Chest pain (of any nature).
• Shortness of breath (of any nature).
• Suspected arrhythmias.
• Collapse.
• Electrolyte abnormalities (particularly potassium).
• Suspected or confirmed bacterial endocarditis (to monitor for progressive lengthening of the PR interval).
• Pre-operative work-up.
EQUIPMENT
• 12-lead ECG machine.
• ECG leads – 4 limb leads and 6 chest leads.
• ECG lead attachment stickers.
• Razor.
PRACTICAL PROCEDURE
• Gain consent from the patient (to perform the ECG and the shaving of chest hair that this may entail).
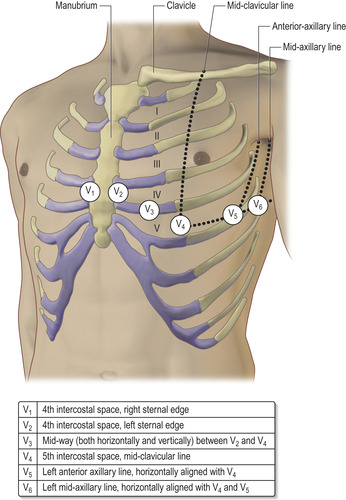
• Place ECG lead attachment stickers for the limb leads to bony prominences at the wrists and just above the ankles (to reduce interference from skeletal muscle impulses) and attach the leads as in Table 14.1.
| Limb lead | Colour of limb lead wire |
|---|---|
| Right wrist | RED |
| Left wrist | YELLOW |
| Right ankle | BLACK |
| Left ankle | GREEN |
 Tip Box
If the ECG stickers are not attaching to the patient, wipe away any sweat or body moisturizer.
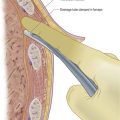
• Shave the areas of the chest required for chest lead placement outlined below (Fig. 14.1). This ensures good sticker contact. Place ECG lead attachment stickers at these positions and attach the chest leads to the corresponding stickers.
• Ensure that the ECG machine contains standard ECG graph paper and switch the machine on. Enter the patient’s details.
• Make sure that the ‘FILTER’ button is on and that the machine is calibrated by pressing the 1 mV marker button. The height of the reference pulse mark on the resulting ECG will be 10 small squares.
• Ask the patient to relax, lie still and remain silent. Now acquire the ECG.
• Standard ECG paper speed runs at 25 mm/second. Each small square of the ECG measures 1 mm, which at 25 mm/second represents 0.04 seconds (Fig. 14.2). Five small squares constitute 1 large square, representing 0.2 seconds. Hence 1 second equates to 5 large squares.
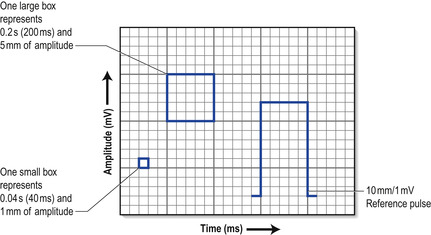 |
| Fig. 14.2 |
• The calibration of the ECG voltage amplitude is set at 1 mV per 10 mm (i.e. the trace deflects 2 large squares vertically for every 1 mV signal detected).
 Tip Box
• Other than a shivering patient, baseline interference or poor traces are invariably due to the poor sticker contact or faulty wiring. If after changing the stickers a problem persists, change the whole lead set.
• If the ECG reports an abnormal axis, check you have the limb leads correctly placed.
POST-PROCEDURE INVESTIGATIONS
• Date, time and add a patient label to the finished ECG.
• Note on the ECG if it was taken when the patient was experiencing symptoms (e.g. chest pain). This is of importance in the clinical interpretation of the ECG.