[level-membership-for-cardiovascular-category]
CHAPTER 13. ARTERIAL CANNULATION
Indications112
Contraindications112
Equipment112
National Patient Safety Agency (NPSA) recommendations113
Practical procedure113
Post-procedure investigations116
Complications116
Suggested reading117
The Reverend Stephen Hales (1677–1761), a British veterinarian, cannulated the femoral artery of a horse using a brass tube and published his findings in 1733 in Hemastatiks. He connected the brass tube to a glass tube and recorded the rise of the blood column, thus becoming the first individual to measure blood pressure. This invasive approach was refined by Carl Ludwig in 1847 with his kymograph, which with the use of a quill plotted the waveform undulation of the arterial pulse. Non-invasive measurement followed individual observations and instrumental modifications by Karl Vierordt in 1855, Etienne Jules Mary in 1860, Samuel Von Basch in 1881 and Scipione Riva Rocci in 1896, cumulating into the modern day sphygmomanometer.
INTRODUCTION
Arterial cannulation is an advanced procedure performed on patients who require regular measurements of blood gases or who require continuous monitoring of blood pressure. It is normally performed on patients in a critical care environment. The radial artery is usually the vessel most suitable for cannulation. It is readily palpable and accessible, and the hand usually has an extensive collateral ulnar arterial circulation, thereby minimizing risk of digital ischaemia.
There are various cannulae available for arterial cannulation: some are the same design as venous cannulae whilst others are inserted using a guidewire approach. Note that whichever cannula is used it is unusual to use one larger than 20 G – larger cannulae risk damage to the vessel, whilst smaller cannulae become easily damped, kinked and provide poorer arterial traces. This chapter will concentrate on the insertion of guidewire-placed arterial cannulae using the Seldinger technique.
INDICATIONS
• Regular monitoring of arterial blood gases.
• Continuous or regular monitoring of blood pressure – mandatory if on inotropic support in the critical care setting.
• Patients undergoing major surgery, such as cardiovascular, cardiothoracic or neurosurgical procedures.
CONTRAINDICATIONS
• Negative Allen’s test (see Chapter 12).
• Previous injury – such as from trauma, burns or surgery performed on the arm.
• Previous radial artery harvesting for coronary artery bypass surgery (may only have one vessel remaining for perfusion of the hand).
• Congenital deformities (such as in radial club hand) may result in anomalous vasculature to the extremity.
• A history of diabetes, hypertension, peripheral vascular disease, active infection in the extremity, collagen vascular disorders and blood dyscrasias may affect the decision to place the arterial catheter. All of these conditions have been associated with an increased risk of complications with arterial cannulation.
• Anticoagulant medications such as warfarin, aspirin, heparin and clopidogrel increase the risk of bleeding. This may lead to haematoma formation and a risk of hand ischaemia.
• Lack of consent.
EQUIPMENT
• 10 mL syringe.
• Green needle.
• Orange needle.
• Lidocaine.
• Dressing pack.
• Sterile gloves.
• Chlorhexidine cleaning solution.
• Heparin.
• Arterial cannula with guidewire and introducer needle (or 20 G simple arterial cannula).
• Gauze.
• Sutures and cutting blade.
• Clear sterile dressing.
• Transducer.
 Tip Box
Ask a nurse to set up the transducer system and prepare a syringe of normal or heparinized saline prior to commencing the procedure. This should be ready to attach to the end of the cannula immediately on insertion.
NATIONAL PATIENT SAFETY AGENCY (NPSA) RECOMMENDATIONS
The NPSA recommends the use of 0.9% normal saline as a flush to maintain arterial line patency, with heparinized saline also permitted as a flush solution. However, it was also noted that the evidence base for using heparinized saline rather than normal saline as a flush for arterial lines is inconclusive (from the NHS National Electronic Library for Medicines, NELM). The NPSA report goes on to state that solutions used to flush arterial lines must not contain glucose.
PRACTICAL PROCEDURE
 Tip Box
Ask the hand dominance of the patient and attempt to use the contralateral radial artery if possible.
• Obtain consent.
• Position the patient’s wrist dorsiflexed over a pillow.
• Perform Allen’s test (see Chapter 12) to confirm collateral circulation.
• Open the dressing pack and assemble equipment.
• Wash your hands and wear gloves.
• Clean the proposed site of entry over the radial artery.
• Draw up local anaesthetic into a 10 mL syringe with a green needle.
• Infiltrate intradermal and subcutaneous local anaesthetic around the presumed entry site with the orange needle. The local anaesthetic wheal can be readily dispersed by rubbing the area prior to puncture.
• Gently palpate the radial artery.
• Warn the patient of a sharp scratch.
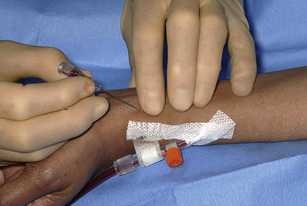
• Hold the arterial needle at a 30 degree angle and insert with bevel upwards into the artery (Fig. 13.1). A ‘give’ is sometimes sensed followed by brisk blood flow, which should be pulsatile.
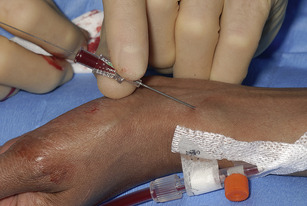
• Slowly advance the guidewire through the needle and hence into the artery, allowing a portion of the guidewire to remain in sight at all times at the free end (Fig. 13.2).
• Remove the needle over the guidewire.
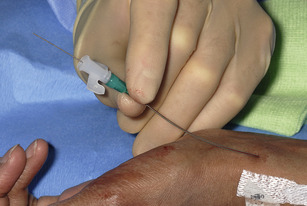
• Advance the arterial cannula over the wire making sure that the free end of the guidewire is obtained from the cannula prior to the cannula touching the skin (Fig. 13.3).
• Whilst holding the free end of the guidewire, slide the arterial cannula over the guidewire into the artery.
• Connect the transducer system and flush the arterial cannula to ensure free flow (Fig. 13.4). A continuous arterial waveform and blood pressure should be evident with the transducer connected to the bedside monitor.

 Tip Box
Ensure that the transducer is at the level of the patient’s heart or the blood pressure readings will consequently be inaccurate.
• Suture the arterial line to the skin via the holes on the wings of the cannula.
• Apply a clear sterile dressing.
• Document the procedure clearly in the patient’s medical notes.
 Tip Box
If there are contraindications to using the radial artery, consider other vessels for cannulation. These may include the opposite radial artery, the femoral, ulnar or brachial arteries. Occasionally the dorsal artery of the foot, axillary and temporal arteries have been used.
POST-PROCEDURE INVESTIGATIONS
• Continuous transduction of the arterial waveform and blood pressure.
• Arterial blood gas sampling and analysis.
COMPLICATIONS
Despite constituting an invasive procedure, the risk of serious complications is less than 0.2%.
• Inadvertent disconnection when connections are manipulated, or accidental removal when the patient’s position changes – both can cause significant unnoticed bleeding.
• Arterial thrombosis: increased risk in first 24 hours and with decreasing wrist circumference. This may require surgery to remove the clot or to bypass the artery, or thrombolytic therapy.
 Tip Box
In the event of distal ischaemia, non-invasive arterial duplex ultrasonography can be done at the bedside to delineate areas of occlusion and flow through the artery. Angiography to evaluate the extent of injury to the radial artery may also be considered.
• Haematoma formation.
• Haemorrhage.
• Local infection of skin/subcutaneous tissue.
• Acute carpal tunnel syndrome.
• Compartment syndrome.
• Nerve injury.
• Ischaemia and skin/tissue necrosis.
• Air embolization – occurring with vigorous flushing of radial lines.
• Kinking of the line rendering it non-functional, particularly if the line is frequently redressed and remains hidden by dressings.
SUGGESTED READING
NPSA. Problems with infusions and sampling from arterial lines. Available online at: http://www.npsa.nhs.uk/patientsafety/alerts-and-directives/rapidrr/arterial-lines/
[/level-membership-for-cardiovascular-category][not-level-membership-for-cardiovascular-category]
CHAPTER 13. ARTERIAL CANNULATION
Indications112
Contraindications112
Equipment112
National Patient Safety Agency (NPSA) recommendations113
Practical procedure113
Post-procedure investigations116
Complications116
Suggested reading117
The Reverend Stephen Hales (1677–1761), a British veterinarian, cannulated the femoral artery of a horse using a brass tube and published his findings in 1733 in Hemastatiks. He connected the brass tube to a glass tube and recorded the rise of the blood column, thus becoming the first individual to measure blood pressure. This invasive approach was refined by Carl Ludwig in 1847 with his kymograph, which with the use of a quill plotted the waveform undulation of the arterial pulse. Non-invasive measurement followed individual observations and instrumental modifications by Karl Vierordt in 1855, Etienne Jules Mary in 1860, Samuel Von Basch in 1881 and Scipione Riva Rocci in 1896, cumulating into the modern day sphygmomanometer.
INTRODUCTION
Arterial cannulation is an advanced procedure performed on patients who require regular measurements of blood gases or who require continuous monitoring of blood pressure. It is normally performed on patients in a critical care environment. The radial artery is usually the vessel most suitable for cannulation. It is readily palpable and accessible, and the hand usually has an extensive collateral ulnar arterial circulation, thereby minimizing risk of digital ischaemia.
There are various cannulae available for arterial cannulation: some are the same design as venous cannulae whilst others are inserted using a guidewire approach. Note that whichever cannula is used it is unusual to use one larger than 20 G – larger cannulae risk damage to the vessel, whilst smaller cannulae become easily damped, kinked and provide poorer arterial traces. This chapter will concentrate on the insertion of guidewire-placed arterial cannulae using the Seldinger technique.
INDICATIONS
• Regular monitoring of arterial blood gases.
• Continuous or regular monitoring of blood pressure – mandatory if on inotropic support in the critical care setting.
• Patients undergoing major surgery, such as cardiovascular, cardiothoracic or neurosurgical procedures.
CONTRAINDICATIONS
• Negative Allen’s test (see Chapter 12).
• Previous injury – such as from trauma, burns or surgery performed on the arm.
• Previous radial artery harvesting for coronary artery bypass surgery (may only have one vessel remaining for perfusion of the hand).
• Congenital deformities (such as in radial club hand) may result in anomalous vasculature to the extremity.
• A history of diabetes, hypertension, peripheral vascular disease, active infection in the extremity, collagen vascular disorders and blood dyscrasias may affect the decision to place the arterial catheter. All of these conditions have been associated with an increased risk of complications with arterial cannulation.
• Anticoagulant medications such as warfarin, aspirin, heparin and clopidogrel increase the risk of bleeding. This may lead to haematoma formation and a risk of hand ischaemia.
• Lack of consent.
EQUIPMENT
• 10 mL syringe.
• Green needle.
• Orange needle.
• Lidocaine.
• Dressing pack.
• Sterile gloves.
Buy Membership for Cardiovascular Category to continue reading. Learn more here
[/not-level-membership-for-cardiovascular-category]
