CHAPTER 12. ARTERIAL BLOOD GAS SAMPLING
Indications105
Contraindications106
Equipment107
Practical procedure107
Femoral artery puncture109
Complications109
Gustav Magnus (1802–1870) made the first consistent analyses of blood gases in 1837. He obtained his blood samples from both horses and ‘commoners who for a small sum permitted themselves to be bled’. Magnus went on to estimate the oxygen capacity of blood in 1845. However, modern blood gas analysis is the accumulation of the work of numerous brilliant men, namely Cremer (1865–1935), Haber (1868–1934), Hasselbalch (1874–1962), Van Slyke (1883–1971), Henderson (1878–1942), Astrup (1915–2000), Clark (1918–2005) and Severinghaus (1922–). These men pioneered the construction and refinement of the hydrogen, oxygen and carbon dioxide electrodes. Furthermore, they also constructed formulae to explain the relationships between the directly measured values of haemoglobin, oxygen tension, acidity and carbon dioxide, and the derived calculations of base deficit and bicarbonate.
INTRODUCTION
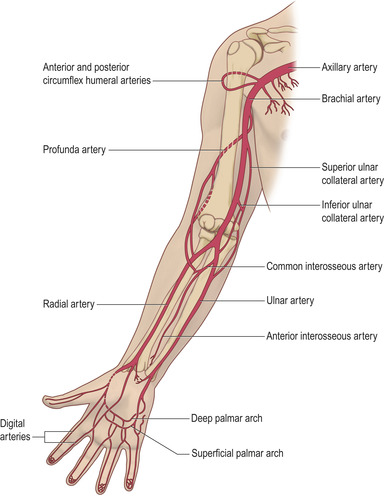
Arterial blood gas sampling provides useful information in the assessment of both respiratory function and acid–base balance. The usual site of puncture is the radial artery, although femoral and brachial arteries are common alternatives when the radial approach proves to be difficult. It is important to understand the anatomy of vessels in the area (Fig. 12.1) prior to puncture to ensure successful sampling, and to minimize discomfort and complications to the patient.
INDICATIONS
CONTRAINDICATIONS
ALLEN’S TEST
Allen’s test helps to ensure that while you are performing a radial puncture, the ulnar artery is capable of perfusing the hand. Ask the patient to clench a fist. Obstruct the radial and ulnar arteries using the index and second finger of both your hands on the respective arteries simultaneously. This prevents arterial flow into the hand. Ask the patient to open their hand while you are still occluding both arteries. Now release the pressure on the ulnar artery while still occluding the radial artery. This allows the ulnar artery blood to flow into the hand. Look for a change in colour from white to pink of all digits of the hand. This demonstrates that blood flow to the hand would be adequate should cannulation of the radial artery lead to its obstruction. This positive Allen’s test is a prerequisite to radial cannulation and is a necessary precaution prior to puncture for gases. A negative Allen’s test is a warning that digital ischaemia is a significant risk following radial artery cannulation for any period of time.
Research exists both in favour and against the reliability of Allen’s test as a potential marker of ischaemic damage to the hand. You may wish to consider exploring the collateral circulation of the hand more definitively using a Doppler probe.
EQUIPMENT
• Pre-heparinized arterial blood gas sampling tube.
• Blue or green needle.
• Sterile alcohol swab.
• Cotton wool balls.
• Gloves.
PRACTICAL PROCEDURE
• Obtain consent.
• Ensure the patient is comfortable with their wrist supinated and held in a slightly extended position (if required, place the wrist over a pillow to aid dorsiflexion).
• Assemble the needle to a pre-heparinized syringe.
 Tip Box
Unless you are very good at this procedure it is always kinder to inject some intradermal and subcutaneous lidocaine prior to obtaining a sample from the radial artery. It is always difficult to repeat procedures on patients who you have already hurt and failed on. They lose confidence in you, become tense and therefore hold their hand in a more flexed manner than ideal and at the point of puncture are more likely to withdraw their arm. The local anaesthetic wheal can be readily dispersed by rubbing the area prior to puncture.
• Wash your hands and wear gloves.
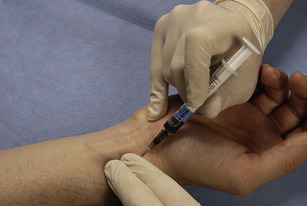
• Palpate for the radial arterial pulse and clean the area of skin with sterile alcohol swabs.
• Expel all of the heparin from the tube.
• Palpate for the radial arterial pulse along its length using two fingers. Warn the patient of a sharp scratch and puncture the skin at a 30–45 degree angle.
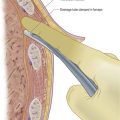
• Slowly advance the needle in the direction of the pulse until you get flashback (Fig. 12.2). Depending upon the make, the syringe either self-fills or the operator is required to pull on the plunger.
 Tip Box
If you hit bone gently withdraw the needle while keeping its tip under the skin and proceed in a different direction of insertion.
• Once the sample has been taken, gently remove the needle and immediately apply firm pressure with the cotton wool ball to the site of needle insertion for 3–5 minutes.
• Remove the needle from the syringe. Gently tap the syringe in the upright position to allow air and air bubbles to rise to the top of the sample. Attach the air-filter bung and expel the air.
FEMORAL ARTERY PUNCTURE
• Clean the area with antiseptic solution and feel for the femoral pulse. The femoral artery lies at the midpoint between the anterior superior iliac spine and the pubic symphysis (see Fig. 6.5), with the femoral nerve laterally and the femoral vein medially.
• Use a 21 G needle and insert at a 90 degree angle at the site of pulsation and proceed as above, remembering to apply firm pressure on the femoral artery for 5 minutes on removal of the needle.
 Tip Box
Arterial blood gases may be difficult to obtain. The majority of the data from an arterial sample can be obtained from a central venous blood gas. For all intents and purposes venous base deficit, carbon dioxide tension (about 0.5 kPa higher) and pH (very slightly more acidic) are the same as arterial. Furthermore, while venous oxygenation (normally approximately 5.3 kPa) and saturation (normally approximately 75%) are considerably lower than corresponding arterial values, oxygen saturations measured by pulse oximetry when combined with a venous blood gas (in the absence of an arterial sample) would be more than adequate upon which to base acid–base or ventilatory clinical decisions. It is more important to obtain approximate information than abandon obtaining any information because it is not arterial.
• In extreme circumstances when attempts at arterial or venous sampling have failed, capillary samples from an ear lobe that has been rubbed provide very similar carbon dioxide, pH and bicarbonate measurements as an arterial sample.
• If you are struggling, get help!
COMPLICATIONS
• Pain.
• Failure to gain arterial sample: go to another site or ask for help.
• The sample obtained is in fact venous. If it is from the femoral or brachial you could use the information in conjunction with measuring pulse oximetry to indicate the adequacy of oxygenation.
• Bleeding.
• Haematoma formation.
• Infection at puncture site.
• Ischaemia of hand or finger due to emboli, spasm, aneurysm formation or thrombosis.