Preparing and Administering Medications
Objectives
1. Compare dosage forms for drugs given by the enteral route.
2. Outline procedures for giving medications enterally, parenterally, and percutaneously.
3. List processes to prevent human immunodeficiency virus (HIV ) transmission.
4. Identify anatomy landmarks used for giving parenteral medications.
Key Terms
ampules (ĂM-pūls, p. 105)
asepsis (ā-SĔP-sĭs, p. 94)
barrel (BĂ-rŭl, p. 103)
buccal administration (BŬK-ŭl, p. 131)
capsules (CĂP-sūlz, p. 94)
elixirs (ĭ-LĬK-sĭrz, p. 94)
emulsions (ĭ-MŬL-shŭnz, p. 94)
intramuscular (IM) injections (ĭn-tră-MŬS-kū-lăr, p. 113)
intravenous (IV) route (ĭn-tră-VĒN-ěs, p. 117)
lozenges (LŎZ-ĭn-jěz, p. 94)
Mix-o-vial (MĬKS Ō VĪ-ăl, p. 108)
nasogastric (NG) tube (nā-zō-GĂS-trĭk, p. 97)
needle (NĒD- ăl, p. 103)
parenteral route (pě-RĔN-těr-ăl, p. 101)
percutaneous administration (pěr-kū-TĀ-nē-ŭs, p. 126)
piggyback infusion (ĭn-FŪ-zhŭ n, p. 122)
pill (PĬL, p. 93)
plunger (PLŬN-jĭr, p. 103)
subcutaneous injections (sŭb-kū-TĀ-nē-ěs, p. 111)
sublingual administration (sŭb-LĬNG-wĕl, p. 131)
suspensions (sŭs-PĔN-shŭnz, p. 94)
syringes (sĭ-RĬN-jěz, p. 103)
syrups (SĬR-ŭps, p. 94)
tablets (TĂB-lĕts, p. 94)
tip (TĬP, p. 103)
topical medications (TŎP-ĭ-kăl, p. 127)
vials (VĪ-ăl z, p. 105)
Overview
 http://evolve.elsevier.com/Edmunds/LPN/
This chapter gives an overview of basic principles of medication administration. Section One discusses information about drugs taken by the enteral route: oral, nasogastric (NG), or rectal. Section Two describes how to give drugs parenterally. Section Three describes the methods for giving medications percutaneously.
Enteral Medications
Enteral medications are given directly into the gastrointestinal (GI) tract through the oral, NG, or rectal route.
Oral Administration
The most common route of administration of medications is through the mouth, or orally. The order is often written, “give PO,” meaning per os or “by mouth.” Advantages of oral preparations are as follows:
• They are easy for the nurse to give and for the patient to swallow.
• Most medications come in this form.
• It is usually not very expensive to make oral preparations.
The major disadvantages of oral preparations are as follows:
• They cannot be given to patients with a lot of nausea, who are vomiting, or who are unconscious.
• Some chemicals are not effective if mixed with gastric secretions.
• The onset of action may vary because the drug may be slowly absorbed in the GI tract.
There are many different forms of oral medications. Each form is desired for a specific reason (for example, to increase absorption, delay absorption, or reduce gastric irritation). The term pill is often used by patients to describe capsules or tablets. Tablets and capsules are very common and are made up of several different chemicals. Tablets may be covered with a special coating that resists the acidic pH of the stomach but will dissolve in the alkaline pH of the intestine.
 Memory Jogger
Actions for Which the Nurse Will be Held Responsible
The nurse has responsibility to make sure patients take the medication given them. The nurse cannot know if the patient takes the medicine if the nurse doesn’t see them swallow it. Even when the nurse is busy, medicine should not be left at the bedside for them to take later.
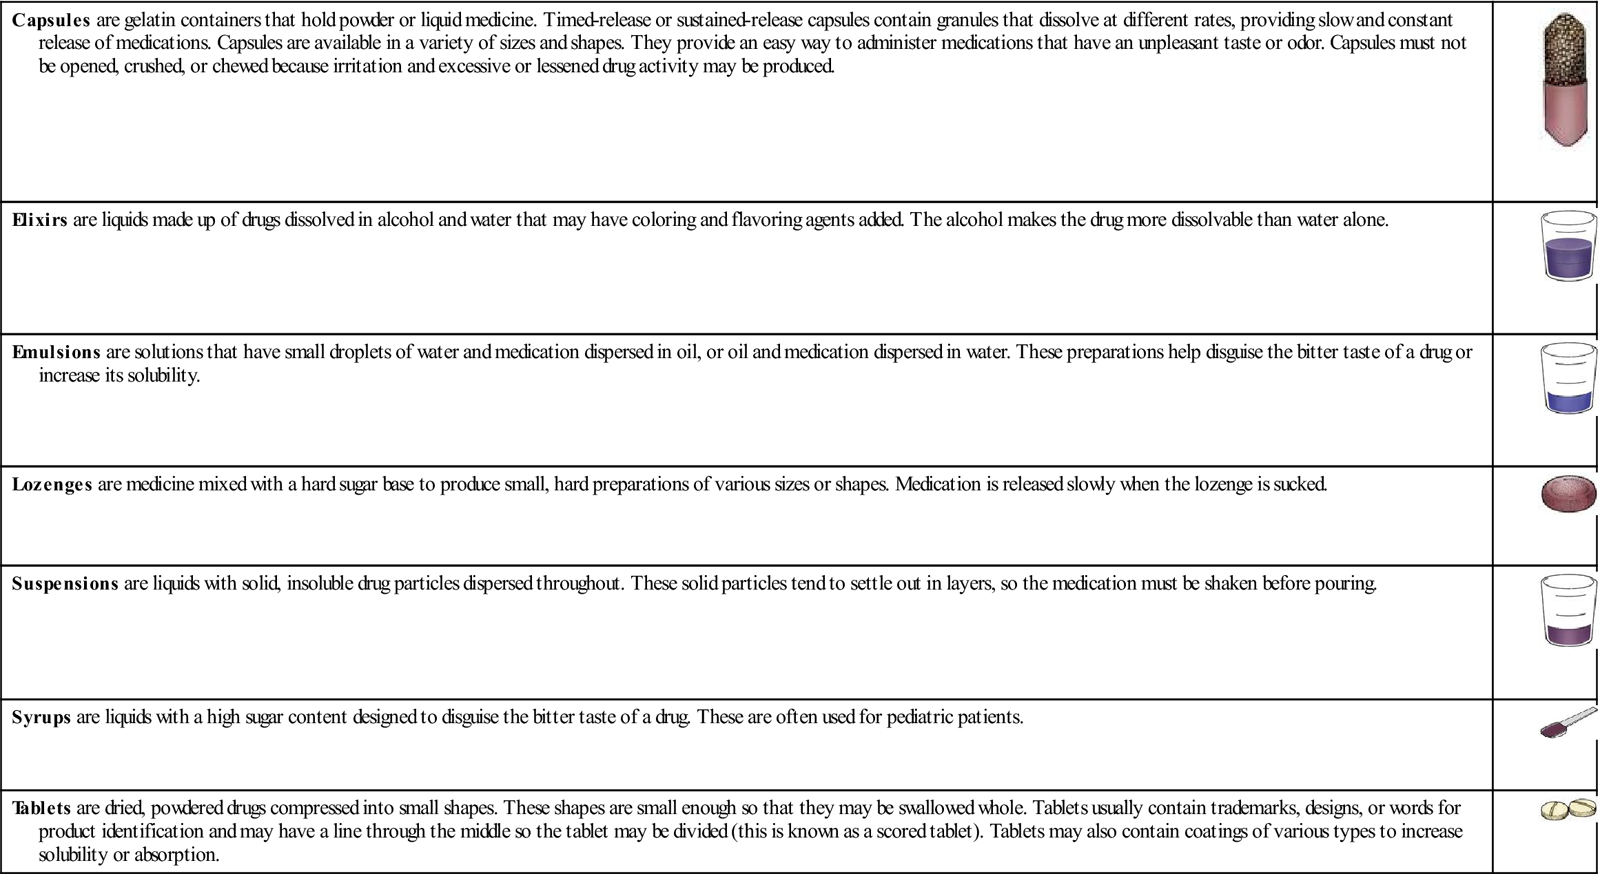
Box 10-1 summarizes the various oral dosage forms and their characteristics.
Box 10-1
Oral Medication Forms
| Capsules are gelatin containers that hold powder or liquid medicine. Timed-release or sustained-release capsules contain granules that dissolve at different rates, providing slow and constant release of medications. Capsules are available in a variety of sizes and shapes. They provide an easy way to administer medications that have an unpleasant taste or odor. Capsules must not be opened, crushed, or chewed because irritation and excessive or lessened drug activity may be produced. |
 |
| Elixirs are liquids made up of drugs dissolved in alcohol and water that may have coloring and flavoring agents added. The alcohol makes the drug more dissolvable than water alone. |
 |
| Emulsions are solutions that have small droplets of water and medication dispersed in oil, or oil and medication dispersed in water. These preparations help disguise the bitter taste of a drug or increase its solubility. |
 |
| Lozenges are medicine mixed with a hard sugar base to produce small, hard preparations of various sizes or shapes. Medication is released slowly when the lozenge is sucked. |
 |
| Suspensions are liquids with solid, insoluble drug particles dispersed throughout. These solid particles tend to settle out in layers, so the medication must be shaken before pouring. |
 |
| Syrups are liquids with a high sugar content designed to disguise the bitter taste of a drug. These are often used for pediatric patients. |
 |
| Tablets are dried, powdered drugs compressed into small shapes. These shapes are small enough so that they may be swallowed whole. Tablets usually contain trademarks, designs, or words for product identification and may have a line through the middle so the tablet may be divided (this is known as a scored tablet). Tablets may also contain coatings of various types to increase solubility or absorption. |
 |
Procedure for Administering Oral Medications
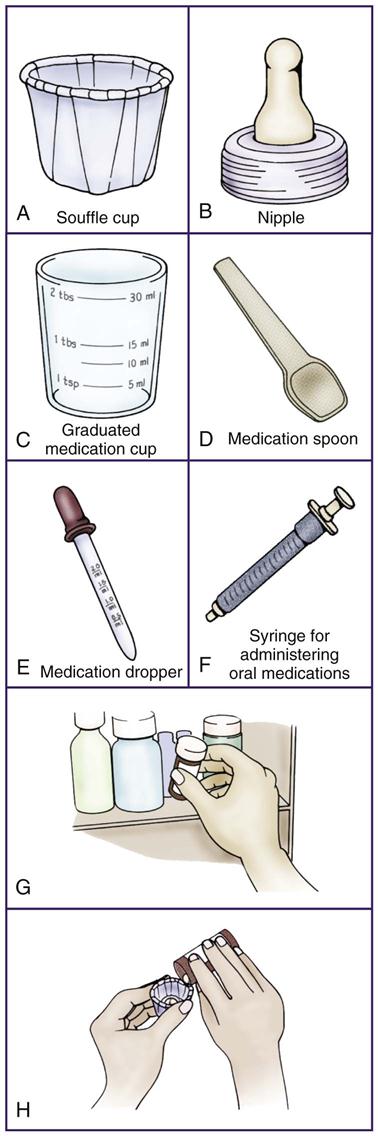
The basic procedure in administration of medication is the same, regardless of type or route of administration. The equipment available and the agency policies may vary because nurses work in many different settings. General principles that underlie all procedures include accuracy, taking responsibility, and asepsis (preventing of infection). The legal policies and rules, along with the nursing process and knowledge about the drug, are all part of giving medications. The steps in giving medications by the various routes are generally followed as outlined in the following sections. There are wide differences in the specific process and equipment used in administering medications and institutional procedures may require some changes in the recommended procedure. Procedure 10-1 shows the basic procedure for administering oral medications that may be used when there is no sophisticated equipment available for the process. Following these steps each time reduces the chance of medication error. This is a clean procedure and begins with cleanly washed hands.
Procedure 10-1
Administering Oral Medications


Step One: Getting Ready
Step Two: Preparing the Medication
3. Open the container and pour the correct number of tablets or capsules into the paper medication cup.
• Do not touch the medication, but pour the medication directly into the bottle lid or the cup.
• Return any extra medication to the container (H).
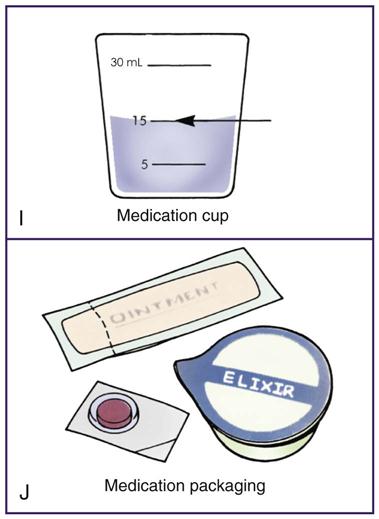
To avoid errors, hold the medication cup at eye level when pouring liquids (I).
5. Close the box or replace the lid on the container, and check the information on it for the third time with the medication card or MAR. Medication lids are always replaced immediately after use.
• Medication that requires special storage (such as refrigeration) is replaced immediately.
6. Put the medication container back on the shelf.
7. Place the cup containing the medication next to the medication card or MAR on the tray.
Step Three: Administering the Medication
Step Four: Concluding
Solid-Form Oral Medications
 Memory Jogger
General Principles that Underlie All Procedures
Liquid-Form Oral Medications
 Lifespan Considerations
Nasogastric Administration
The nasogastric (NG) tube is another route for enteral medication. Patients who cannot swallow or who are weak or nauseated may be able to take medications through this tube, which leads directly through the nose and into the stomach. The tubing and the clamp allow the nurse to easily give medications over a long period to patients who are unable to take food or medicine by mouth. Some patients find the NG tube so irritating to the nose that the medication must be given another way. In such cases, a percutaneous endoscopic gastrostomy (PEG) tube may be surgically placed directly through the abdomen and into the stomach.
Procedure for Administering Nasogastric, Peg, and Jejunum Tube Medications
The process for giving medications through a tube is similar to that given for oral medications, but with the following precautions:
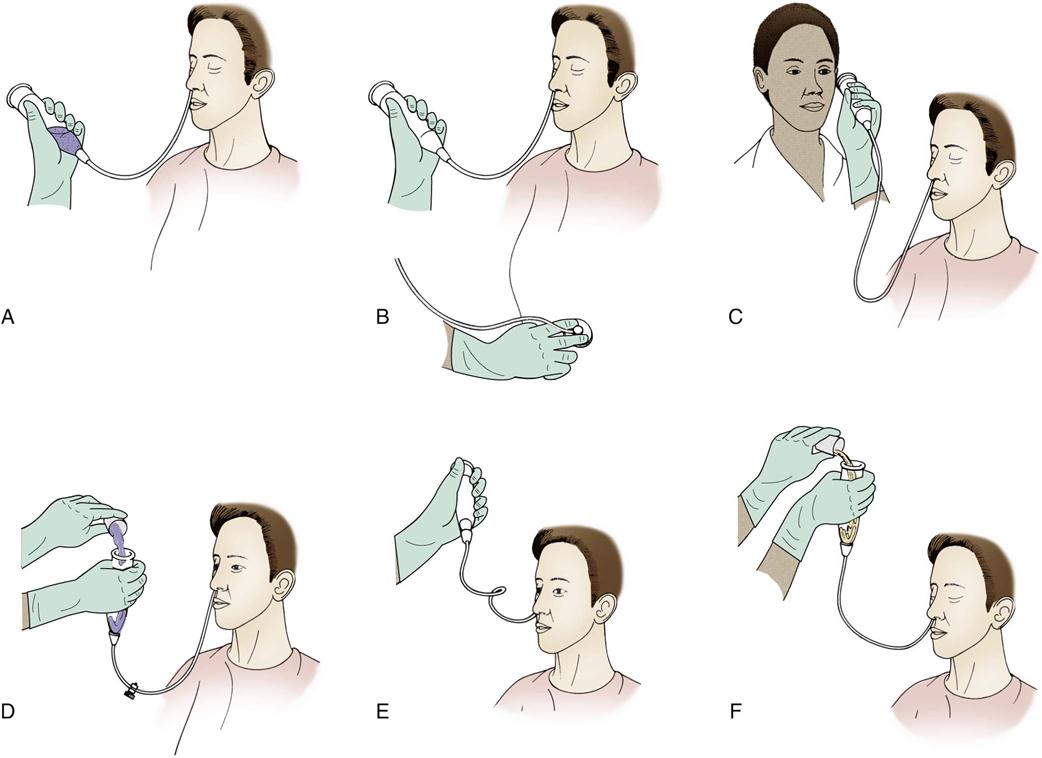
• The procedure for giving tubal medications is very similar to steps 1, 2, and 4 of the procedure for giving oral medications. The major difference is that the medicine must be crushed and then put into the tube rather than having the patient swallow it. Some institutions suggest all medications be crushed, mixed together in one cup and administered; other institutions wish each medication to be crushed and administered separately. If NG suction is attached to the tubing, disconnect it and clamp the suction tube shut. Clamp the NG tube and attach a bulb syringe. Next, pour the medication into the syringe, unclamp the NG tube, and let the medication run in by gravity. Add water, usually at least 50 mL or according to the institution’s policy, to flush and clean out the tubing when the medicine has all passed through the tube. Reclamp the tube. The tube remains clamped for at least 30 minutes before the suction tube is reattached so that there is time for the medication to be absorbed. This procedure is shown in figure 10-1.
Rectal Administration
When a patient has severe nausea or vomiting, medication may need to be put into the rectum, thus avoiding the mouth and stomach. Unlike an enema, when medication is given rectally, the medication is left to be absorbed and not expelled. Accurate dosage through rectal administration is somewhat more difficult and harder to predict than are the small, accurate doses used in oral medications. This is true for a variety of reasons:
• Some required medications do not come in suppository or enema form.
• Sometimes the patient has diarrhea and cannot hold the medication.
• Sometimes other rectal problems may make using this route a problem.
• If the patient has a lot of fecal material, the medication may not be well absorbed.
• Medications are not absorbed from the rectal mucosa at a standard or predictable rate.
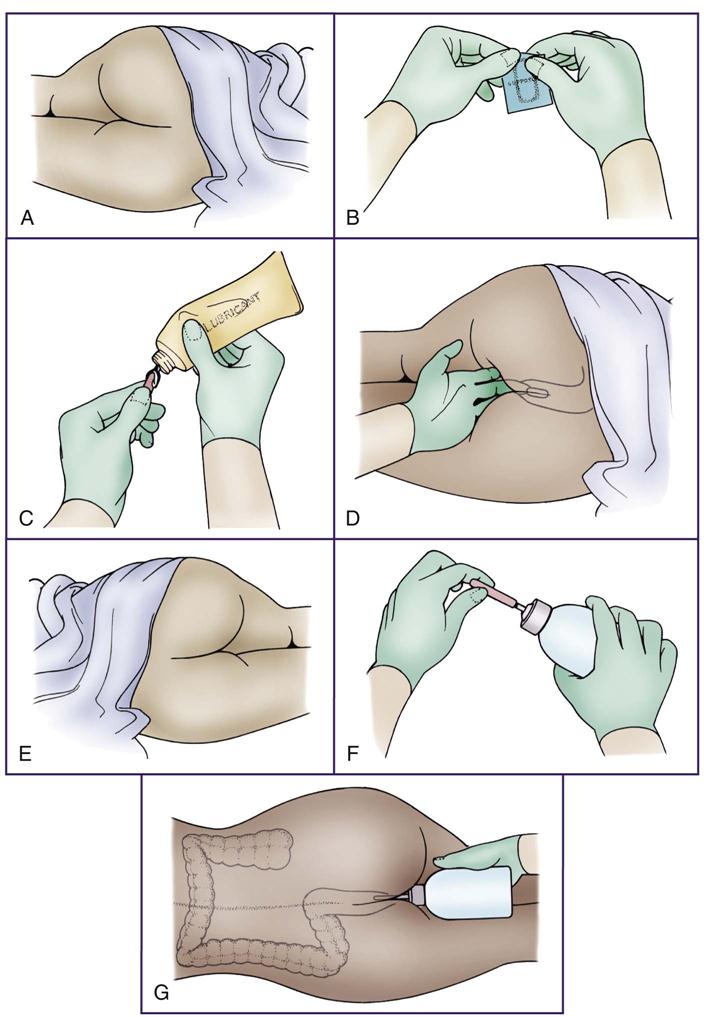
The procedure for administering rectal medications is described in Procedure 10-2. Note that steps 1, 2, and 4 again are similar to those for administering oral medications.
 Memory Jogger
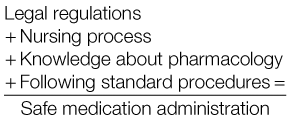
Safe Medication Administration Equation
< ?xml:namespace prefix = "mml" />
Procedure 10-2
 Administering Rectal Medications


Step One: Getting Ready
Step Two: Preparing the Medication
Step Three: Administering the Medication
If the medication is being given by disposable enema, the procedure is the same, except that the lubricated tip is inserted into the rectum and the 50 to 150 mL of medication is slowly squeezed from the disposable container (E through G).
Step Four: Concluding
1. Dispose of the foil packet or plastic containers and the gloves. Clean the medication tray or cart.
2. Leave patients with tissues to wipe themselves if needed and a way to wash their hands.
3. Wash hands.
Parenteral Medications
Standard Precautions
In 1987, in an effort to protect health care workers from exposure to human immunodeficiency virus (HIV), hepatitis B virus (HBV), and other bloodborne pathogens, the Centers for Disease Control and Prevention (CDC) issued recommendations for universal precautions for all health care workers to follow. They recommend that health care workers use gloves, gowns, masks, and protective eyewear when they are likely to be exposed to patient blood or body fluids, and that they consider that all patients might be infected. In 1988, an update from the CDC clarified the specific body fluids that may be a problem (Box 10-2). Evidence has suggested that only blood, semen, vaginal fluid, and possibly breast milk could carry HIV. These precautions also apply to a variety of other body fluids and tissues (see Box 10-2), although the risk from these is unknown. In 1996, the CDC published revised guidelines, called Standard Precautions, which are considered to be the primary ways to prevent the transmission of infections.
Standard Precautions recommend the use of puncture-resistant containers for disposing of all needles and sharps. Scoop up the syringe with one hand. Do NOT put the cap back on a needle, because most needlestick injuries occur at this time. Do not break the needle off the syringe. If the syringe is supplied with a safety-cover system, be sure to slide the safety cover in place, per manufacturer instructions, prior to placing the whole syringe in the sharps container. If the syringe is supplied in a retractable needle system, simply place the whole syringe in the sharps container after use, as the needle will retract automatically after injection; in order to activate this system, be sure to administer the full volume of medication present in the syringe. With either product, if the safety feature does not activate or fails, be sure to place the whole device in the sharps container to minimize any risk of needle puncture. Place both needle and syringe in a well-marked “hazardous material” plastic canister directly after use. Research suggests that probably more needlestick injuries occur than are reported, and every effort should be made to prevent people from recapping used needles.
Parenteral Administration
The parenteral route (into the skin) of medication administration may be through intradermal, subcutaneous, intramuscular (IM), or intravenous (IV) injections. Drugs are administered parenterally for the following reasons:
• The patient cannot take an oral medication.
• The action of the medicine is required quickly.
• Gastric enzymes might destroy the medication.
• Medication must be given at a steady rate to provide a constant blood level.
For example, vomiting or unconscious patients may receive IM or IV antibiotics; IV medication may be given in a life-threatening emergency; or a patient may receive continuous IV medication to control heart dysrhythmias.
IM and subcutaneous injections require some time for the medication to reach the bloodstream, so the onset of action may be slower than if the medication were given intravenously. If an individual is filled with fluid (edema), has large quantities of fat, or has poor circulation (for example, if in shock), the rate of absorption may be unusually long for IM or subcutaneous injections.
IV injections or infusions may be needed when medication must go directly into the bloodstream because the action of these methods is rapid. IV medications may be effective for only a short time, requiring frequent doses. Overdosage errors of IV medications can be very serious. Also, the cost is generally higher for IV medication, even though the total dose may be smaller than if the medication were given orally.
Although all medication administration should be 100% accurate, the nurse giving parenteral medication has a special responsibility for careful and accurate administration because any errors in technique or dosage may have serious consequences. Once injected, the medication cannot be withdrawn. Precise administration of drug dosage is essential. Accurately locating the site of injection is required to avoid pain and damage to tissues, nerves, or blood vessels. Aseptic (sterile) technique must be followed to lessen chances of infection. A slow and gradual rate of injection of the medication into the tissues is important for most drugs. This will reduce pain, prevent overdosage, and decrease adverse reactions such as respiratory collapse or heart dysrhythmias.
Basic Equipment
Syringes
Syringes, or instruments for injecting liquids, come in 1-, 3-, 5-, 10-, 20-, and 50-mL sizes and in plastic or glass. Plastic syringes are the preferred equipment because they may be used once and thrown away. This makes them convenient in terms of packaging and disposal, but they are more expensive than glass and cannot be used with some medications; also, dosage lines or calibration may be more difficult to read. Reusable glass syringes cost far less, but they may break, may become loose with constant use, and must be cleaned, repackaged, and sterilized each time they are used. Needleless syringe systems are also now available for use, consisting of a high-pressured delivery device, a needleless syringe, and a cartridge of pressurized air deliver the medication across the dermis. Needleless systems offer a pain-free alternative, although medications available for delivery through this method are limited. Cost and medication exposure (in the form of powdered or aerosolized compounds) are risks associated with the use of a needleless system (Figure 10-2).

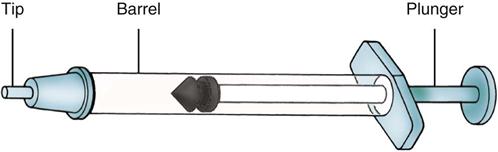
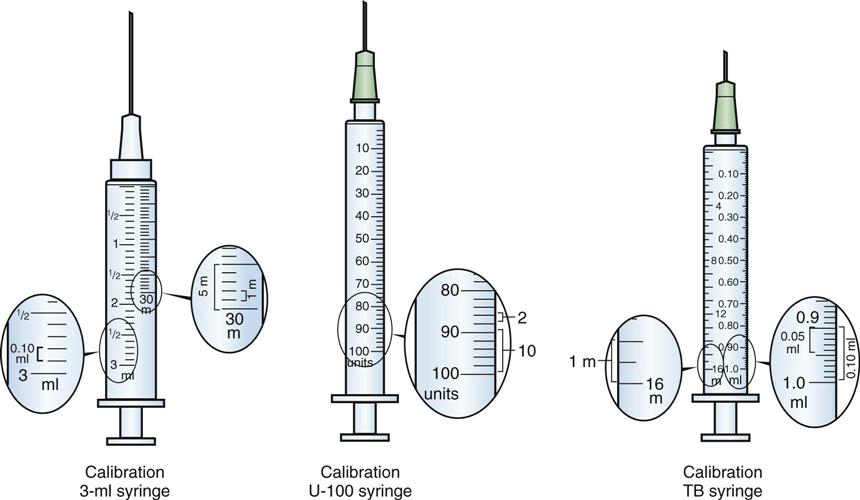
Syringes are made up of three main parts (Figure 10-3). The tip is the portion that holds the needle. The needle screws onto the tip or fits tightly so it does not fall off. The barrel is the container for the medication. The calibrations are printed numbers on the barrel, and they indicate the amount or volume of medication in either minims (m), milliliters (mL), units, or cubic centimeters (cc) (Figure 10-4). The plunger is the inner portion that fits into the barrel. The medication is forced out through the needle when the plunger is pushed into the barrel.
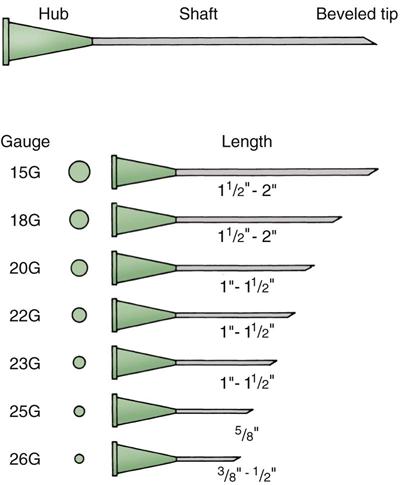
Needles
The needle must be selected according to the needs of the medication. The needle is made up of the hub, or bottom part, which attaches to the syringe; the shaft, which is the hollow part through which the medication passes; and the pointed or beveled tip, which pierces the skin (Figure 10-5). The longer the pointed tip of the needle, the more easily the needle enters the skin. The diameter of the needle is called the gauge. The larger the number of the gauge, the smaller the hole. (For example, a 25-gauge needle is smaller than a 17-gauge needle.) Thick solutions require larger diameters for injection. The needle gauge is written on the needle hub and on the package. Needles also come in varying lengths, from  inch to 3 inches. Generally, the smaller the needle (larger the gauge), the shorter the needle. The smallest needles are used for intradermal or subcutaneous injections because they do not need to go very far into the skin. Filter needles are also available for use when medication is drawn from an ampule to prevent uptake of glass shards and risk of injection. Needleless systems are a recent technology that allows the administration of medication through the dermis and into the bloodstream by way of a high-pressure needleless injection. Pressurized air drives aerosolized or powdered compounds through the skin, allowing for a pain-reduced or pain-free method of rapid administration. The needleless syringe or tip used in this procedure is disposable, as it does come in contact with the skin and is considered a one-time use component of the device.
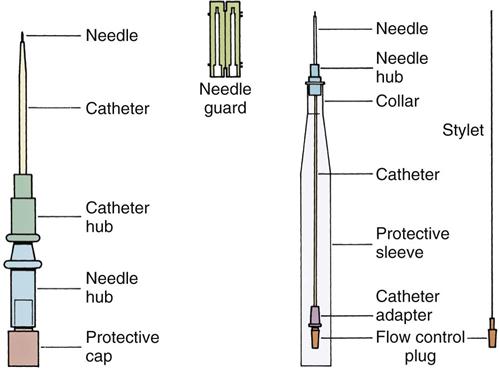
There are also several specialized IV needles that are used when a needle is to be left in place in the vein for a long period (Figure 10-6). Short, small needles with plastic “wings” are used in infants and children, in the smaller veins of the hands in older adult patients, or in adults who are able to move around. These needles are referred to as scalp vein, butterfly, or wing-tipped needles, and all have small pieces of plastic on either side of the needle that can be pinched together when the needle is going in and then flattened against the skin and held in place with tape. These needles have a small, capped plastic tube attached to the hub that can be used when withdrawing blood specimens or injecting drugs such as heparin.
The sizes of the needle and syringe are determined by how viscous (thick) the medication is and by the amount to be injected. For example, blood is very thick and requires a 15- to 19-gauge needle. Sometimes when the volume is very small and the dosage must be very accurate (as with heparin or insulin), a small-gauge needle (such as a 27-gauge) is used so no medicine is lost. If more than 3 mL of medication is to be given IM, the medication must be divided and given in two injections so that a large pool of medicine does not form in the tissue, which would irritate the tissue. The hub of the syringe is to be  to
to  inch above the skin surface when the drug is injected. This allows the needle to be easily grabbed and pulled out if the patient jerks or the needle breaks. (This rarely happens.) A general guide for choosing the best syringe and needle sizes is presented in Table 10-1.
Table 10-1
Suggested Guide for Selecting Syringe and Needles
| Route | Gauge (G) | Length (IN) | Volume to be Injected (mL) |
| Intradermal | 25-27 |  |
0.01-0.1 |
| Subcutaneous | 25-27 |  |
0.5-2 |
| Intramuscular | 20-22 | 1-2 | 0.5-2 |
| Intravenous | 15-22 |  |
Unlimited |
A needleless syringe (such as Dermo-Jet, Vitajet, AdvantaJet, Medi-Jector, and Preci-Jet 50) uses pressure to force aerosolized or powdered medication across the skin into the bloodstream, or directly into tissue, and can be used for some medications and immunizations. Various needleless infusion lines are also used (Figure 10-7). This type of delivery system is growing in popularity because it removes the risks associated with reusing needles and needle disposal.
Procedure for Preparing and Administering Parenteral Medications
The basic procedure for preparing and administering parenteral medications is similar to that for oral medications (Procedure 10-3). Whereas giving oral or enteral medications is a clean procedure, giving parenteral medications is a sterile procedure. So the nurse will note in the following discussion that there is greater emphasis on sterile technique in giving parenteral medications because the risk for infection is high. There is also a need to correctly determine the proper site for the injection. The type of parenteral injection and the medication itself often require special equipment or injection techniques. Accurate selection of the syringe and needle and the packaging of the medication help determine the specific steps to follow in drawing up the medication.
Procedure 10-3
 Preparing and Administering Parenteral Medications


Step One: Getting Ready
Step Two: Preparing the Medication
Step Three: Administering the Medication
Step Four: Concluding
All equipment and medication used in parenteral injections is to be clearly labeled. All packages are to be closely inspected to make certain the contents are sterile. Any equipment that appears old or has crumpled or torn packaging is to be thrown away. Check dates to make certain the sterilization date has not expired. Any medication with a questionable seal or with changes in color or appearance is to be returned promptly to the pharmacy. Any expired medications must be disposed of to ensure they are not accidentally administered.
Forms of Parenteral Medications
Parenteral medications are supplied in a variety of different containers. Ampules, vials, Mix-o-vials, and prefilled tubes are the most common dosage forms.
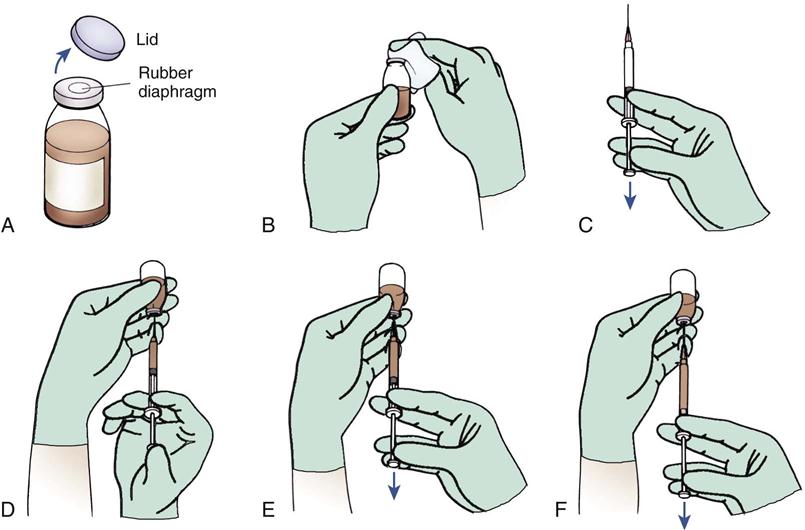
Small, single- or multiple-dose glass or plastic containers of medication are called vials. The top of the glass container is covered first with a rubber diaphragm and then with a small aluminum lid. A tightly fitting metal band holds the rubber diaphragm in place. First the metal lid is removed, then the rubber diaphragm is cleansed with an alcohol wipe, and the needle is inserted through the rubber diaphragm into the medication. An amount of air equal to the amount of solution to be withdrawn is injected into the vial to assist the withdrawal of the medication (Figure 10-8).
The vial may contain a solution, or it may contain a powder to which a liquid must be added just before administration to make a solution. Read the label carefully to determine the type and amount of diluent that is required.
Needles are always inserted into the vial with the bevel up so the nurse may inspect the needle as it goes into the rubber stopper. The needle is always changed before administering the medication to the patient because forcing the needle through the rubber stopper may make it dull or create sharp, irregular edges called “burrs” that would produce pain when inserted into the patient.
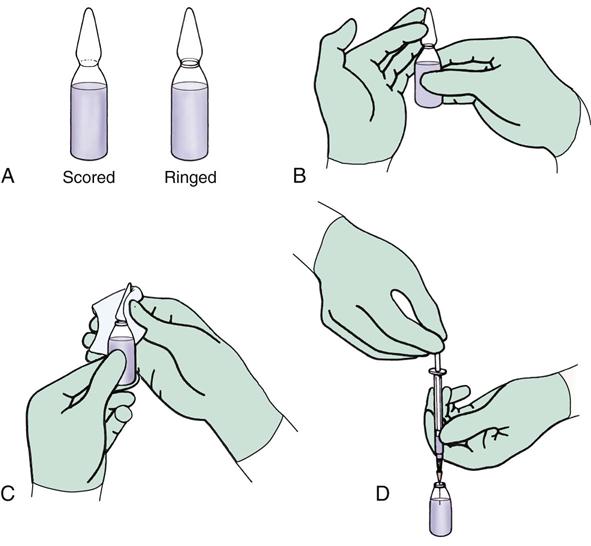
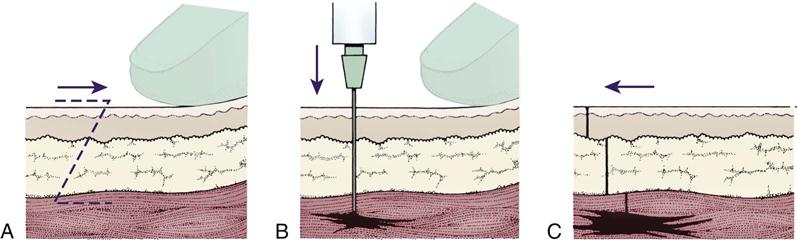
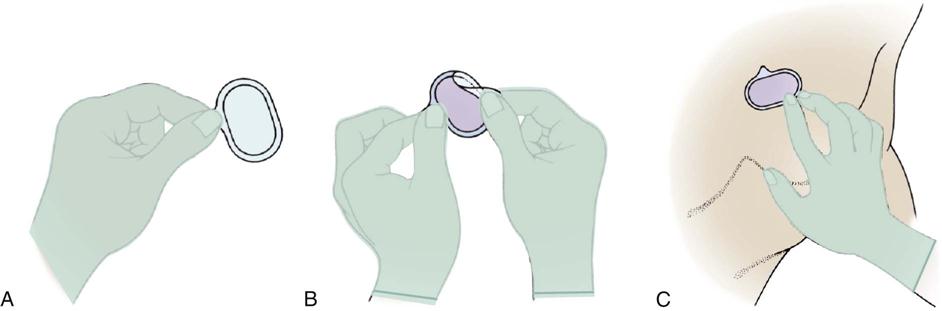
Ampules contain one dose of medicine in a small, breakable glass container. The narrow neck of the ampule may have to be cut with a small ampule file, or may have a line (score) or ring around it, indicating a weakened area where the top can be broken off. All the medicine can be shifted to the bottom of the ampule by flicking the top lightly with a finger. Grasp the top above the scored or ringed area with an alcohol wipe or gauze pad and pull down sharply on the glass top. The top should easily fall off, allowing insertion of the needle into the ampule to draw up the medicine (Figure 10-9). A filter needle is used to prevent glass shards from being drawn up into the syringe with the medication. Ampules were very common forms of medication storage in the 1960s and 1970s, after which their popularity decreased because of the availability of less expensive vials. There is interest in using ampules again as a way to reduce allergic reactions to the latex stoppers in the vials. Therefore the American Society of Health Systems Pharmacists has recommended the use of ampules whenever possible.
Occasionally two medications may be ordered that may be given in the same syringe. Two compatible medications are often ordered to be given together as a preoperative medication before surgery (for example, meperidine [Demerol] and promethazine HCl [Phenergan]). Another example is the common practice of ordering two types of insulin (for example, regular and neutral protamine Hagedorn [NPH]) to be given together. In contrast, many antibiotics must be given in separate syringes because they chemically precipitate (harden and separate into layers) or become inactive if mixed together. It is important when mixing medications in one syringe to remember the following:
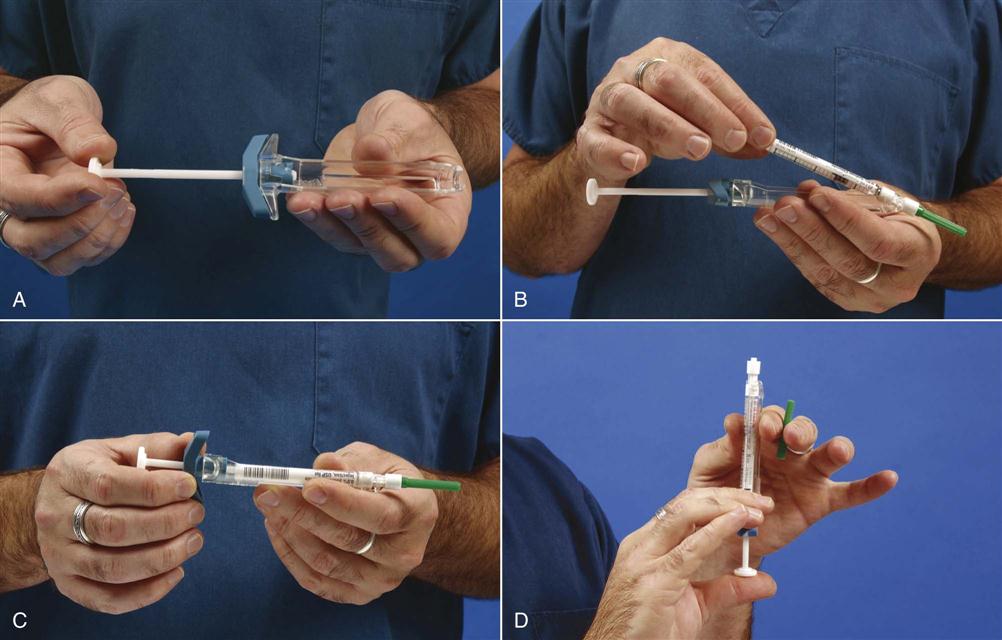
Medications that come as a powder must have a solution added immediately before use. The diluent for the powder and the amount to be used are to be specified on the label. Frequently, normal saline solution or sterile water is used. The diluent may be drawn into a 1- or 2-mL syringe and added to the powder. Roll the vial carefully to make certain all the powder is dissolved in the liquid. If the powder does not completely dissolve, do not give the medication. Some of these medications come in a two-compartment vial called a Mix-o-vial. The top compartment contains a sterile solution; the bottom compartment contains the medication powder. A rubber stopper separates the two areas. Pressure on the rubber plunger of the top compartment forces the rubber stopper below to fall into the bottom compartment, letting in the solution to dissolve the powder. The vial is gently rolled to help dissolve the powder, and then a needle may be inserted to withdraw the solution (Figure 10-10).

Any multiple-dose vial or newly mixed (reconstituted) powder solution must be clearly labeled when it is first opened. The date, time, and concentration are to be included, as well as the expiration time of the medication. The nurse who opened or mixed the medication also initials the label.
Many narcotics and emergency drugs (such as adrenalin) come in prefilled syringes and cartridges. These medication cartridges may be quickly slipped into a plastic holder and screwed into place; after the needle is added, the medication is administered (Figure 10-11). Prefilled syringes are particularly helpful when time is important (such as during a cardiac arrest) or when the dosage of medication rarely varies.
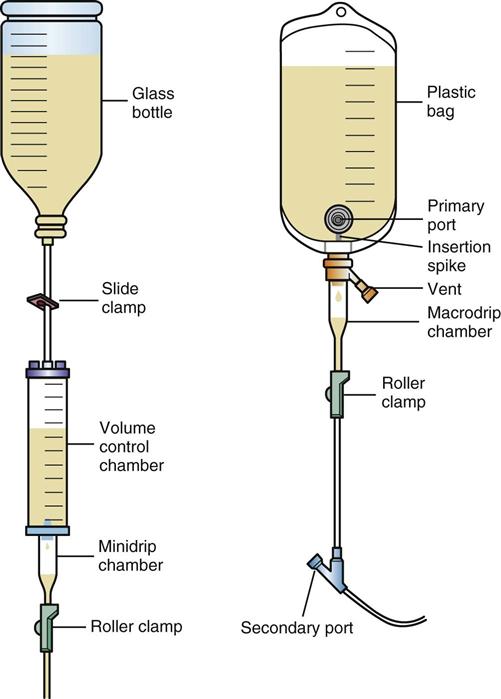
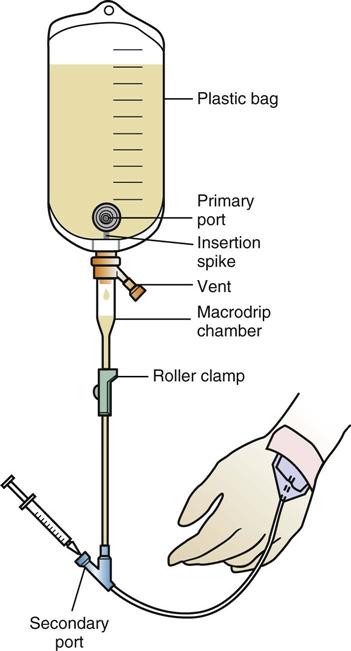
Medications or solutions to be given intravenously come in large plastic or glass containers that hold from 50 to 1000 mL. The opening to the glass container is plugged with a hard rubber stopper, a thin rubber diaphragm, and a metal cover. The metal cover and diaphragm are removed just before inserting the infusion tube that connects the bottle to the tube through a small hole in the hard rubber stopper. In many products, there is also a second small hole in the rubber stopper that allows air to enter the container to replace the amount of medication being infused. Plastic containers come sealed in another plastic bag, which is not opened until the infusion is to begin. Air may enter the plastic bag either at the bag opening or farther down on the infusion tubing (Figure 10-12).
Some medications, such as antibiotics, are ordered to be given every few hours. This medication comes from the pharmacy already mixed or as a solution to be injected into a smaller bottle or plastic bag, usually containing 50 to 250 mL of fluid, and hung with new tubing that is “piggybacked” or “secondary” to an infusion that is already running. The existing solution is clamped off while the piggyback medication is administered, usually over 20 to 60 minutes, and then the original solution is restarted. The piggyback medication being added must be compatible with the original solution.
After studying these general procedures for administering parenteral medications, examine specific techniques necessary for administration of intradermal, subcutaneous, IM, and IV medications. The equipment, sites of injection, and technique must be completely understood.
 Administering Intradermal Medications
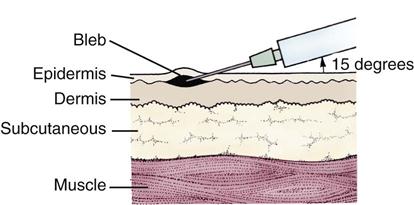
Intradermal injections are used to determine if someone has an allergy (allergy sensitivity testing), for tuberculosis testing, for vaccination, and for allergy desensitization shots. They are also used for injection of local anesthetics before wart removal, during suturing of the skin for minor cuts, and for minor procedures. The medication is injected into the intradermal space between the upper two layers of the skin, the epidermis, and the dermis (Figure 10-13). Injections are made into the inner aspect of the forearm, the scapular area of the back, and the upper chest, if these areas are reasonably hairless. Usually, just a small volume is injected, producing a small bump like a mosquito bite, called a bleb. The blood supply to this area of the skin is less than in other areas, so there is very slow absorption from the intradermal layer. Once the medication has been injected, the patient should not wear tight clothing over the area.
Equipment and Technique
Usually 0.01 to 0.1 mL is injected, so a needle that is both small (25 gauge) and short ( inch) is used. The needle is inserted firmly at a 15-degree angle. The bevel or slanted tip of the needle is pointing upward. The medication is injected, and the needle is swiftly removed. The small bleb should be seen on the skin at the point where the medication was injected into the intradermal space.
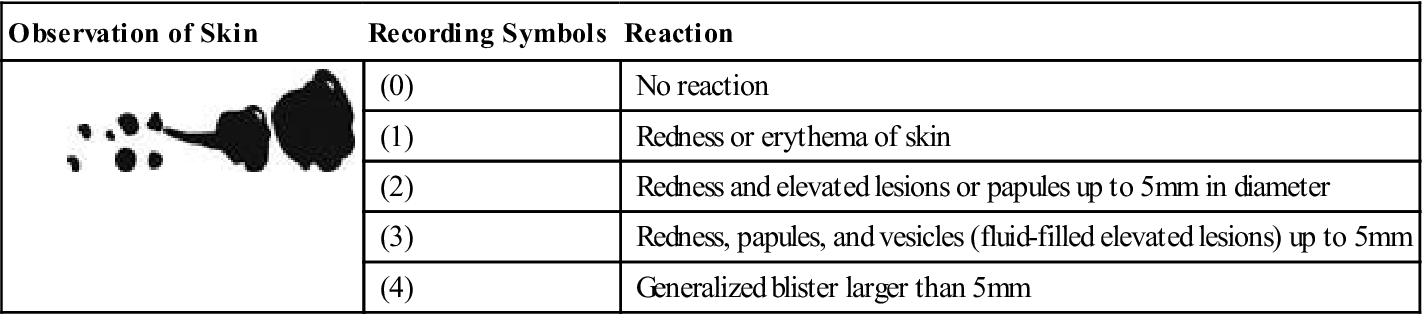
If the injection was given for allergy or sensitivity testing, it is important to record the concentration of the medication used and the site of the injection (Figure 10-14). Many reactions to intradermal injections are not apparent for several hours or even days after injection. It is sometimes helpful to draw a circle around the injection site with a pen to help identify the site accurately at a later date when it is inspected for any reaction. The patient has an allergic reaction, or a clinically significant reaction to testing, if there is a wheal (elevated area) at the site where the diluted dose of medication was injected. The amount of swelling is measured at 5, 10, and 15 mm.
If the patient has an allergy, the injection site may also become red, swollen, and very itchy (pruritic). The patient should not scratch this area and should use cool, wet compresses to reduce the irritation. The patient should call the health care provider or go to an emergency room if he has any symptoms in any other body systems, particularly trouble breathing, shortness of breath, puffiness of the face, or hives.
Skin reactions to intradermal allergy injections or to testing for tuberculosis (purified protein derivative test) must be checked at a predetermined time after the injection. Each agency has a policy on how the patient reaction is to be evaluated and recorded. When testing is done on an outpatient basis, a reliable patient is often told to look at injection site and mail in a postcard showing a picture that is most similar to the reaction. Table 10-2 shows common reactions to intradermal injections and how they are described.
Table 10-2
Description of Intradermal Skin Reactions
| Observation of Skin | Recording Symbols | Reaction |
    |
(0) | No reaction |
| (1) | Redness or erythema of skin | |
| (2) | Redness and elevated lesions or papules up to 5 mm in diameter | |
| (3) | Redness, papules, and vesicles (fluid-filled elevated lesions) up to 5 mm | |
| (4) | Generalized blister larger than 5 mm |
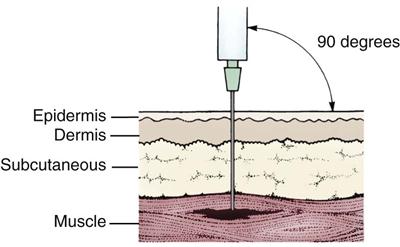
 Administering Subcutaneous Medications
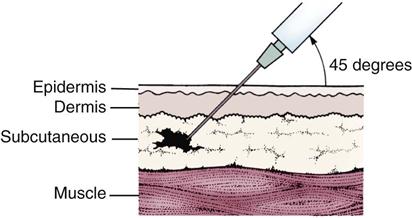
Subcutaneous injections involve placing no more than 2 mL of fluid into the loose connective tissue between the dermis of the skin and the muscle layer (Figure 10-15). (This is a little deeper than the intradermal injections we have been discussing.) Because less blood is normally supplied to this area than to muscle, any medication injected here will be slowly, but completely, absorbed. This means there will be a slow onset of medication action but a long duration of drug action. Medications injected into the subcutaneous tissue are usually very strong, but concentrated into small doses. For example, insulin and heparin are the most frequently given subcutaneous injections. Because these medications are often given daily for a long time in patients with chronic illnesses, special care must be taken not to irritate the tissue with repeated injections in the same area.
Equipment and Sites for Injection
In preparing the subcutaneous injection, only a small syringe and needle are needed. Usually a 25- or 27-gauge needle is used, and one that is no longer than  inch in length.
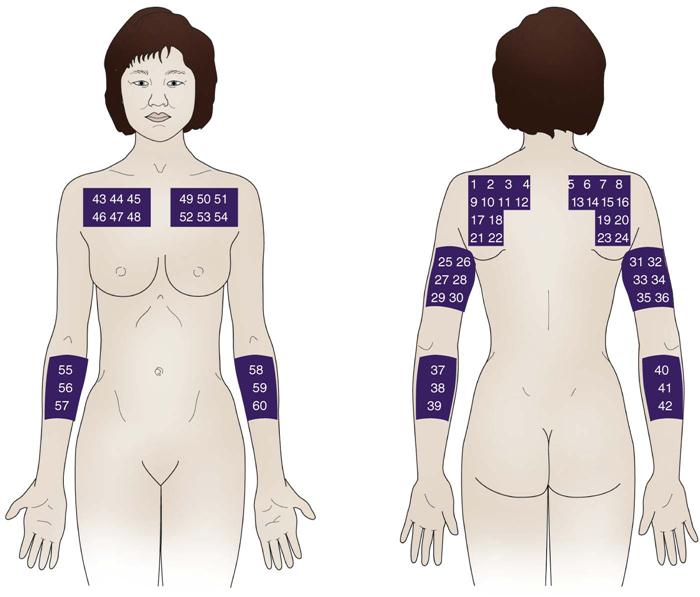
The sites used for subcutaneous injection depend on whether the nurse or the patient is giving the injection. Commonly, the nurse gives subcutaneous injections in the upper arms, upper back, or scapular region. The nurse in the hospital will often need to teach the patient how to give herself or himself the subcutaneous injection while the patient is in the hospital and can practice under the nurse’s supervision. The patient is able to inject herself or himself most easily in the upper arms, anterior thighs, and abdomen. The patient should develop a rotation plan for injection sites, and this is posted with the patient’s medications or by the patient’s bedside. The front view in figure 10-16 shows areas usually used for self-injection. The back view shows less commonly used areas that may be used by the nurse. The site used is part of the information recorded about the injection.
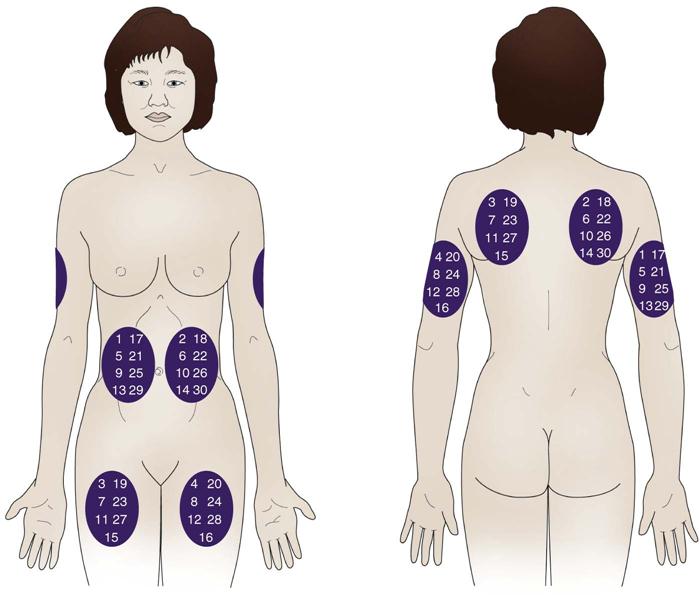
Insulin injections are absorbed 50% faster from the abdomen than from other areas. Other sites for injection include arms, thighs, and buttocks. Because it may be difficult for patients to remember where they last injected the insulin, a “tape-dot” method has been developed. Using the face of a clock, patients inject themselves in the abdomen at 3, 6, 9, and then 12 o’clock. After each injection they put a small dot of tape over the injection site. When they get around to the 3 o’clock position again, they move to the extremities and then back to the abdomen, 1 inch to the side of their previous injection, and start their new series of dots. Thus the sites are rotated in an organized manner. Teach diabetic patients to avoid injecting within 1 inch of a previous injection site for 1 month in order to avoid tissue damage.
Technique
The technique for subcutaneous injection is identical to that for other parenteral medications with the following three exceptions:
 Administering Intramuscular Medications
The IM route is a common route for parenteral injections. Many antibiotics, preoperative sedatives, and narcotics are administered intramuscularly. In intramuscular (IM) injections, the medication is deposited deep into the muscle mass, past the dermis and subcutaneous tissue and into the very deepest layers of the muscle (Figure 10-17), where the rich blood supply allows for rapid and full absorption. The muscles also contain large blood vessels and nerves, so it is important to place the needle correctly to avoid damage to these structures.
Equipment
The syringe chosen has to be large enough to hold the amount of medicine to be injected. Generally, 0.5 to 2 mL is injected IM, although infants and children rarely receive more than 1 mL. On the rare occasions when more than 3 mL of medicine is ordered, give it in two doses rather than in one syringe. The needle length must be chosen to allow deeper placement of the needle. Usually 1- or  -inch needles are used. Very obese patients may require an even longer needle; very thin or emaciated patients may require a shorter needle. The gauge of the needle is determined by the type of medication and how free-flowing it is. Usually 20- to 22-gauge needles are used.
There is substantial risk for overpenetration of the IM layer when providing injections to children. Potential dangers of needle overpenetration into the bone or periosteum may include pain and/or damage to the bone or periosteum and detachment of the needle from the syringe. New research suggests that for injections in the thigh muscle, a 1-inch needle is adequate for all children aged 6 years or younger.
For injections in the deltoid muscle of the shoulder, the recommendations include using:
 -inch needle for any girl weighing 70 kg or less and for any boy weighing 75 kg or less
 -inch needle for any girl weighing between 70 and 115 kg and for any boy weighing between 75 and 140 kg
 – to 1-inch needle for any girl weighing 115 kg or more and for any boy weighing 140 kg or more
Sites for Injection
Five muscles are commonly used for IM injections: the deltoid, dorsogluteal, rectus femoris, vastus lateralis, and ventrogluteal muscles. Each site has advantages and disadvantages, and must be correctly identified for safe administration. These sites have been selected because they are usually away from major blood vessels and nerves, and so are safer to use. Some of these sites are not used for children. Use of the dorsogluteal site most often results in accidental injury to patients because it is close to the sciatic nerve. It is rarely used for IM injections because there have been so many lawsuits related to permanent nerve damage caused by a needle. However, if care is taken to properly identify landmarks, it is a site that may be used when other sites cannot be used. Box 10-3 summarizes the five sites for IM injections and how to identify them.
Box 10-3
Sites for Intramuscular Injections
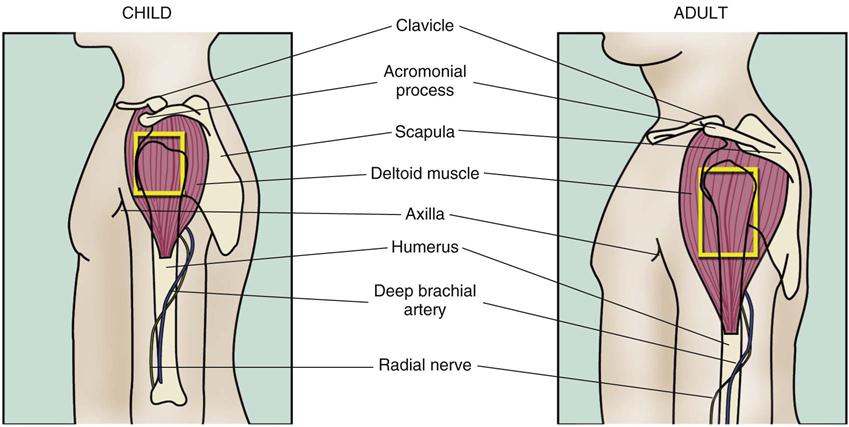
Deltoid Muscle
The deltoid muscle is easily reached but used infrequently because the muscle is small and can accommodate only small doses of medications. The deltoid is also near the radial nerve. No more than 2 mL may be injected here (less in children), and the medication should not be irritating and absorbed quickly. For this site, seat the patient upright or have the patient lie flat with the arms apart. Two imaginary lines can be drawn across the armpit at the level of the axilla and the lower edge of the acromion, the sharp point of the shoulder. Two more imaginary lines are then drawn down on either side, one-third and two-thirds of the way around the outer lateral aspect of the arm. This creates a small rectangle in which medication can be safely given.
Dorsogluteal Muscle
The dorsogluteal muscle is a common injection site for adults because it is relatively free from nerves and major blood vessels. However, the muscles are not developed enough for this site to be used for children younger than 3 years of age. The patient must lie prone (on stomach) on a flat surface and point the toes inward to relax the muscles. An imaginary cross can be drawn from the anus laterally, and from the posterior superior iliac spine down the leg. The injection is given in the upper, outer quadrant of the cross. Hold the syringe perpendicular to the flat surface and inject the medication. Many nurses are afraid to use this site because the sciatic nerve may be injured when nurses fail to properly identify the landmarks.

Rectus Femoris Muscle
The rectus femoris muscle lies medial to (toward the middle of the body from) the vastus lateralis muscle, but does not cross the midline of the anterior thigh. It is used in both children and adults, especially for self-injection. Injections here may be painful if the muscle is not well developed. For this site, position the patient in bed either sitting up or lying flat.

Vastus Lateralis Muscle
The vastus lateralis muscle is located on the anterior lateral thigh away from blood vessels and nerves. It can absorb a large volume of medication. This is the preferred site for intramuscular (IM) injections in infants; it is also a good site for healthy, ambulatory adults because there are few near major blood vessels and nerves. The muscle mass here tends to shrink or become smaller in elderly or very ill patients and may be inadequate. The muscle extends from one handbreadth below the greater trochanter to one handbreadth above the knee.

Ventrogluteal Muscle
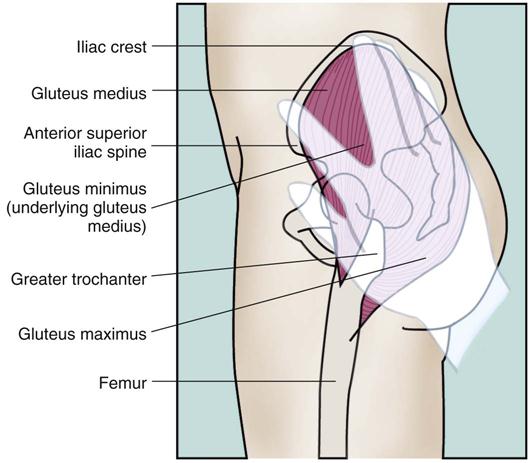
The ventrogluteal muscle is a large muscle mass that is free of major nerves and adipose tissue, and is also remote from the rectum (minimizing the risk of contamination). Whether the site may be used for children depends on the extent of muscle development. The patient lies on the side with the upper leg flexed, or lies prone (on stomach) and points the toes inward to relax the muscles. The palm of the nurse’s hand is placed on the lateral portion of the greater trochanter, the index finger on the anterior superior iliac spine, and the middle finger extended to the iliac crest. The injection is made into the center of the V formed between the index and middle fingers, with the needle directed slightly upward toward the crest of the ilium.
Technique
The process for giving of IM injections is the same as that for other parenteral medications, except for several additional items:
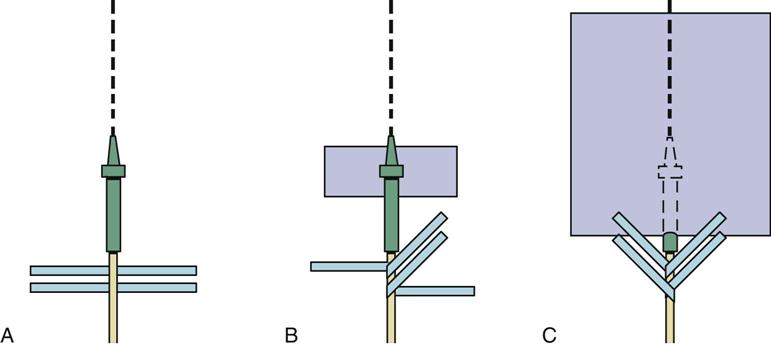
4. Some medications are irritating or may stain the skin (for example, iron). Use the “Z-track technique” of injection (Figure 10-18) for these medications. The Z-track technique uses the skin itself as a “door” to seal in the drug and prevent it from leaking back out. Medications of the type that require the Z-track technique are injected into the ventrogluteal site. Use a long needle and add 0.5 mL of air to the syringe after drawing up the medication to ensure that all of the medication is injected from the needle. Stretch or pull the skin approximately 1 inch to one side. Insert the needle, aspirate, inject the medication slowly, and wait approximately 5 seconds. Remove the needle and let the skin slide back to its normal position. Do not massage the injection site. The patient should avoid putting pressure on the area from clothing, although walking helps increase absorption.
Administering Intravenous Medications
The intravenous (IV) route is used when it is necessary for medication to enter the bloodstream directly. Sometimes large doses of medication must be given, either every few hours or over a long period. Because IV medication has not been exposed to other enzymes or tissues before reaching the bloodstream, the rate of absorption and the onset of action are faster. In addition, some medications cannot be given orally, and may be very painful or irritating if given IM. In emergencies, medication may be injected directly into a vein, but usually the IV medication is given on a scheduled basis or infused slowly through IV tubing or an infusion line that is already in the vein.
If a patient must have numerous medications injected daily, both the patient and the nurse generally prefer IV administration. Some patients do not like to be “tied down” by the tubing and feel general discomfort and irritation from the needle and the medication. Nurses must use greater skill to administer medication intravenously than with other routes, and must be especially careful to prevent infection at the needle site. In addition, because the effect of the medication is immediate, drug overdosages, errors in dosage calculation, or failure to control the rate of administration may produce serious problems for the patient. Thus the nurse has an increased responsibility for implementing and evaluating the medication given. Registered nurses are usually the nurses who will give these types of medicines, but LPN’s/LVN’s often assist in this procedure.
Equipment
IV solutions come in large-volume, plastic or glass containers, ranging from 250 to 1000 mL. Medications in vials, ampules, or prefilled syringes marked specifically “for IV use” may be added to these containers. Many hospitals receive IV solutions from the pharmacy with the medications already added.
Some hospitals have “IV teams” who can be called to insert the IV needle and start the initial medications. More frequently, the nurse has the responsibility for performing the venipuncture and starting the infusion. All hospitals have clear policies about what nurses may do in starting infusions. Most of these policies have been updated to protect the nurse from accidental exposure to HIV and HBV, which may be spread by direct contact with blood and other body fluids and may lead to the development of acquired immune deficiency syndrome and hepatitis, respectively. It is mandatory that nurses review these policies before attempting to start an IV, for their own protection and the protection of others. Policies clearly state that gloves are to be worn and state how to dispose of the equipment that is contaminated with the patient’s blood.
Sites for Intravenous Needle Insertion
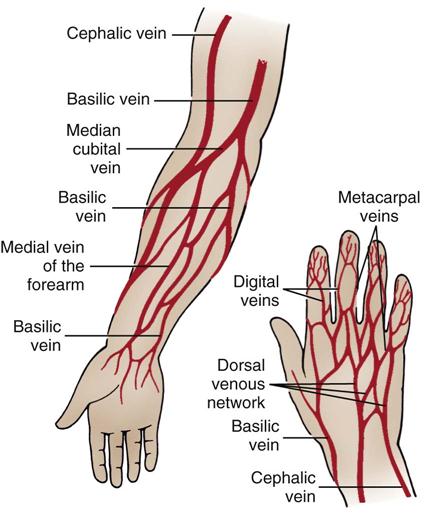
Needles for IV infusions are generally inserted into the smallest veins and as close to the hands as possible. Arteries are not used. As more infusion sites are needed, the needle is inserted farther and farther up the vein, closer to the patient’s heart. This principle allows one vein to be used multiple times. The metacarpal, dorsal, basilic, and cephalic veins are commonly used in adults (Figure 10-19). Veins in the lower extremities; veins over sharp, bony areas or joints; and veins in areas of recent injury or surgery are to be avoided. Veins commonly used in infants and children include the scalp vein in the temporal area, veins in the dorsum of the foot, and those in the back of the hand (Figure 10-20). Elderly or emaciated patients generally have such fragile skin that needles will not stay in the veins of the hand.

Venipuncture and Intravenous Infusion
The procedures for venipuncture and starting an IV infusion are somewhat different from those with other routes of administration. Procedure 10-4 summarizes the steps involved in venipuncture and IV infusion.
Procedure 10-4
 Preparing and Administering Intravenous Medications


Step One: Getting Ready
Step Two: Preparing the Medication
3. Attach the needle to the syringe, keeping the needle covered with a cap.
4. Ready the medication for withdrawal by opening the ampule, if necessary.
6. Insert the needle into the medication container and fill the syringe with the proper amount of medication. (See the text for a discussion of drawing up medications from different dosage forms.) Check the information on the container for the third time with the medication card or MAR. Dilute the medication in the proper volume and type of solution. Always follow the manufacturer’s recommendations. Do not mix medications with blood or albumin. Do not administer any solution that is hazy or cloudy or that has a precipitate or any particles in it.
Step Three: Inserting the Needle into the Vein
 inch below the point of entry into the vein. Then decrease the angle to 15 degrees and slowly push the needle into and along the vein. Blood will flow down into the tubing when the needle is in the vein.
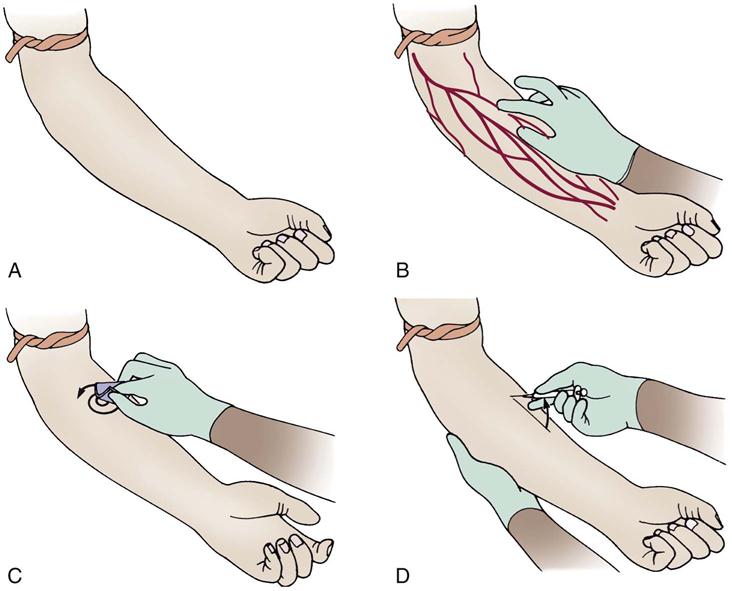
Step Four: Concluding
Modifications in Technique for Specific Situations
Adding Medication by Syringe to an Infusion.
IV medications are commonly added by syringe to an IV infusion that is already running. This is done by using the medication portal available on the IV tubing. Wear gloves while carrying out this procedure. The tubing is clamped above the self-sealing IV portal of the infusion tubing. The portal is cleaned with an alcohol swab, and a syringe containing the medication is inserted through the portal. A short needle is used to avoid accidentally pushing the needle all the way through the tubing. Some institutions may use needleless IV tubing, allowing a syringe to be attached to a luer lock site without a needle. The plunger on the syringe is drawn back until blood is seen in the tubing above the needle at the skin insertion site. This confirms that the needle is in the vein. The medication is then slowly injected into the IV line, according to the prescribed rate of infusion for that medication. Once all the medication is injected, the needle is withdrawn and the tubing is unclamped. Any blood or fluid is cleaned up, and the rate of infusion is readjusted. Then remove gloves and wash hands.
All gloves, needles, swabs, and equipment must be disposed of according to hospital policy. This may involve putting waste in the patient’s waste basket and needles in a sharp’s container in the room or taking them to the dirty utility room. Now wash hands again.
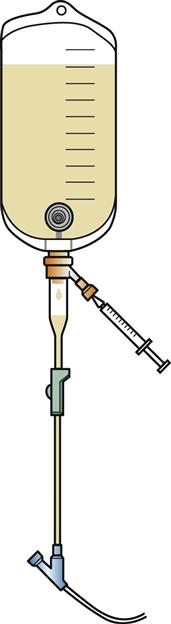
Adding Medication to a Plastic Bag or an IV Bottle.
Make certain that the medication is compatible with the solution into which it will be injected. The top of the plastic bag or the IV glass bottle has an air portal, a tubing portal, and an injection portal (Figure 10-21). Identify the proper portal and cleanse it with an alcohol wipe. Allow the portal top to air dry. Fill the syringe with medication and inject the medication slowly with a small needle through the medication portal into the IV container. Some plastic bags or bottles may have a needleless access port; medication may be added by locking the syringe to a luer lock site, and injecting the medication into the bag or bottle without the use of a needle. Slow administration will allow air to escape from the container while the medication is being injected. The nurse should label the bottle or bag with the date, time, dosage, and medications added and sign her initials.
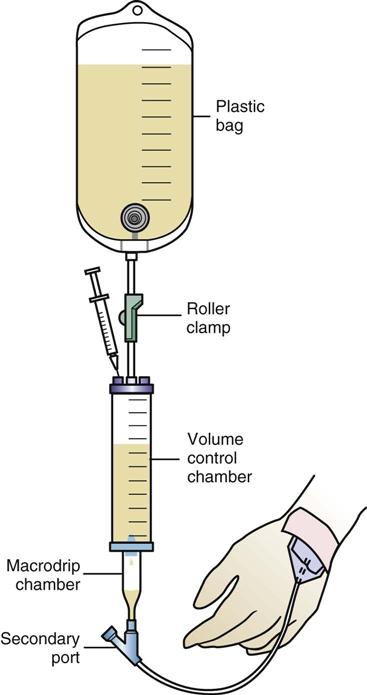
Adding Medication to a Volume Control.
Draw up the medication in a syringe. Fill the volume chamber with the specified amount of IV solution and clamp the tubing between the IV bottle or bag and the volume control chamber. Cleanse the medication portal on the volume control chamber with an alcohol wipe and slowly inject the medication into the chamber. Adjust the rate of flow, allowing for infusion of the fluid in the tubing and the volume control chamber within the specified time limit (Figure 10-22). Label the container with the date, time, dosage, and medication added and sign or initial the label.
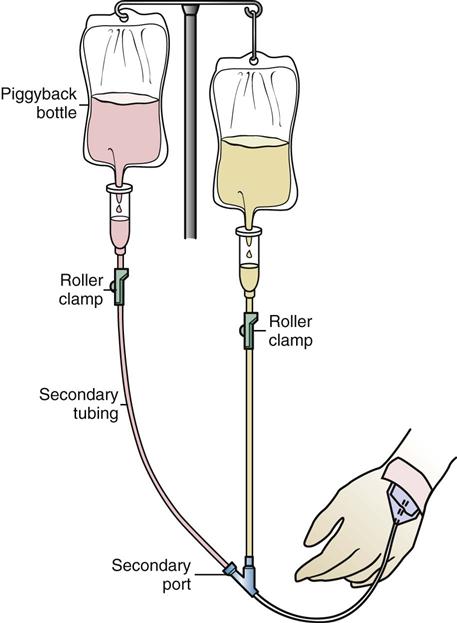
Adding a Medication by Piggyback Infusion.
While an infusion is running to keep a vein open, it may be clamped off and a second IV infusion added to allow administration of medication. In this case, rather than injecting medication directly into the medication portal, the medication is added to a second, small IV bottle or bag, which is connected to the medication portal with a small needle. If this second IV container, or piggyback infusion, is hung slightly higher than the first IV container and the tubing to the first container is clamped off, the medication from the smaller container will be infused (Figure 10-23). Usually antibiotics are given in this manner. The smaller IV container is to be labeled with the time, date, medication, and dosage, and the nurse’s initials. The order will specify the time in which the piggyback infusion should be completed. Once the smaller volume is infused, the setup is removed and the clamp on the original bottle is reopened.
Administration of Medication When There is Only an Intermittent Infusion Device.
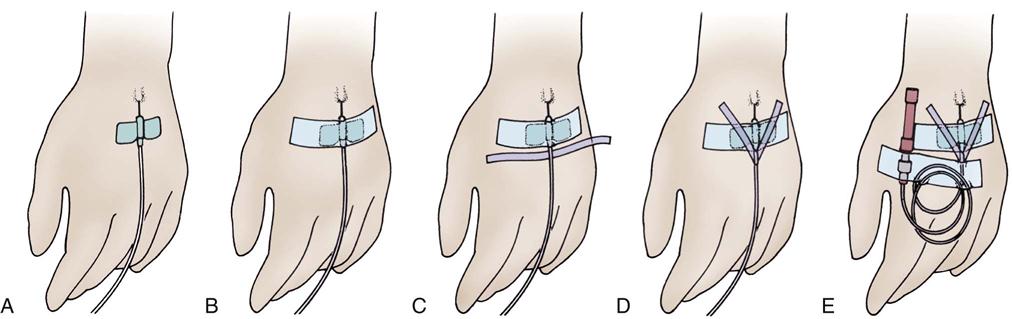
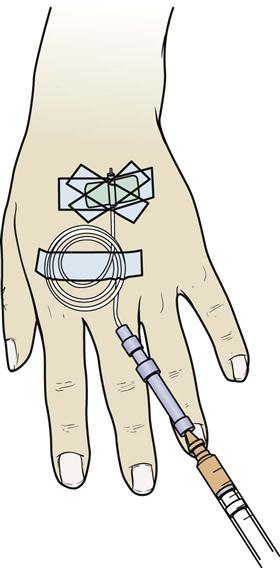
When a butterfly or scalp vein needle is inserted and left in place, it also may become a portal for intermittent infusion. These units were formerly called heparin locks or saline locks, depending on what solution was used to flush them. They are now more often referred to as intermittent infusion devices. Some institutions limit LPN/LVNs from administering drugs through these systems. Follow institutional policy. If the LPN/LVN is allowed to give drugs in this manner, wear disposable gloves and use an alcohol wipe to cleanse the top of the rubber diaphragm at the end of the tubing. Pull back the plunger to aspirate blood into the tubing and then slowly inject the medication into the tubing. Follow this by inserting another syringe with 1 to 2 mL of normal saline to flush the medication out of the tubing. Some institutions also use 1 mL of heparin to help keep the tubing open. The nurse must carefully follow the hospital’s policy. Clean up any spilled blood or fluid, remove the gloves, and dispose of the equipment properly. Figures 10-24 and 10-25 illustrate the taping of an intermittent infusion device and the addition of medication.
Intravenous Infusion Rates
Because so many factors influence the gravity flow, a solution may not necessarily continue to flow at the rate originally set. Therefore, IV infusions must be monitored frequently to verify that the fluid is flowing at the intended rate. The IV flask or bag should be marked with tape to indicate the rate so that the nurse can tell at a glance whether the correct amount has been infused. The flow is calculated when the solution is originally hung, and then rechecked at least hourly. To calculate the flow rate, the number of drops delivered per milliliter must be determined. This number varies depending on the equipment used and is usually printed on the solution set packaging. A formula that can be used to calculate the drop rate is as follows:
gtt/mL of given set/60 (min in 1 hr) × total hourly volume = gtt/min
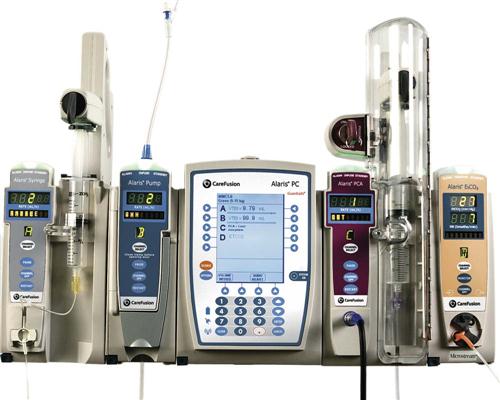
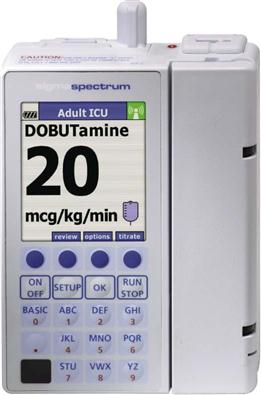
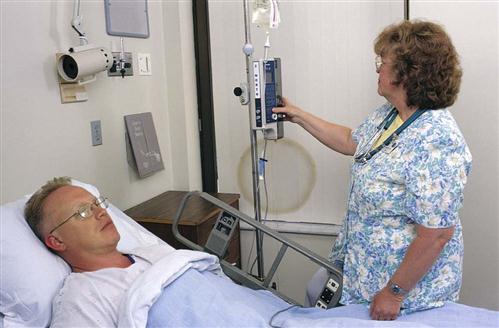
A variety of infusion pumps are available to assist in IV fluid delivery. These devices allow more accurate administration of fluids and medications than is possible with routine gravity-flow setups. Some pumps have flow rates calibrated in terms of milliliters per hour and are referred to as volumetric pumps (Figures 10-26 and 10-27). Others are calibrated in drops per minute and are referred to as infusion controllers. It is important to read the manufacturer’s directions carefully before using any infusion pump or controller because there are many variations in available models. Use of these devices does not eliminate the need for frequent monitoring of the infusion and the patient.
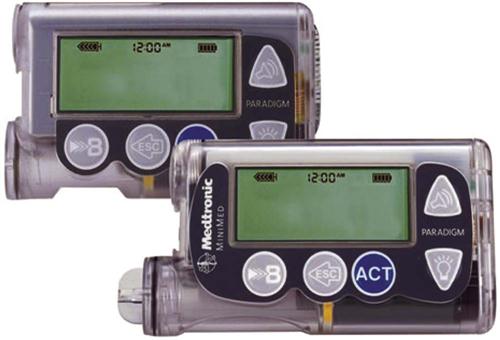
Small pumps weighing approximately half a pound are now available as portable infusion systems for continuous drug treatment of certain patients with type 1 diabetes or cancer. The systems currently in use generally consist of a battery, a programmable electronic “brain,” an electric motor and a pump, and a syringe. All of these parts can be removed as a unit from the small needle kept in place in either subcutaneous abdominal or thigh tissue in the diabetic patient or by a Silastic catheter inserted into an artery supplying the malignant tumor in a cancer patient. Some systems are designed to be worn externally over clothing, stored in a pocket, or suspended from a belt or a neck chain (Figure 10-28). Others are implanted within a subcutaneous pocket in the lower abdomen or elsewhere. The starting dosage levels and six other parameters of therapy are programmed initially by the physician. With this open-loop system, the patient measures the blood glucose levels throughout the day and calculates any necessary adjustments in the baseline infusion rate. The patient places the day’s supply of insulin in a syringe and inserts the syringe into the pump. A length of special tubing is connected to the hub of the syringe, and a subcutaneous needle is attached to the distal end. The patient inserts the needle into the abdomen in the same manner used for a subcutaneous injection. The needle is then taped in place, and the infusion begins. The patient can also push a button that releases a bolus dose to cover each meal consumed. The infusion site is changed every 2 days and kept dry to prevent bacterial contamination.
A second type of pump is a closed-loop system, sometimes called an artificial pancreas. This unit consists of a device that constantly measures blood glucose levels and sends information to a small computer, which calculates the needed dose of insulin and triggers the batter-powered delivery system. The insulin is then delivered through a subcutaneous needle that is usually implanted in the abdomen.
Additional Delivery Systems
Several other sites may be used for long-term administration of fluids and medication following special placement of catheters by a physician.
The Hickman catheter has been used for years as a venous access device. This device is commonly used for obtaining blood samples and to administer medications or hyperalimentation. This catheter and other similar venous access devices are implanted in a large vein such as the cephalic or internal jugular vein. The tip extends into the right atrium, and the end of the catheter exits the vessel through the chest wall. The end of the catheter has an intermittent infusion port attached. The flushing and special care of this tubing are required to keep it patent (open and unblocked).
Using the epidural route, a catheter is placed into the spinal column through a lumbar puncture. Anesthesia and narcotic analgesics are often administered by this route during surgery and postoperatively. The procedure for injecting or infusing medication through the epidural catheter follows that used for the IV route. The epidural route requires much lower doses of medication than the IV route; in addition, the effects of the medication last longer.
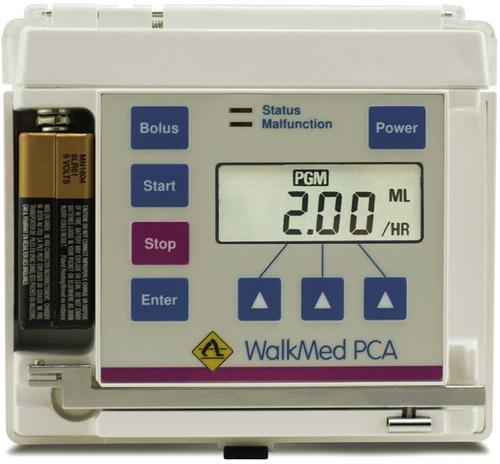
Percutaneous administration (PCA) and percutaneous epidural administration (PCEA) systems are often used in both venous and epidural sites for acute or chronic pain management (Figure 10-29). This method is also often used for short-term treatment of severe pain after surgery. The medication is delivered through an infusion pump using a microdrop infusion set. This pump allows the patient to receive a predetermined IV bolus (a preset quantity of drug injected into a vein at one time) of an analgesic (usually morphine) by using the syringe pump mechanism. Another type of device is a patient-controlled analgesia unit. Using this equipment, the patient can control when a dose of pain medication is released. The health care provider orders the dose of medication and how often the patient can receive it. The pump is then set or calibrated to deliver the ordered dose whenever the patient pushes the button (Figure 10-30). The equipment can be locked from 5 to 20 minutes after a dose is given. The lockout mechanism prevents accidental overdose or excessive dosing by the patient. The pump also records the number of times the button is pushed and the total amount of all medication given. The pump may be programmed for continuous administration, patient-activated delivery, or clinician-activated delivery. The pump also records all bolus attempts, successful and unsuccessful, made by the patient. This helps the provider determine if the patient feels more medicine is needed than what is allowed. These systems are left in place for extended periods, and only need monitoring to ensure that the medication provided does not run out. These systems in hospitalized patients provides a method for nurses to administer medication, allow patients to self-manage their pain based on their perceived need, and avoid use of frequent IM injections.
General Nursing Actions for a Patient with an Intravenous Infusion
A patient receiving an IV infusion is to be checked hourly, and the rate of infusion closely monitored. When an infusion runs behind schedule, the infusion rate should never be increased to “catch up.” Too much fluid could overwhelm infants and patients with congestive heart failure, arrhythmias, pulmonary edema, or kidney failure. Intake and output records are closely monitored. The patient should maintain an hourly output of 30 mL of urine or more. Any decrease in this level is promptly reported to the physician.
When one IV infusion has been completed and another is started, the rate is turned down very low to keep the vein open but not stopped. Using aseptic technique, the old infusion container is clamped off, the old container is exchanged for a new container, and the drip chamber is filled halfway before the tubing is unclamped and the rate is recalculated.
If the completed infusion is to be discontinued, explain to the patient what is to happen, then clamp the tubing, loosen the adhesive tape, and put on gloves. Holding a gauze pad in the nondominant hand, apply gentle pressure on the venipuncture site with the pad and carefully withdraw the needle with the dominant hand. The needle should be inspected to make sure it is intact. The area is then cleaned with an alcohol wipe and elevated, if possible, and direct pressure applied to stop any bleeding at the site. Check for bleeding after 1 to 2 minutes. Follow institutional procedure in applying an antibiotic ointment, povidone-iodine (Betadine), or just a clean pressure dressing to the area. Dispose of all contaminated equipment in the authorized way.
In evaluating the patient receiving an infusion, there are six primary areas of concern.
Failure to Infuse Properly.
Occasionally, the tubing may become bent or the patient may be lying on the tubing, preventing proper infusion. At other times, the needle may become lodged against the wall of the vein; pulling back slightly on the needle and reanchoring it will start the flow again. Sometimes the rate of infusion is so slow that a small clot may form at the end of the needle, blocking the flow. The IV container might have to be elevated to keep adequate pressure for infusion, or blood pressure cuffs or tight gowns that are restricting fluid flow might have to be removed. Starting at the bottle and moving downward, check every part of the infusion setup for problems. If the IV container is placed below the needle site and the needle is in place and not obstructed, gravity causes blood to run back into the tubing. If blood fails to return to the tubing, suspect that the needle is out of place or blocked.
Infiltration.
Another common complication occurs when the needle becomes dislodged from the vein, allowing infusion of medication and fluid into the tissues (infiltration). This produces pain, swelling of the area, and redness. When some kinds of medication accidentally leak into tissue, they can irritate and damage the tissue. Whenever IV infiltration is discovered, the infusion site must be carefully inspected for signs of injury. The infusion is discontinued and the physician contacted, especially if necrosis, sloughing, blistering, or unusual swelling is seen. Warm, moist compresses are then applied to the area. Sometimes other drugs are injected to counteract the medication that accidentally infused into the tissue.
Air in the Tubing.
Air that is infused into a patient is potentially dangerous, producing a bubble in the bloodstream. If air is seen in the tubing, the tubing is to be immediately clamped below the air bubble and, using aseptic technique, the air is withdrawn through a syringe and a needle inserted at the piggyback portal, or at the hub of the needle. All air, fluid, and blood in the syringe is then discarded. Small amounts of air probably will not harm the patient. Should a larger amount of air actually enter the patient through the tubing, he should be placed with the head down and turned on the left side, and the physician notified. Give the patient oxygen if he complains of shortness of breath.
Signs of Infection.
Redness, swelling, warmth, and burning along the course of the vein are signs of infection or inflammation of the vein (phlebitis) and are often produced or aggravated by irritating medication. They are commonly seen with medications such as potassium, antibiotics, or anticancer drugs, but may occur with any infusion. Stop the IV; the physician should be notified and warm, moist compresses applied to the area.
A contaminated infusion that causes a systemic infection is rare. If the patient suddenly develops chills, fever, nausea, vomiting, and headache, immediately stop the infusion, monitor the patient closely, and contact the health care provider. The solution is saved so that cultures may be taken.
Allergic Reactions.
Some products create an allergic response in the patient. Antibiotics often cause shortness of breath, temperature elevation, or rash. Reactions to blood or blood products are also common, producing shaking chills, hematuria, and temperature elevations. Stop the medication infusion and notify the health care provider.
Circulatory Problems.
Problems in the systemic circulation are produced primarily in two forms: circulating particles (which can cause pulmonary embolism) or excess fluid volume (which can cause pulmonary edema).
In some individuals, the excess fluid accumulates primarily in the lungs, producing coughing, difficulty breathing, crackles in the lung sounds, and frothy sputum. The infusion is slowed and the physician is notified if these symptoms develop.
Table 10-3 summarizes the problems that may occur with an IV infusion and the appropriate nursing actions to take.
Table 10-3
Common Problems with Intravenous Infusions
| Problem | Nursing Action to Take |
| Failure to infuse properly | Check for bent tubing, needle against vein wall, or small clot at needle end; the intravenous (IV) pole may be too low, or the needle may be out of the vein. Check for damage done from tissue infusion. Stop infusion and restart it, if required. |
| IV infiltration | Check to see if any tissue was damaged. Notify physician of any necrosis or sloughing. Apply wet compresses to the area to reduce pain. Stop infusion and restart it, if required. |
| Air in tubing | Clamp tubing and remove the air with a syringe. If air was infused into the patient, put the patient in the head-down position, lying on the left side, and notify the physician. |
| Signs of infection | Check for local and systemic symptoms. Stop infusion, restart with a fresh setup, and notify physician. Treat symptomatically. Save the solution for testing. |
| Allergic reactions | Stop infusion and notify the physician or other health care provider. |
| Circulatory problems | Watch for symptoms of pulmonary edema: shortness of breath, poor color, weight gain, restlessness, edema. Notify the physician. |
| Other | Watch for symptoms of pulmonary embolus: poor color, shortness of breath, chest pain, coughing up blood. Notify the physician. |
Percutaneous Medications
Percutaneous Administration
The topical application of medication for absorption through the mucous membranes or skin is called percutaneous administration. The medication acts locally to clean, soften, disinfect, or lubricate the skin. Many products are now given through transdermal systems to provide effects throughout the body (systemic effects).
It is difficult to predict how topical medications will be absorbed. They often have a short duration of action and require frequent applications. Some medications must be properly inhaled, spread, or shampooed to be effective. In addition, many of these medications are greasy or messy to apply and leave stains on clothing and bedding.
The amount of medication absorbed through the skin or mucous membranes depends on several factors:
• The size of the area covered by medication
• The concentration or strength of the drug
• The length of time the medication stays in contact with the skin
The general condition of the skin itself also makes a difference. Important factors include:
Methods of percutaneous administration include the following:
Procedure for Administering Percutaneous Medications
Follow the same general procedures outlined for other routes of administration when applying medications to the skin or mucous membranes. This is a clean procedure. Strictly follow the rules of safety. The general method for giving percutaneous medications is outlined in Procedure 10-5. However, the site of administration and the form of medication may require minor adjustments in the technique the nurse will use for different types of medication.
Procedure 10-5
 Preparing and Administering Percutaneous Medications


Step One: Getting Ready
Step Two: Preparing the Medication
Step Three: Administering the Medication
Step Four: Concluding
Administering Topical Medications
Topical medications are applied directly to the area of skin requiring treatment. The most common forms of topical medications include creams, lotions, and ointments, although there are many others. Each form of topical application has specific advantages and characteristics. Several forms are discussed in Box 10-4.
Technique
 Technique for Nitroglycerin Ointment
Medicated ointment is an increasingly common method of giving nitroglycerin to patients with chest pain from angina. When properly applied, nitroglycerin ointment (Nitrol or Nitro-Bid) can provide constant medication to help prevent anginal attacks.
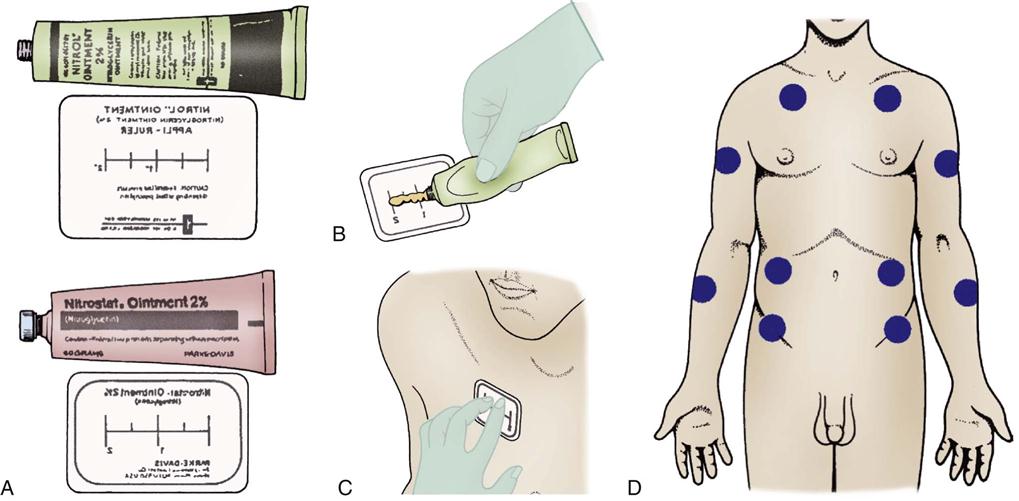
To apply nitroglycerin ointment, select a site on the chest, upper arm, or flank areas. Use an area without hair. Adhesive tape applied to the skin and removed quickly will help remove small hairs. Do not shave the skin because this may cause skin irritation when medication is applied. Clean the skin gently with an alcohol wipe. The physician or health care provider will order the patient to apply a certain number of inches of nitroglycerin ointment. A measuring applicator paper that looks like a ruler is provided with the medication (Figure 10-31). The correct number of inches of medication is squeezed onto the applicator paper as a small ribbon. The applicator paper is then laid on top of the skin where the medication is to be applied. There are several ways to proceed:
Transdermal Delivery Systems
Disks or transdermal patches are another method of giving constant medication through the skin. Some medications using a transdermal delivery system include fentanyl, nitroglycerin, birth control pills, scopolamine, testosterone, and clonidine. Various antismoking programs also use nicotine patches. The principles for administration are similar to those for applying nitroglycerin ointment.
The medication comes packed over a semipermeable membrane and an adhesive patch. A site is chosen for application according to a standard rotation pattern. The patch is carefully picked up, and the clear plastic backing is removed from the patch, showing the medication (Figure 10-32). The medicated side is then pressed firmly onto the skin. The outer edge of the patch is adhesive and will hold the patch tightly to the skin. Patches are changed on a regular schedule, as indicated by the product, unless they become loose or come off and require replacement. Transderm-Nitro, Fentanyl patches, Nitro-Dur, and birth control patches may be worn while showering; all other medicated patches are to be applied after bathing.
Administering Medications to Mucous Membranes
The mucous membranes are the other major route of percutaneous medication administration. In general, medication is easily absorbed across mucous membranes and it is easy to reach therapeutic dosages. However, all mucous membranes do not have the same sensitivity to medication or the same ability to absorb chemicals. The blood supply under the mucous membranes also varies. These differences may be used to good advantage. For example, putting medication in an oily base will slow its absorption and might help when administering antibiotics, whereas a water-based medication would be quickly absorbed and its action would stop rapidly.
There are seven places where medications are commonly applied to mucous membranes: under the tongue (sublingual administration); against the cheek (buccal administration); in the eye, nose, or ear; or inhaled into the lung through an aerosol. Vaginal suppositories, creams, or douches also represent treatment through mucosal membranes. The medications for mucous membranes might come as tablets, drops, ointments, creams, suppositories, or metered-dose inhalers.
The procedure for applying medications to mucous membranes follows the general format already discussed. Different mucous membranes require minor changes in technique, which are listed in Procedure 10-6.
Procedure 10-6
Administering Medications to Mucous Membranes


Buccal Area of Cheek
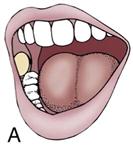
The patient holds the medication between the cheek and molar teeth (A),
where it is rapidly absorbed into the bloodstream and reaches the systemic circulation without being metabolized by the liver. This site is used for nitroglycerin tablets to relieve chest pain.
Ear
Localized infection or inflammation of the ear is treated by dropping a small amount of a sterile medicated solution into the ear. Very low dosages of medication are required, and the medication label must indicate that it is for otic (ear) usage. Have the medication at room temperature. The patient lies on the side with the affected ear up. Shake the medication well and draw the medication up into the dropper. In children younger than 3 years, gently pull the earlobe down and back (B); in adults, gently pull the earlobe up and out (C)
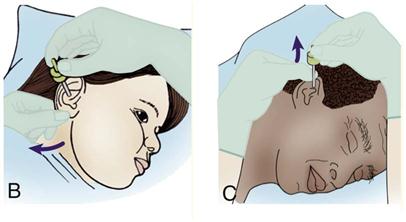
. This will straighten the external canal so that the medication may be dropped into the canal. Do not touch the dropper to the ear. The patient is to remain in the same position for 5 minutes to allow the medication to coat the surface of the inner canal. A cotton ball may also be inserted, if ordered. Repeat in the other ear if indicated.
Eye
Sterile drops or ointments in very low dosage and specifically labeled for ophthalmic (eye) use may be applied to the eye. Gloves are used during the procedure. The eye may be cleaned with normal saline and cotton balls to remove exudate (discharge) or previous medication. Wipe from the nasal side out. Have the medication at room temperature. Infants may need to be restrained. Have the patient look up, and pull out the lower lid to show the conjunctival sac (D). Never touch the eye with the dropper or the ointment tip. Drop the medication or squeeze the ointment into the conjunctival sac, not onto the eye itself. Using a cotton ball, apply gentle pressure to the inner corner of the eyelid on the bone for 1 to 2 minutes to ensure adequate concentration of medication and prevent medication from draining rapidly into the nose (E)
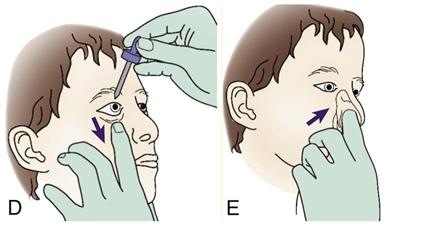
. Instruct the patient to move their eyes around with eyelids closed to spread the ointment over the surface of the eye. Sterile dressings may be ordered to cover the eye at conclusion of treatment.
Nose
Nasal solutions act locally to treat minor congestion or infection. To instill nasal drops, draw the medication into the dropper (F). Have the patient gently blow the nose and then lie down with the head hanging back over the side of the bed (G). Hold the dropper just over one nostril, taking care not to touch the dropper to the skin, and administer the required number of nose drops. Have the patient turn the head slightly. The procedure is repeated for the other nostril. Infants may need to be restrained.
If a nasal spray or inhaler is used, the solution is shaken, the patient sits upright, one nostril is blocked, and the tip of the nasal spray is inserted into the nostril (H). As the patient takes a deep breath, squeeze a puff of spray into the nostril (I).
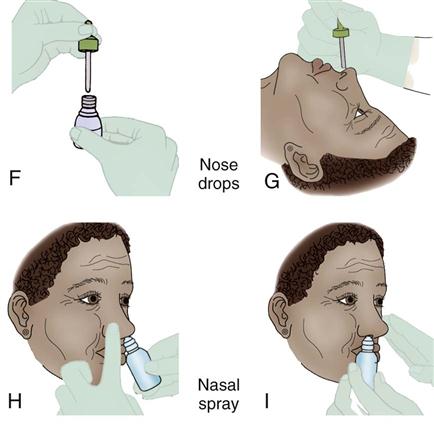
Wipe tip of spray bottle if medication is to be sprayed into both nostrils. Less medication is required with the spray, and the medication is rapidly absorbed into the vascular areas of the nose for prompt action.
Respiratory Mucosa
Medication may be carried through the mouth or nose and down into the respiratory tract through use of aerosol nebulizers, or metered-dose inhalers. These techniques require special equipment that must be kept very clean, and that breaks the medication up into very small particles, which can be carried with air down into the lungs where the desired action takes place.
Aerosols
Aerosols use a special nebulizer mouthpiece, and medications are diluted according to a special concentration. Oxygen is used to deliver the medication. The patient sits upright, places the nebulizer mouthpiece loosely in the mouth, and breathes in and out slowly and deeply while the oxygen is directed through the nebulizer until the medication is gone. The equipment must be cleaned after it is used.
Metered-Dose Inhalers
Metered-dose inhalers are used to deliver specific amounts of corticosteroids or bronchodilators to nasal or lung tissue. These small canisters are pressurized with gas, which propels the medication out and breaks it up into small particles that can be carried deep down into the lungs as the patient takes a deep breath. The medication is carried directly to the site of action with very little systemic effect. The onset of action is rapid. Some medications are designed to be administered through the mouth, and others through the nose. It is important to read the directions completely. Shake the medication before use. If a patient can stand, he or she then leans slightly forward so his or her feet are visible. If a patient must sit upright, have the patient hold the nebulizer in the hand 1 to 2 inches in front of the mouth or at the opening of the nose (J). If the patient cannot cooperate, he or she may place his lips around the mouthpiece. Have the patient exhale, then squeeze the canister in its holder as the next inspiration begins. This will carry medication down into the lungs. Have the patient hold her or his breath as long as possible before exhaling to allow the medication to settle before administering in the other nostril or taking another puff. It is important to time the squeezing of the nebulizer to ensure that medication travels in with the next breath and is not just squirted on the back of the throat or nose. The nebulizer must be cleaned with water after each use. It is important that the patient keep an adequate supply of medication on hand. Check a metered-dose canister for medication by placing it in a glass of water. K, Canister is full. L, Canister is partially filled. M,
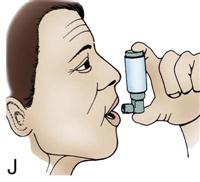
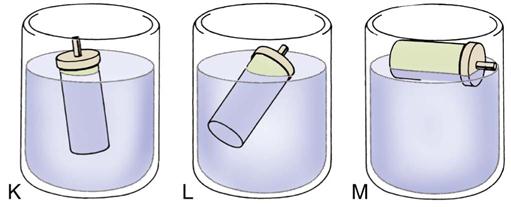
Canister is nearly empty.
Sublingual Mucosa
The patient places the tablet under the tongue (N),
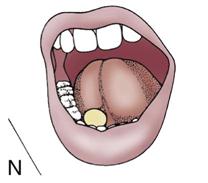
where it dissolves, is rapidly absorbed through the blood vessels, and enters the systemic circulation. This site is used for nitroglycerin tablets to relieve chest pain.
Vagina
Medication to treat local infections or irritation may be applied vaginally through creams, jellies, tablets, foams, suppositories, or irrigations (douches). Room-temperature suppositories are inserted into the vagina with a gloved hand, much like a rectal suppository is inserted. Creams, jellies, tablets, and foams are inserted with a special applicator that comes with the medication. With the patient lying down, the filled vaginal applicator is inserted as far into the vaginal canal as possible and the plunger is pushed, depositing the medication (O).
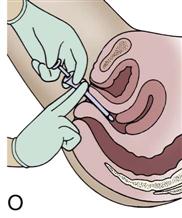
The patient is instructed to remain lying down for 10 to 15 minutes so all the medication can melt and coat the vaginal walls. The patient may need a perineal pad to catch any drainage or prevent staining. Gloves must be carefully discarded according to hospital regulations.
Some medicated solutions are used to wash the internal vaginal area when infection and irritation are present. These solutions are administered as douches. The patient may be on a bedpan or reclining in a bathtub. A douche bag containing a medicated solution is hung from an IV pole or shower head so that it is placed approximately 12 inches above the patient’s hips. The tubing is clamped shut. The vulva is gently washed by slowly unclamping the tubing, and then the douche nozzle is inserted into the vaginal canal 3 to 4 inches and pointed downward toward the patient’s tail bone (coccyx). The labia are held shut while the solution is gently introduced. As much solution as possible is allowed to fill the vaginal canal before the labia are opened and the solution flows out. Rotate the nozzle gently to allow the solution to reach and wash all areas. When all the solution has been used, the nozzle is withdrawn, all the equipment is cleaned and put away, and the gloves are discarded.
Additional Guidelines
Get Ready for the NCLEX® Examination!
Key Points
• Specific steps have been outlined for giving medications orally, by NG tube, and rectally.
• Specific precautions have also been presented for administering medications by the different routes.
• The nurse’s responsibility in medication administration remains significant.
Additional Learning Resources
 Go to your Study Guide for additional learning activities to help you master this chapter content.
 Go to your Evolve website (http://evolve.elsevier.com/Edmunds/LPN/) for additional online resources.
Review Questions for the NCLEX ® Examination
1. The patient who would be the best candidate to receive medication by IM injection would be:
1. the patient who has no difficulty swallowing capsules
2. the patient who is experiencing an episode of prolonged weakness
3. the patient who is in a life-threatening Code Blue situation
4. the patient who is experiencing vomiting after surgery
2. The patient has an order to receive packed red blood cells. The most appropriate needle gauge for the nurse to choose is:
1. 25
2. 23
3. 21
4. 19
3. The nurse has just administered an intradermal injection. The nurse should inspect the injection site afterward for evidence of a(n):
1. blister
2. bleb
3. bruise
4. The nurse is administering an IM injection. The most appropriate angle for administration is:
1. 90
2. 45
3. 30
4. 15
5. The nurse believes that the client is experiencing an allergic response to the IV fluid that is infusing. The highest priority initial action by the nurse should be:
Critical Thinking Questions
2. Test yourself on the administration of rectal medications by sectioning a sheet of paper off into four blocks. Label these blocks as follows: “Getting Ready,” “Preparing the Medication,” “Administering the Medication,” and “Concluding the Process.” Now fill in as many steps within each phase of administration as you can remember. Without checking your work against the book, exchange lists with a partner and fill in steps you know of that have been left out. Now answer these two questions:
a. Did your partner’s list include anything that you left out of yours? What?
| buccal forms | elixirs | emulsions |
| capsules | lozenges | pills |
| suspensions | syrups | tablets |
4. Describe techniques and considerations unique to PEG medication administration.
7. Describe Standard Precautions for preventing the transmission of HIV.
10. How do you get rid of bubbles in a filled syringe? Why should you bother?
