Chapter 100 Techniques of Scleral Buckling
 For additional online content visit http://www.expertconsult.com
Introduction
While almost any rhegmatogenous detachment can be managed with scleral buckling, there has been a trend towards increased use of pneumatic retinopexy and primary vitrectomy.1 This chapter describes the techniques used in scleral buckling. The choice between buckling and other techniques is covered in Chapter 105, Optimal procedures for retinal detachment repair.
The term “buckle” refers to deformation of a structure under stress. Sometimes the term “buckle” is used synonymously with some form of encircling explant, while others use the term to describe local explants.2 In this chapter, the term is used in the more generic sense to imply any type of explant.
Different schools of buckling technique have arisen with divergent views in particular on the role of encirclement and subretinal fluid drainage.3 This chapter has been written to reflect this diversity of practice.
Buckling of the sclera to close retinal breaks was initially achieved using combinations of lamellar scleral dissection with compression sutures until it was shown that it could be achieved more efficiently using scleral implants4 and subsequently explants.5,6 Scleral implants are now of purely historical interest. Likewise diathermy, which was used extensively in the past to achieve retinopexy,4 has been supplanted by photocoagulation and cryotherapy. There have also been subsequent refinements of the basic technique of scleral buckling, including intraocular gas injection and subretinal fluid drainage. However, in contrast with other areas of vitreoretinal surgery, there have been no major innovations in the basic technique of scleral buckling in the past 20 years.
Surgical anatomy
Coats of the eye
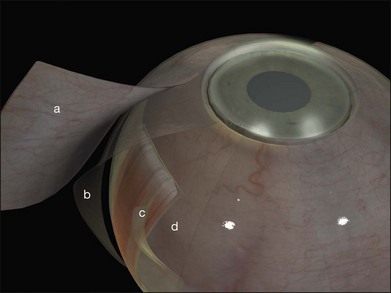
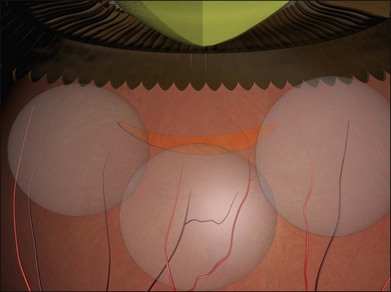
Tenon’s capsule is a layer of fascia that envelops the globe from the limbus to the optic nerve (Fig. 100.1). It is pierced by the extraocular muscles. A glove-like sleeve of fascia extends anteriorly (to the rectus insertions) and posteriorly (for several mm) along the muscles from the points at which they pierce Tenon’s capsule. Between the rectus muscles anteriorly these sleeves are joined by a layer of fascia: the intermuscular septum. The intermuscular septum and fascial sleeves of the recti are sometimes collectively referred to as the posterior Tenon’s capsule. The result of this complex arrangement is that several layers of tissue have to be incised to get access to the surface of the sclera (or sub-Tenon’s space). The anterior Tenon’s capsule may be dissected away from the sclera along with the conjunctiva (to which it is adherent by small fascial filaments). The intermuscular septum is then divided separately. Care must be taken when stripping fascia off the rectus muscles because ligaments from the recti to the wall of the orbit are functionally important in the actions of the muscle.7
Extraocular muscles
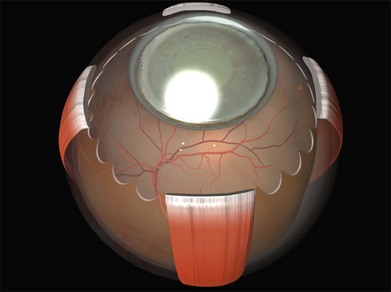
The recti are adherent to the sclera at the spiral of Tillaux. The location of this ring corresponds approximately to that of the ora serrata (Fig. 100.2).8 Circumferential scleral tires are therefore often placed as anteriorly as the rectus muscle insertions will allow. In this position they support the retina as far anteriorly as the ora serrata (“break ora occlusive buckling”).
 ) portion of the insertion to facilitate suturing seems to have little effect on ocular motility. Note that a vortex vein is usually present under the temporal edge of the superior oblique insertion.
Choroidal vasculature
The long posterior arteries (as well as their corresponding nerves) run anteriorly from the equator at 3 and 9 o’clock and may be damaged by heavy photocoagulation or subretinal fluid drainage in these meridia (Fig. 100.3, available online).
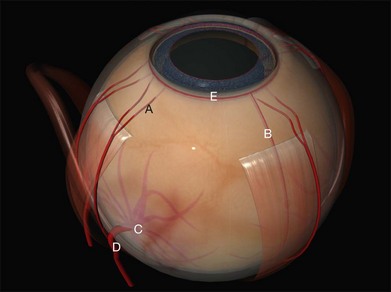
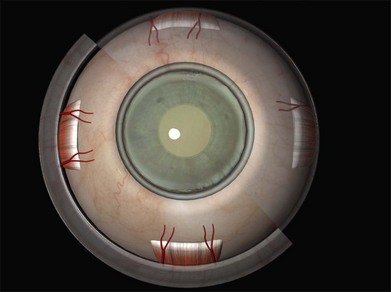
The anterior ciliary arteries are useful indicators of the meridia of the rectus muscle insertions (Fig. 100.4). As they supply the arterial circles of the iris surgical trauma (including diathermy) should be minimized.
Preoperative assessment
• Features suggesting that the retinal detachment is nonrhegmatogenous (see also Chapter 96, Nonrhegmatatogenous retinal detachment)
• The presence of vitreous detachment
• Significant ocular co-pathology, which may affect management (e.g., glaucomatous optic neuropathy, aphakia with vitreous in the anterior chamber, a history of strabismus surgery)
Finding the retinal break
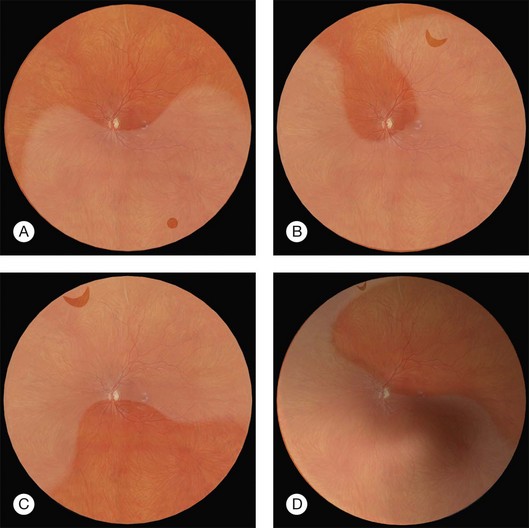
Missed retinal breaks are an important cause of surgical failure so the preoperative examination should be very thorough.9 Even when a break has been found, it is essential to complete examination of the retina, as most retinal detachments have more than one break.10 Their location is carefully documented on a chart that can be referred to subsequently during surgery (Fig. 100.5). These drawings should show the location of retinal breaks in relation to easily visible retinal landmarks such as small hemorrhages, vascular bifurcations, and areas of pigmentation.
Lincoff’s rules
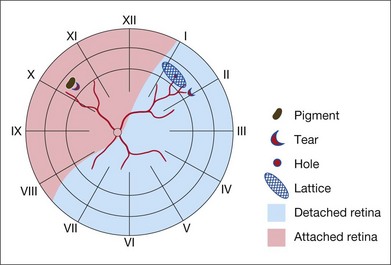
Lincoff has shown how the location of retinal breaks determines the distribution of subretinal fluid (Fig. 100.6).11 Review of the retinal drawings will therefore determine whether the break location is consistent with the subretinal fluid distribution. When the distribution of fluid does not seem to obey Lincoff’s rules reexamine the retina to ensure that no breaks have been missed.
Scheduling surgery
Reducing eye and head movements seems to reduce the rate at which subretinal fluid accumulates. Bed rest, eye patching and rectus sutures have all been used to reduce the amount of subretinal fluid. This may prevent extension of subretinal fluid to the macula and make it easier to identify retinal breaks. It may also avoid the need for subretinal fluid drainage.12 Such measures are rarely practical now, as most retinal detachment care takes place in an ambulatory or semi-ambulatory setting.13
Preparation for surgery
Anesthesia
In theory, sub-Tenon’s anesthesia alone should be insufficient (see above). In practice, sub-Tenon’s anesthesia gives anesthesia equivalent to other techniques,14 presumably due to overspill of anesthetic agents to the peribulbar space. A particular advantage of sub-Tenon’s anesthesia is the ease with which it can be “topped up” intraoperatively.15 Sub-Tenon’s anesthesia may also be a useful adjunct to general anesthesia16 both to block the vagus (preventing bradycardia or asystole from rectus muscle traction) and for analgesia in the immediate postoperative period. The presence of buckles and scarring may make this technique more difficult and less effective in reoperations.
Positioning the head for surgery
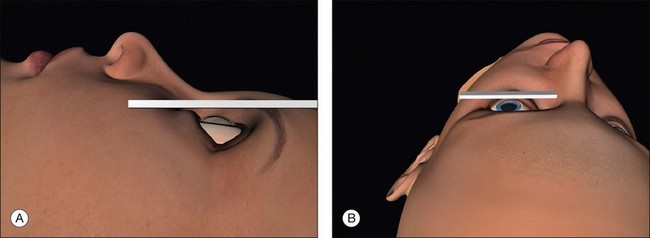
Surgical access is best when the orbital rim is horizontal. This is achieved by extending the neck slightly and tilting the nose away from the operated eye (Fig. 100.7, available online). Once in the correct position the head may be fixed with a loop of clinical adhesive tape.
Surgical steps
Conjunctival peritomy
A circumferential limbal peritomy with radial relieving incisions is made.17 The conjunctiva 3–4 mm behind the limbus is grasped with forceps and gently lifted creating a radial pleat of conjunctiva (Fig. 100.8). A blunt-tipped spring scissors is used to make a vertical radial cut. A second cut is often needed to extend the incision through Tenon’s capsule down to the sclera. Great care is taken not to tear the conjunctiva. The spring scissors can easily be used in either hand and the orientation varied as the incision progresses. A gentle spreading action of the scissors under the conjunctiva breaks the weak trabecular adhesions to the episcleral tissue.
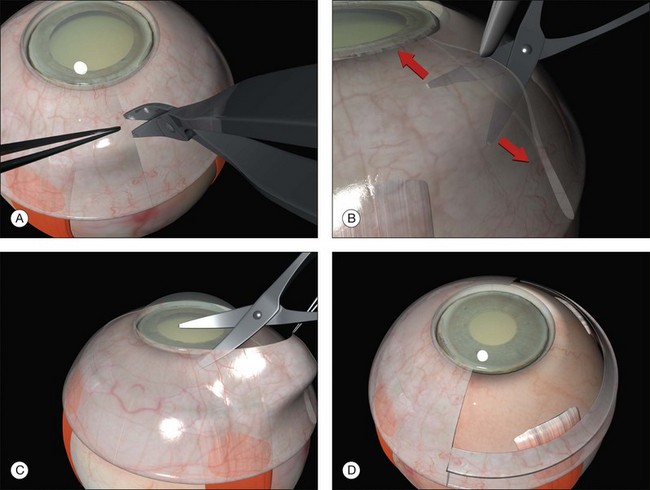
A slight modification of this technique with the circumferential incision 2 mm behind the limbus leaves a frill that may be useful during closure (Fig. 100.9).

Slinging rectus muscles
Between two and four rectus muscles are slung depending on the planned size of the buckle.
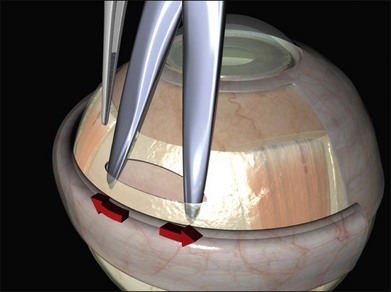
A closed pair of blunt scissors is pushed though the intermuscular septum between two recti. The opening created is enlarged by spreading the blades (Fig. 100.10). In this way, the sub-Tenon’s space is opened and bare posterior sclera is exposed.
The muscle is engaged with a sweeping posterior and circumferential movement around the globe employing a specialized muscle hook (Fig. 100.11, available online). Very posterior “sweeps” risk damage to the vortex veins. Once a rectus has been successfully hooked the globe moves with the hook. If the muscle is inadvertently split a second hook can be passed from the opposite side of the muscle. The remaining anterior fibers of the intermuscular septum are now cut off or swept off. This dissection should be limited to the fascia required to visualize the sclera.

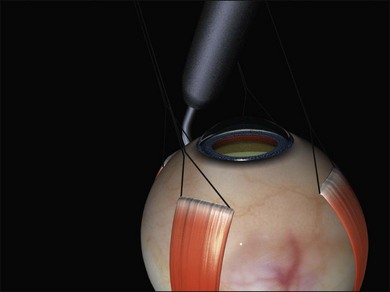
A large braided (e.g., 2/0 silk) bridle suture is passed under the muscle. There are various ways of achieving this involving reverse passage of the suture under the muscle (to avoid engaging the tip in the sclera). Alternatively, a modified muscle hook with a threading eyelet at its tip can be used.18 These bridle sutures can be clipped to the surgical drape to position and stabilize the globe thereafter (e.g., while suturing). When free movement of the globe is desirable (e.g., when searching for breaks) the clips are released.
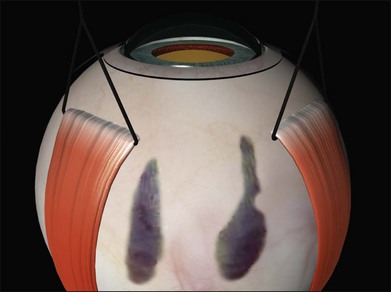
The sclera is now inspected for dark ectatic areas (Fig. 100.12). Suturing and even cryotherapy or indentation at these sites can be perilous so their early identification is essential.
Examination under anesthesia and break localization
The location of each break is marked on the sclera. This essential step is carried out while the cornea is clear and allows planning of the rest of the operation. The sclera is indented under indirect ophthalmoscopic indentation using a fine (but not sharp) tipped instrument such as a Gass scleral indenter.19 Once the indent is seen to correspond to the position of a retinal break sustained (for several seconds) indentation is applied. The resulting transient scleral thinning produces a focal area of scleral translucency and the underlying choroid shows through. This point is then marked with very gentle diathermy or a surgical marker pen. If a marker pen is used the sclera is dried both before and after the application to prevent the dye spreading. Several marks are made for larger breaks.
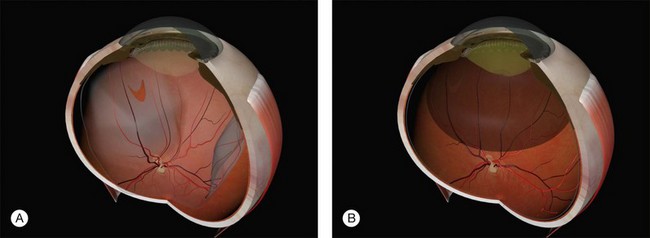
Errors in break localization may lead to buckle malposition. Localization errors tend to be radial (i.e., determining how far back a break is) rather than circumferential (determining its clock hour). For example, if a retinal break is highly elevated (as in a bullous detachment) parallax errors may make the break seem more posterior than it truly is (Fig. 100.13).

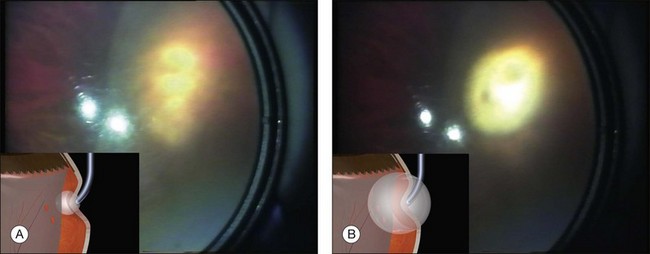
Parallax errors may be avoided by draining subretinal fluid and then reforming the globe with air (the DACE operation) (Fig. 100.14).20,21 The view of the retina through the gas bubble can be challenging for those not experienced with this technique.
Retinopexy
The indent from the explant closes retinal breaks but retinopexy is required to produce an enduring bond between the retina and the retinal pigment epithelium that will persist even if the indent disappears.22
Retinopexy was initially achieved using diathermy in association with lamellar scleral dissection and scleral implants.4 Cryotherapy has supplanted diathermy because it can be performed without scleral dissection and the treatment can be monitored ophthalmoscopically. More recently photocoagulation has also been used.
Cryotherapy
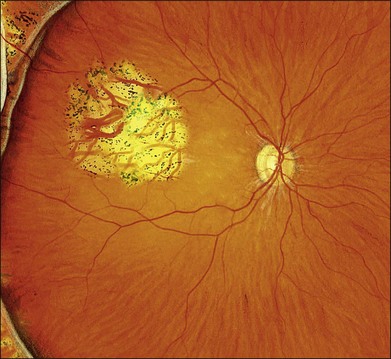
The technique of cryotherapy is described in detail in Chapter 106, Prevention of retinal detachment. The aim is to produce freezing of healthy retina surrounding all the retinal breaks. The treatment is monitored using the indirect ophthalmoscope. When the indent from the tip of the cryoprobe is seen under a retinal break the cryoprobe is activated. After a few seconds one observes whitening of the retina. Smaller breaks can be treated with a single application. The break is seen as a darker area within the freeze and this is useful in confirming that the whole break has been treated. Larger breaks may need several applications. These are applied by working methodically around the edges of the break to ensure contiguous burns with minimal overlap (Fig. 100.15). Refreezing and freezing of the bare central RPE in large breaks are avoided to reduce the risk of RPE dispersion.23
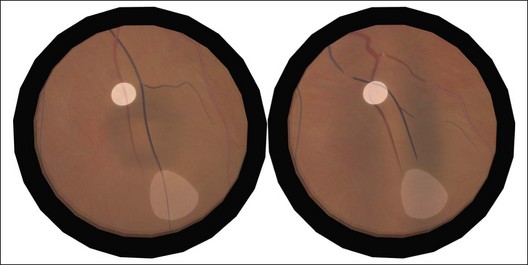
In the presence of shallow subretinal fluid, the indentation of the tip of the cryoprobe approximates the pigment epithelium to the retina and both freeze almost simultaneously. If the breaks are more elevated the pigment epithelium cannot be apposed to the retina. Freezing of the pigment epithelium can then be clearly seen to precede freezing of the retina, sometimes by several seconds (Fig. 100.16). In this situation, what is the optimal end point of treatment: freezing of the pigment epithelium or the retina? This is a particularly important question given the concern about potential adverse effects of excessive cryotherapy on other tissues.24–26 In an experimental model the adhesions produced by freezing of the retinal pigment epithelium alone lacked the microvillous interdigitations normally present between pigment epithelium and retina. The resulting chorioretinal adhesion was weaker than when the freeze was allowed to extend to the retina.27 In practice, the chorioretinal adhesions that develop from freezing of the pigment epithelium alone seem to be sufficient. A further advantage of freezing the retina however, is that the “lighting up” of the retinal breaks is a useful confirmation that all the edges of the break have been treated.
Cryotherapy to the disc or macula (Fig. 100.17) occurs when the indentation from the shaft of the probe is mistaken for its tip (“shaft indentation”) (Fig. 100.18). This cognitive problem can be avoided by encouraging trainees to intentionally indent posteriorly (without actually activating the cryoprobe!) (Fig. 100.19). They then become familiar with the distinctive appearance of shaft indentation.

Beginners find cryotherapy on anterior breaks challenging because the cryoprobe has a tendency to slip over the surface of the eye. This can be overcome with counter-traction from the bridle sutures on the opposite recti (Fig. 100.20). Alternatively, the cryoprobe is intentionally placed anterior to the break and the globe rotated using the tip of the probe. The pressure of the probe is then slightly released while the indent from the probe is viewed using indirect ophthalmoscopy. As the globe returns slowly to the primary position the tip indentation is seen to move. When the indentation of the tip is under the break a very small increase in the pressure applied stabilizes the globe and the cryoprobe is activated.
Diode laser
The delivery technique of transscleral diode laser uses a probe which indents the sclera under indirect ophthalmoscopic visualization. A diode laser aiming beam facilitates accurate placement of the tip. The end point of treatment can be difficult to titrate, particularly in blonde fundi, and over-treatment with choroidal hemorrhage and scleral thinning may occur during the learning curve.28 The theoretical advantages of diode laser (less inflammation, blood–ocular barrier breakdown and pigment dispersion) do not seem to translate into clinical practice as a large randomized trial failed to find any advantage over cryotherapy.29
Photocoagulation
Photocoagulation may be applied several days to weeks postoperatively once the retina has reattached.30,31 While visual recovery was faster in the postoperative laser retinopexy groups the final anatomical and visual results are comparable to cryopexy. Photocoagulation on the buckle is uncomfortable and requires the use of regional anesthesia. The main disadvantage of this technique is the need for an additional procedure.
Choice of retinopexy technique
Intraoperative cryopexy remains a quick and simple technique. The search for an alternative means of producing retinopexy is driven by the belief that cryotherapy is inherently dangerous. This view has been challenged.32
Manipulation of the globe after cryotherapy causes release of pigment into the vitreous cavity23 and some surgeons prefer to carry out cryotherapy at a later operative stage.
Choice of scleral explant
Historically, a number of materials have been used in the manufacture of explants.33 None of these seem to be as well tolerated as silicone rubber which is biologically inert and can be left in situ indefinitely.6,34
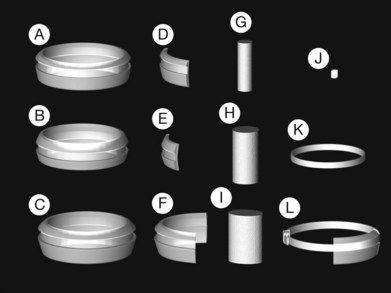
Two types of cylindrical silicone explant are currently in regular use, solid silicone tires and silicone sponges consisting of air-filled cells (Fig. 100.21). Early silicone sponges had communicating air cells and an increased risk of infection35 but this problem has been much reduced by the use of sponges with closed air cells.