Chapter 20 Emergency Airway Management
For online-only figures, please go to www.expertconsult.com 
Airway Anatomy
Internally, the airway is composed of many structures and well-defined spaces. It originates in the nasal and oral cavities (Figure 20-1). The nasal cavity extends from the nostrils to the posterior nares or choanae. Because resistance to airflow through the nose is almost twice that of the mouth, patients who require high flow rates (e.g., during exercise) often breathe through their mouths. The nasopharynx extends from the end of the nasal cavity to the level of the soft palate. Tonsillar lymphoid structures are the primary impediments to airflow through the nasopharynx. The oral cavity is bounded by the teeth anteriorly, hard and soft palates above, and the tongue below. The oropharynx, which communicates with the oral cavity and the nasopharynx, extends from the soft palate to the tip of the epiglottis. The tongue is the principal source of obstruction in the oropharynx.
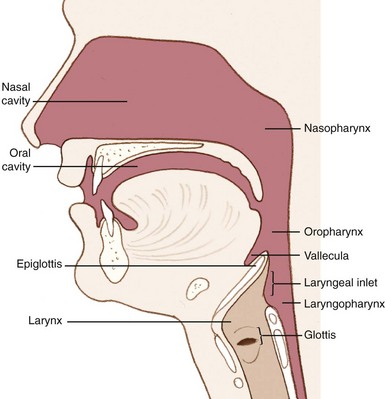
FIGURE 20-1 Lateral airway anatomy.
(Redrawn from Mahadevan SV, Garmel GM, editors: An introduction to clinical emergency medicine: Guide for practitioners in the emergency department, Cambridge, UK, 2005, Cambridge University Press. Courtesy Chris Gralapp. http://www.biolumina.com.)
Externally identifiable landmarks are also important to airway assessment and management (Figure 20-2). The mentum is the anterior aspect of the mandible that forms the tip of the chin. The hyoid bone forms the base of the floor of the mouth. The thyroid cartilage forms the laryngeal prominence (i.e., the “Adam’s apple”) and the thyroid notch. The cricoid cartilage, which lies inferior to the thyroid cartilage, forms a complete ring that provides structural support to the lower airway. The cricothyroid membrane lies between the thyroid and cricoid cartilages and serves as an important site for surgical airway management.
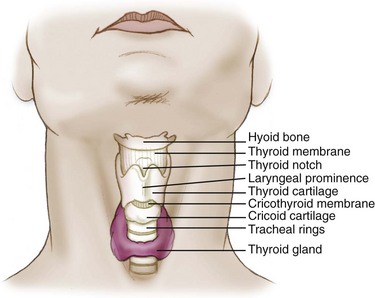
FIGURE 20-2 External airway anatomy.
(Redrawn from Mahadevan SV, Garmel GM, editors: An introduction to clinical emergency medicine: Guide for practitioners in the emergency department, Cambridge, UK, 2005, Cambridge University Press. Courtesy Chris Gralapp. http://www.biolumina.com.)
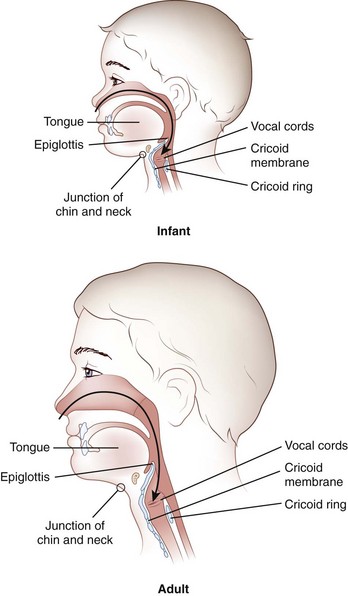
Knowledge of the anatomic differences between adults and infants is integral to effective pediatric airway management. These important differences are summarized in Table 20-1 and Figure 20-3.
TABLE 20-1 Anatomic Airway Differences Between Children and Adults
| Anatomy | Clinical Significance |
|---|---|
| Large intraoral tongue that occupies a relatively large portion of the oral cavity | High anterior airway position of the glottic opening as compared with that of an adult |
| High tracheal opening: C1 in infancy as compared with C3 or C4 at the age of 7 years and C4 or C5 in adulthood | Straight blade preferred over curved blade to push distensible anatomy out of the way to visualize the larynx |
| Large occiput that may cause flexion of the airway; large tongue that easily collapses against the posterior pharynx | Sniffing position is preferred; the large occiput actually elevates the head into the sniffing position in most infants and children; a towel may be required under the shoulders to elevate the torso relative to the head in small infants |
| Cricoid ring is the narrowest portion of the trachea as compared with the vocal cords in adults | Uncuffed tubes provide an adequate seal, because they fit snugly at the level of the cricoid ring; correct tube size is essential, because variable expansion cuffed tubes are not used |
| Consistent anatomic variations with age, with fewer abnormal variations related to body habitus, arthritis, or chronic disease | <2 yr old, high anterior |
| 2-8 yr old, transition | |
| >8 yr old, small adult | |
| Large tonsils and adenoids may bleed; more acute angle between the epiglottis and the laryngeal opening results in nasotracheal intubation attempt failures | Blind nasotracheal intubation not indicated for children; nasotracheal intubation failure |
| Small cricothyroid membrane | Needle cricothyroidotomy difficult and surgical cricothyroidotomy impossible in infants and small children |
Modified from Walls RM, Murphy MF, Luten RC, et al, editors: Manual of emergency airway management, ed 2, Philadelphia, 2004, Lippincott Williams & Wilkins.
Opening the Airway
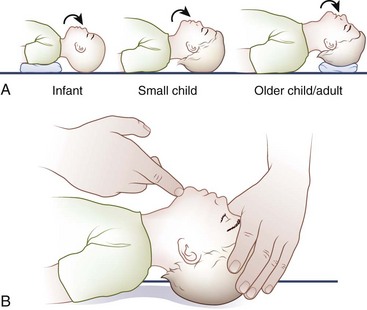
Head Positioning
The optimal head position for airway alignment and patency varies with age. A supine infant’s large occiput contributes to flexion of the head and neck and resultant airway obstruction; this may be alleviated by elevating the shoulders with a small towel (Figure 20-4). In children, slightly extending the head into the sniffing position helps to relieve airway obstruction. In adults, placing a folded towel or article of clothing under the occiput, which flexes the neck at the torso, followed by gentle hyperextension of the head at the atlanto-occipital joint, provides for the optimal alignment of the airway axes.
Manual Airway Techniques
Head Tilt With Chin Lift
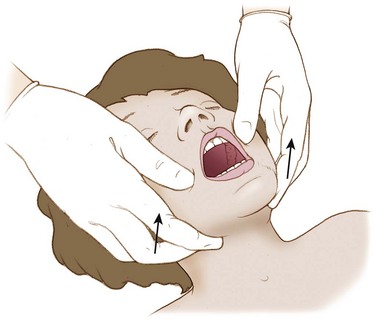
The head tilt with chin lift (Figure 20-5) is a simple and effective technique for opening the airway. The palm of one hand is placed on the victim’s forehead and applies firm backward pressure to tilt the head back. Simultaneously, the fingers of the other hand are placed under the bony part of the chin and lifted to bring the chin forward. These fingers support the jaw and maintain the head-tilt position. This maneuver extends the neck and should not be used if cervical spine injury is a concern.
Jaw Thrust Without Head Tilt
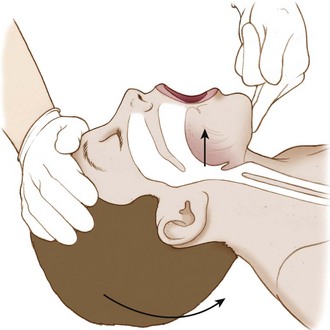
If a cervical spine injury is suspected or cannot be excluded, the jaw thrust without head tilt (Figure 20-6) can be performed while maintaining neutral cervical spine alignment. With this maneuver, the jaw thrust is performed without extending or rotating the neck.
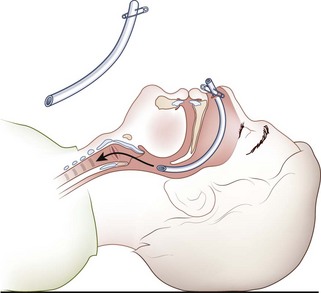
Tongue Traction
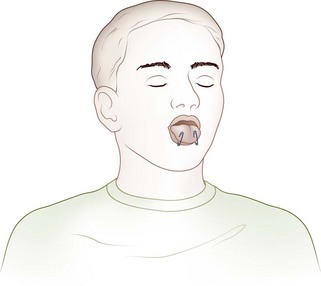
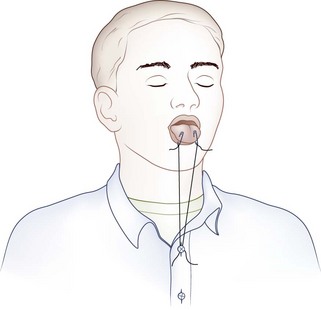
If the patient is unconscious or in extremis, the airway may be opened temporarily by attaching the anterior aspect of the victim’s tongue to the lower lip with two safety pins (Figure 20-7). An alternative to piercing the patient’s lower lip is to pass a string through the safety pins and then secure the end of the string to the victim’s shirt button or jacket zipper (Figure 20-8), thereby exerting traction on the tongue.
Mechanical Airway Adjuncts
Oropharyngeal Airway
The oropharyngeal airway (OPA) is an S-shaped device that is designed to hold the tongue away from the posterior pharyngeal wall (Figure 20-9). When the OPA is properly placed, it prevents the tongue from obstructing the glottis, and also provides an air channel and suction conduit through the mouth. These devices are most effective for unconscious and semiconscious victims who lack a gag reflex or cough. Use of an OPA in a victim with a gag reflex or cough is contraindicated, because the OPA may stimulate retching, vomiting, or laryngospasm.
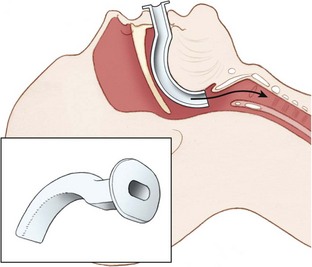
FIGURE 20-9 Oropharyngeal airway.
(Redrawn from Mahadevan SV, Garmel GM, editors: An introduction to clinical emergency medicine: Guide for practitioners in the emergency department, Cambridge, UK, 2005, Cambridge University Press. Courtesy Chris Gralapp. http://www.biolumina.com.)
Technique for insertion
Nasopharyngeal Airway
The nasopharyngeal airway (NPA) is an uncuffed trumpet-like tube that provides a conduit for airflow between the nares and the pharynx (Figure 20-10). The NPA is inserted through the nose rather than the mouth, and it has a flange at the outer end to prevent displacement or slippage beyond the nostril. These devices are better tolerated than are OPAs, and they are commonly used with intoxicated or semiconscious victims. They are also effective when trauma, trismus (i.e., clenched teeth), or other obstacles (e.g., wiring of the teeth) preclude OPA placement. NPAs are contraindicated in victims with basilar skull or facial fractures, because inadvertent intracranial placement may occur.
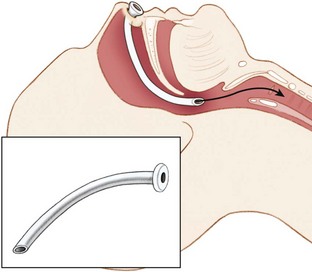
FIGURE 20-10 Nasopharyngeal airway.
(Redrawn from Mahadevan SV, Garmel GM, editors: An introduction to clinical emergency medicine: Guide for practitioners in the emergency department, Cambridge, UK, 2005, Cambridge University Press. Courtesy Chris Gralapp. http://www.biolumina.com.)
Technique for insertion
Any flexible tube of appropriate diameter and length can be used as an improvisational substitute for the NPA. Examples include a Foley catheter, radiator hose, solar shower hose, siphon tubing, or an inflation hose from a kayak flotation bag or sport pouch. An endotracheal tube (ETT) can be shortened and then softened in warm water to substitute for a commercial nasal trumpet. The flange can be improvised with the use of a safety pin through the nostril end of the tube (Figure 20-11).
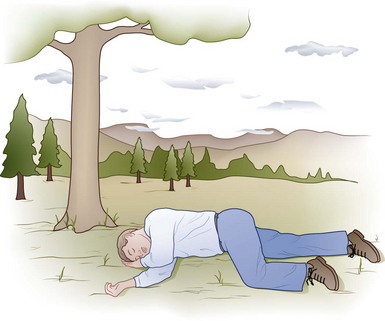
Recovery Position
In the spontaneously breathing unconscious victim who is not at risk for cervical spine injury, the recovery position (Figure 20-12) allows for airway patency while reducing the risk of aspiration. In the recovery position, the tongue is less likely to fall back and occlude the airway, and vomitus is more likely to be expelled than inhaled. Even a diminutive rescuer can place a large person in the recovery position if the proper technique is employed.
Foreign-Body Airway Obstruction
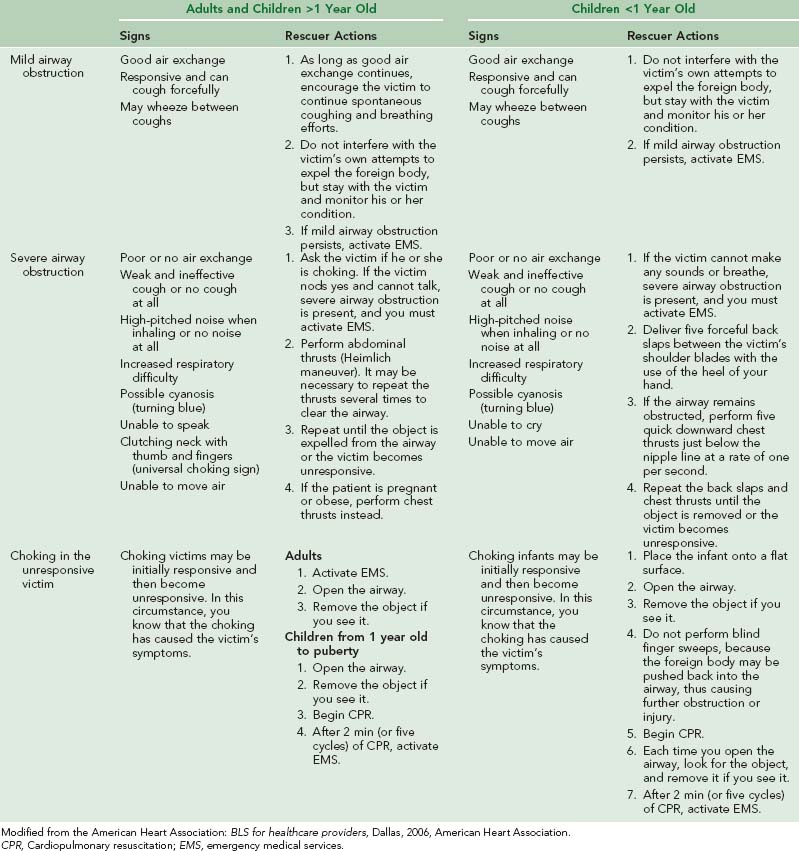
A complete summary of the treatment for complete airway obstruction caused by foreign bodies in adults and children is provided in Table 20-2.
Suction
Portable suction devices, which are available from a number of manufacturers, are ideal for the wilderness setting. These portable units should provide enough vacuum flow for adequate pharyngeal suction. Portable devices may be powered by oxygen, air, or electricity, or they may be manually powered (Figure 20-13, online). Hand-operated units are popular because they are lightweight, compact, reliable, and inexpensive. All units should have large-bore, nonkinking suction tubing, an unbreakable collection container, and a sterile disposable suction catheter.
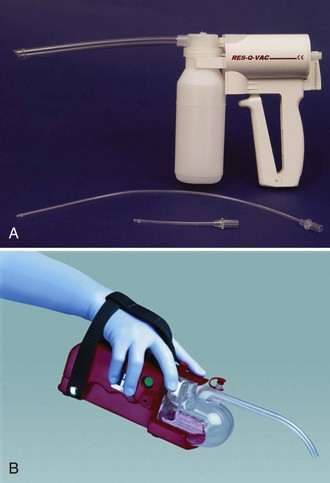
FIGURE 20-13 A, RES-Q-VAC suction device. B, S-SCORT Jr Quickdraw battery-powered handheld device.
(A from Repro-Med Systems, Inc. product information; B redrawn from SSCOR, Inc. product information.)
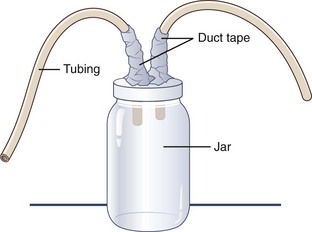
If time permits and supplies are available, a “mucus trap” suction device can be improvised from a jar with two holes poked in its lid and two tubes or straws duct taped into the holes (Figure 20-14). One straw goes to the rescuer, who provides suction, and the other is directed toward whatever has accumulated in the airway. The jar serves to trap the removed secretions, thereby preventing the rescuer from suctioning bodily fluids or foreign substances (e.g., mud) directly into his or her mouth.
Supplemental Oxygen
A variety of oxygen delivery techniques may be employed, depending on the desired oxygen concentration and clinical circumstances (see Chapter 76).


